
Most service businesses lose work after hours. A customer needs help on a Sunday night, searches, finds you, and there is nothing to do but leave a voicemail and keep looking. By morning they have booked whoever made it easy.
Online Booking gives that customer a way to say yes on the spot. In a few short steps they pick the services they need, tell you about the job, choose a day and an arrival window, and leave their address and contact details. The request lands in Servgrow and your team is alerted, so you start the conversation with everything you need to quote and schedule the work. No phone tag, no details scribbled on a sticky note, and no lead lost because nobody picked up.
It works anywhere you can share a link: your website, your Google Business Profile, Facebook, Instagram, an email signature or a text reply. Here is how to set it up.
What your customers see
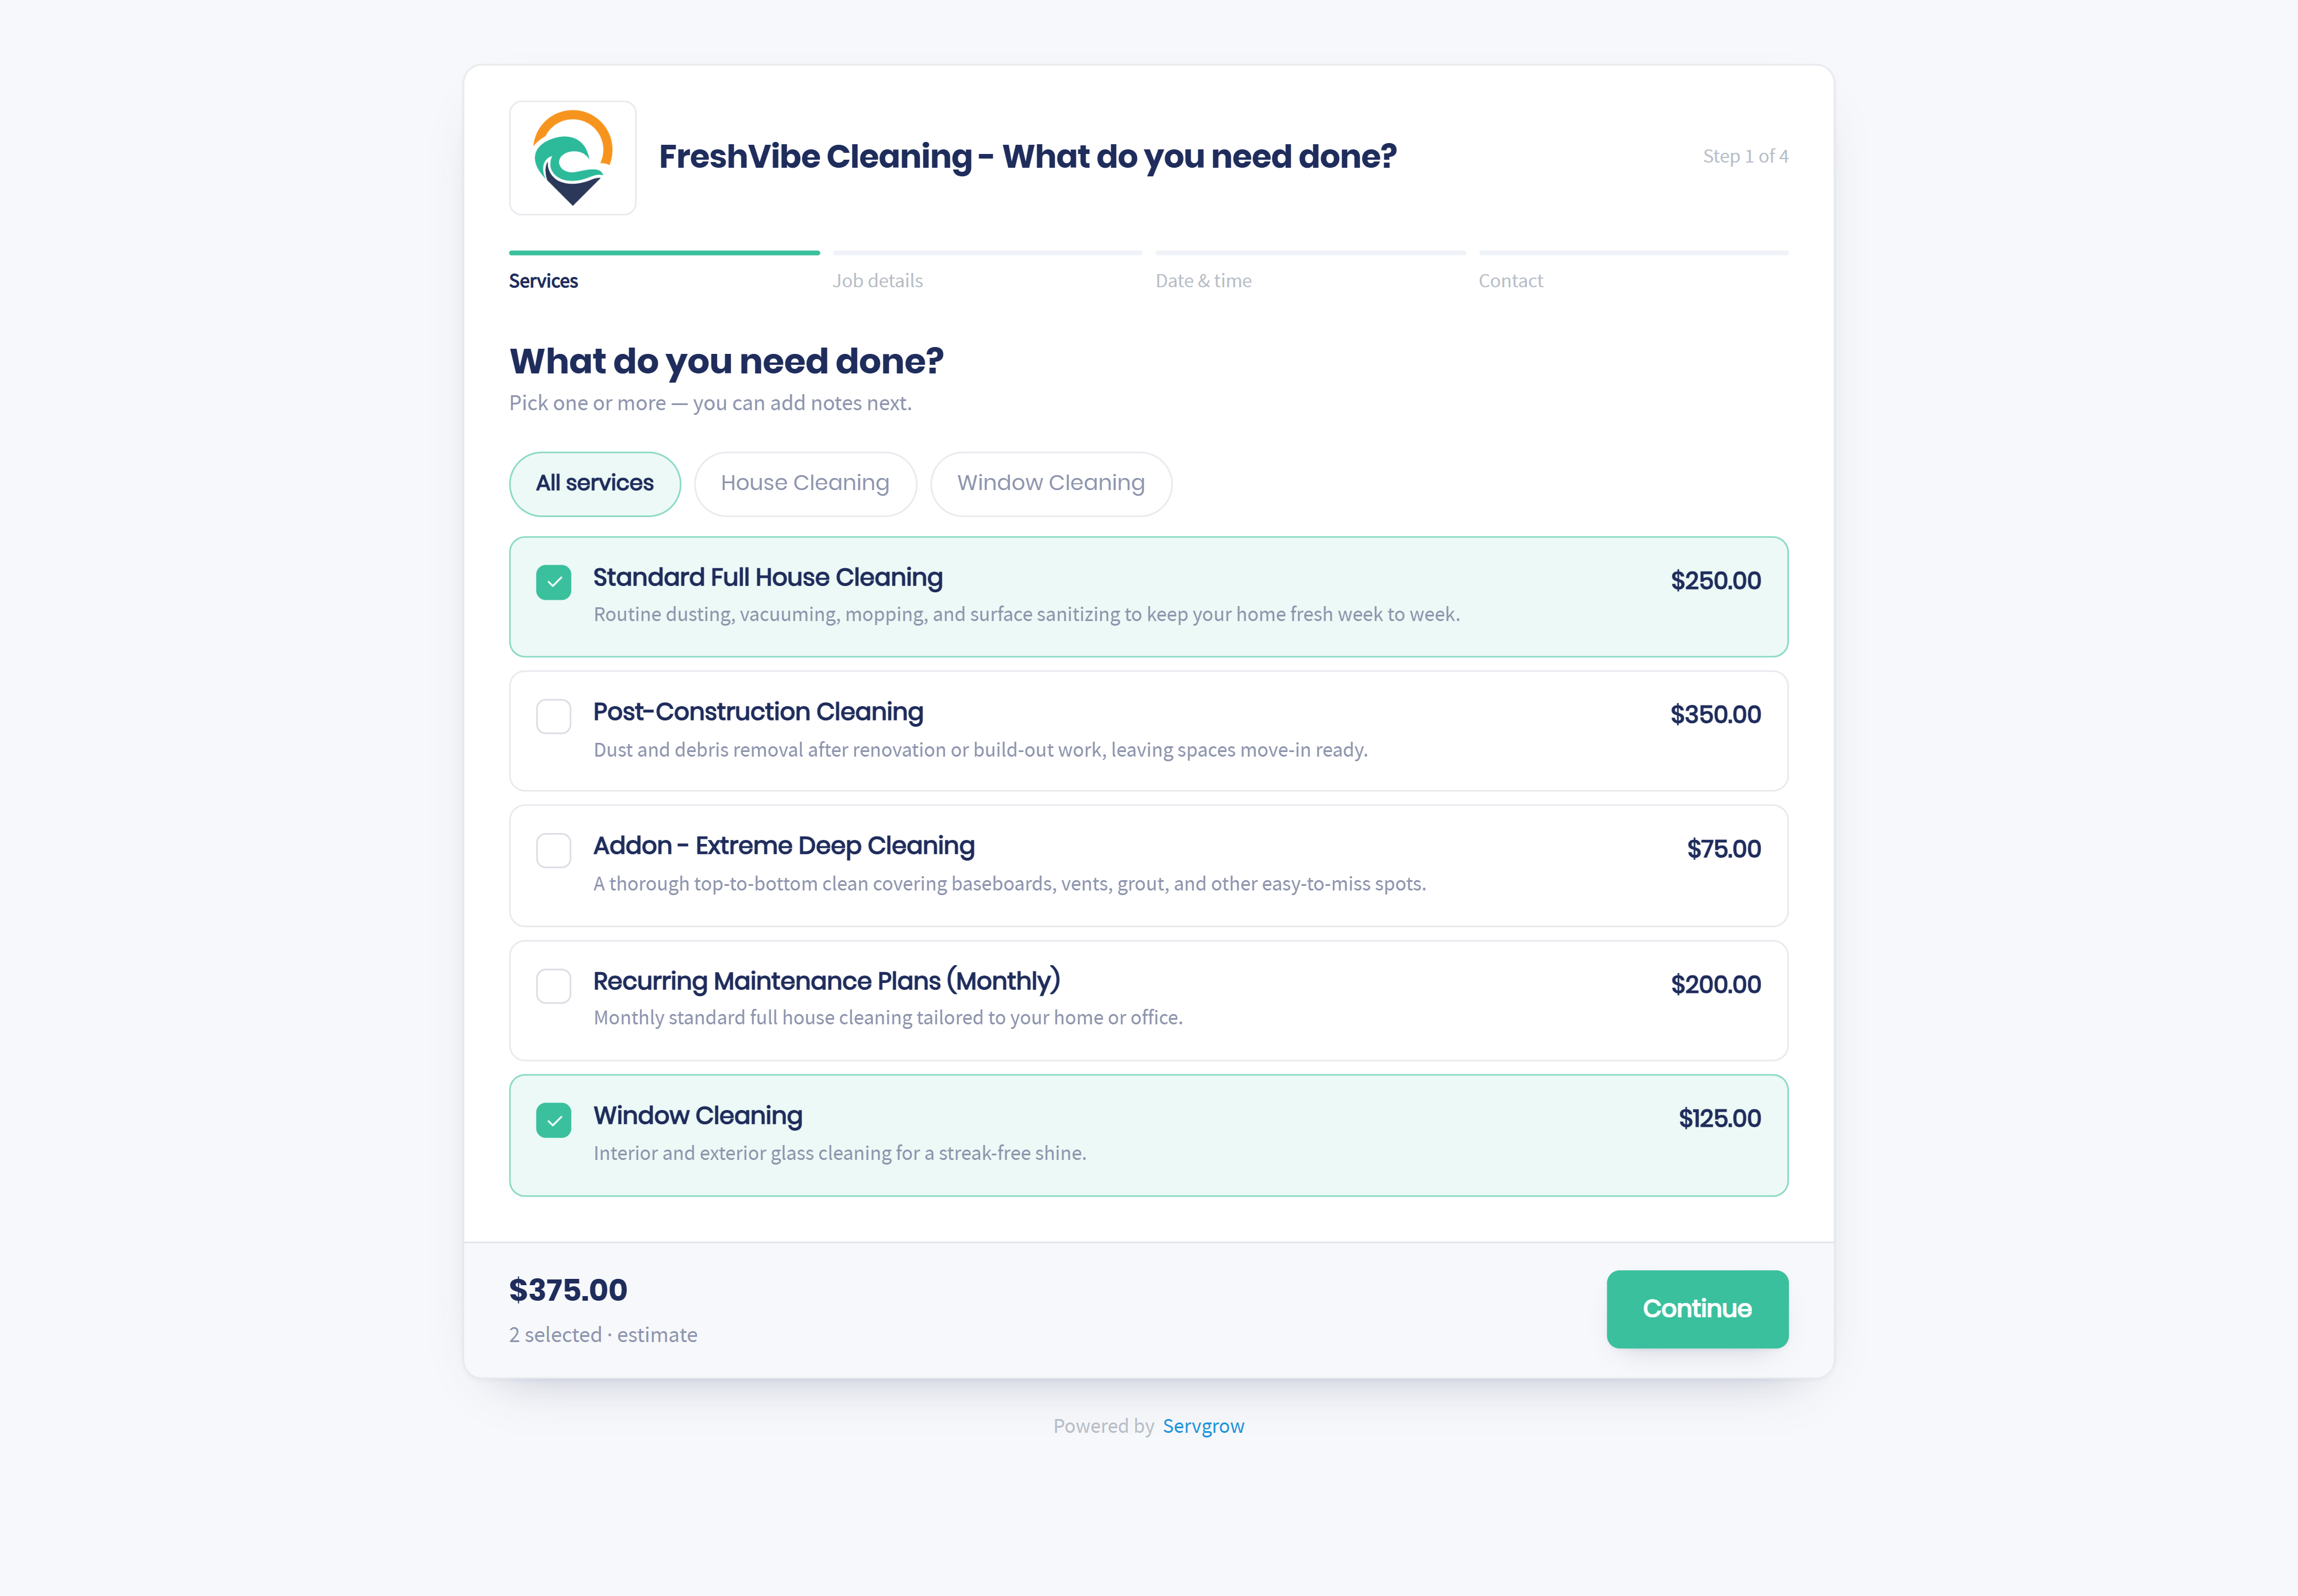
The booking form walks customers through four steps, Services, Job details, Date & time and Contact, with a progress bar so they always know how close they are to done. Your logo and business name sit at the top.
It opens with the question every customer is really asking: what do you do, and what does it cost? Customers see your services with a short description and a price for each, filter them by category, and tick everything they need. A running estimate at the bottom adds it up as they go, so they know what to expect before you ever call, and you get requests from people who are ready to book.
Where to find it
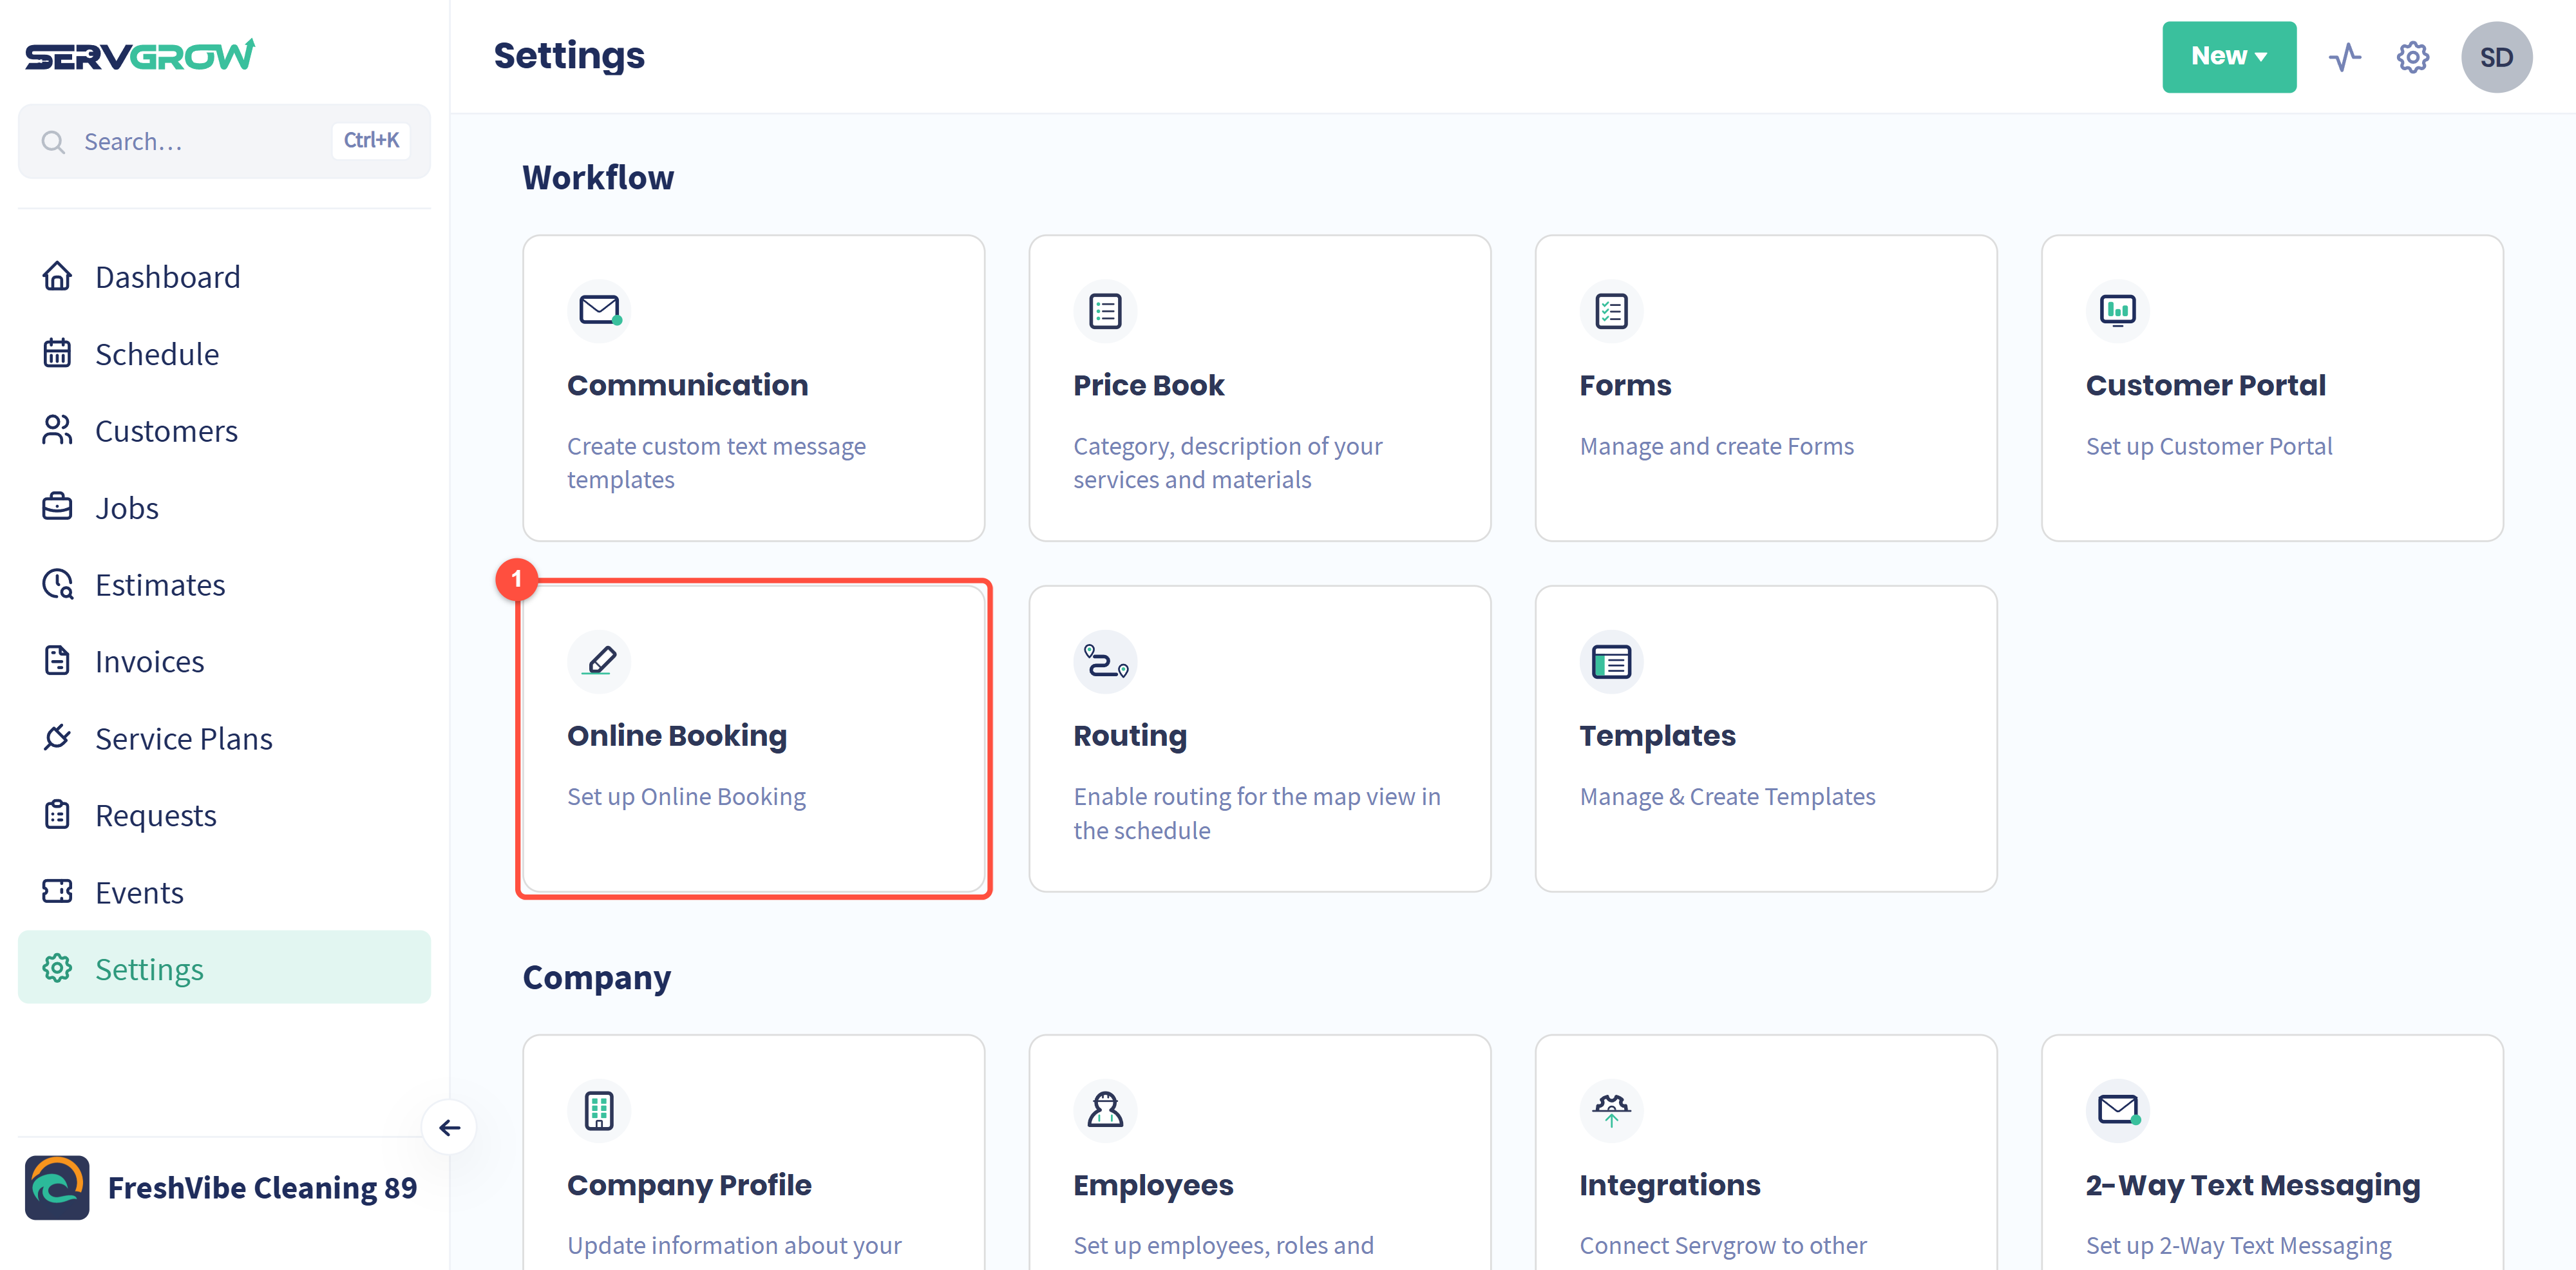
Go to Settings and, under Workflow, click Online Booking.
The settings are split across four tabs: General Info, Questions, Notifications and Opt-In. Everything you set here applies to both your booking form and your Customer Portal, so you only set it up once.
Two buttons at the bottom work on every tab. Preview shows the form exactly as customers will see it, and Submit saves your changes. Nothing is saved until you click Submit.
Part 1: General Info
Name and booking link
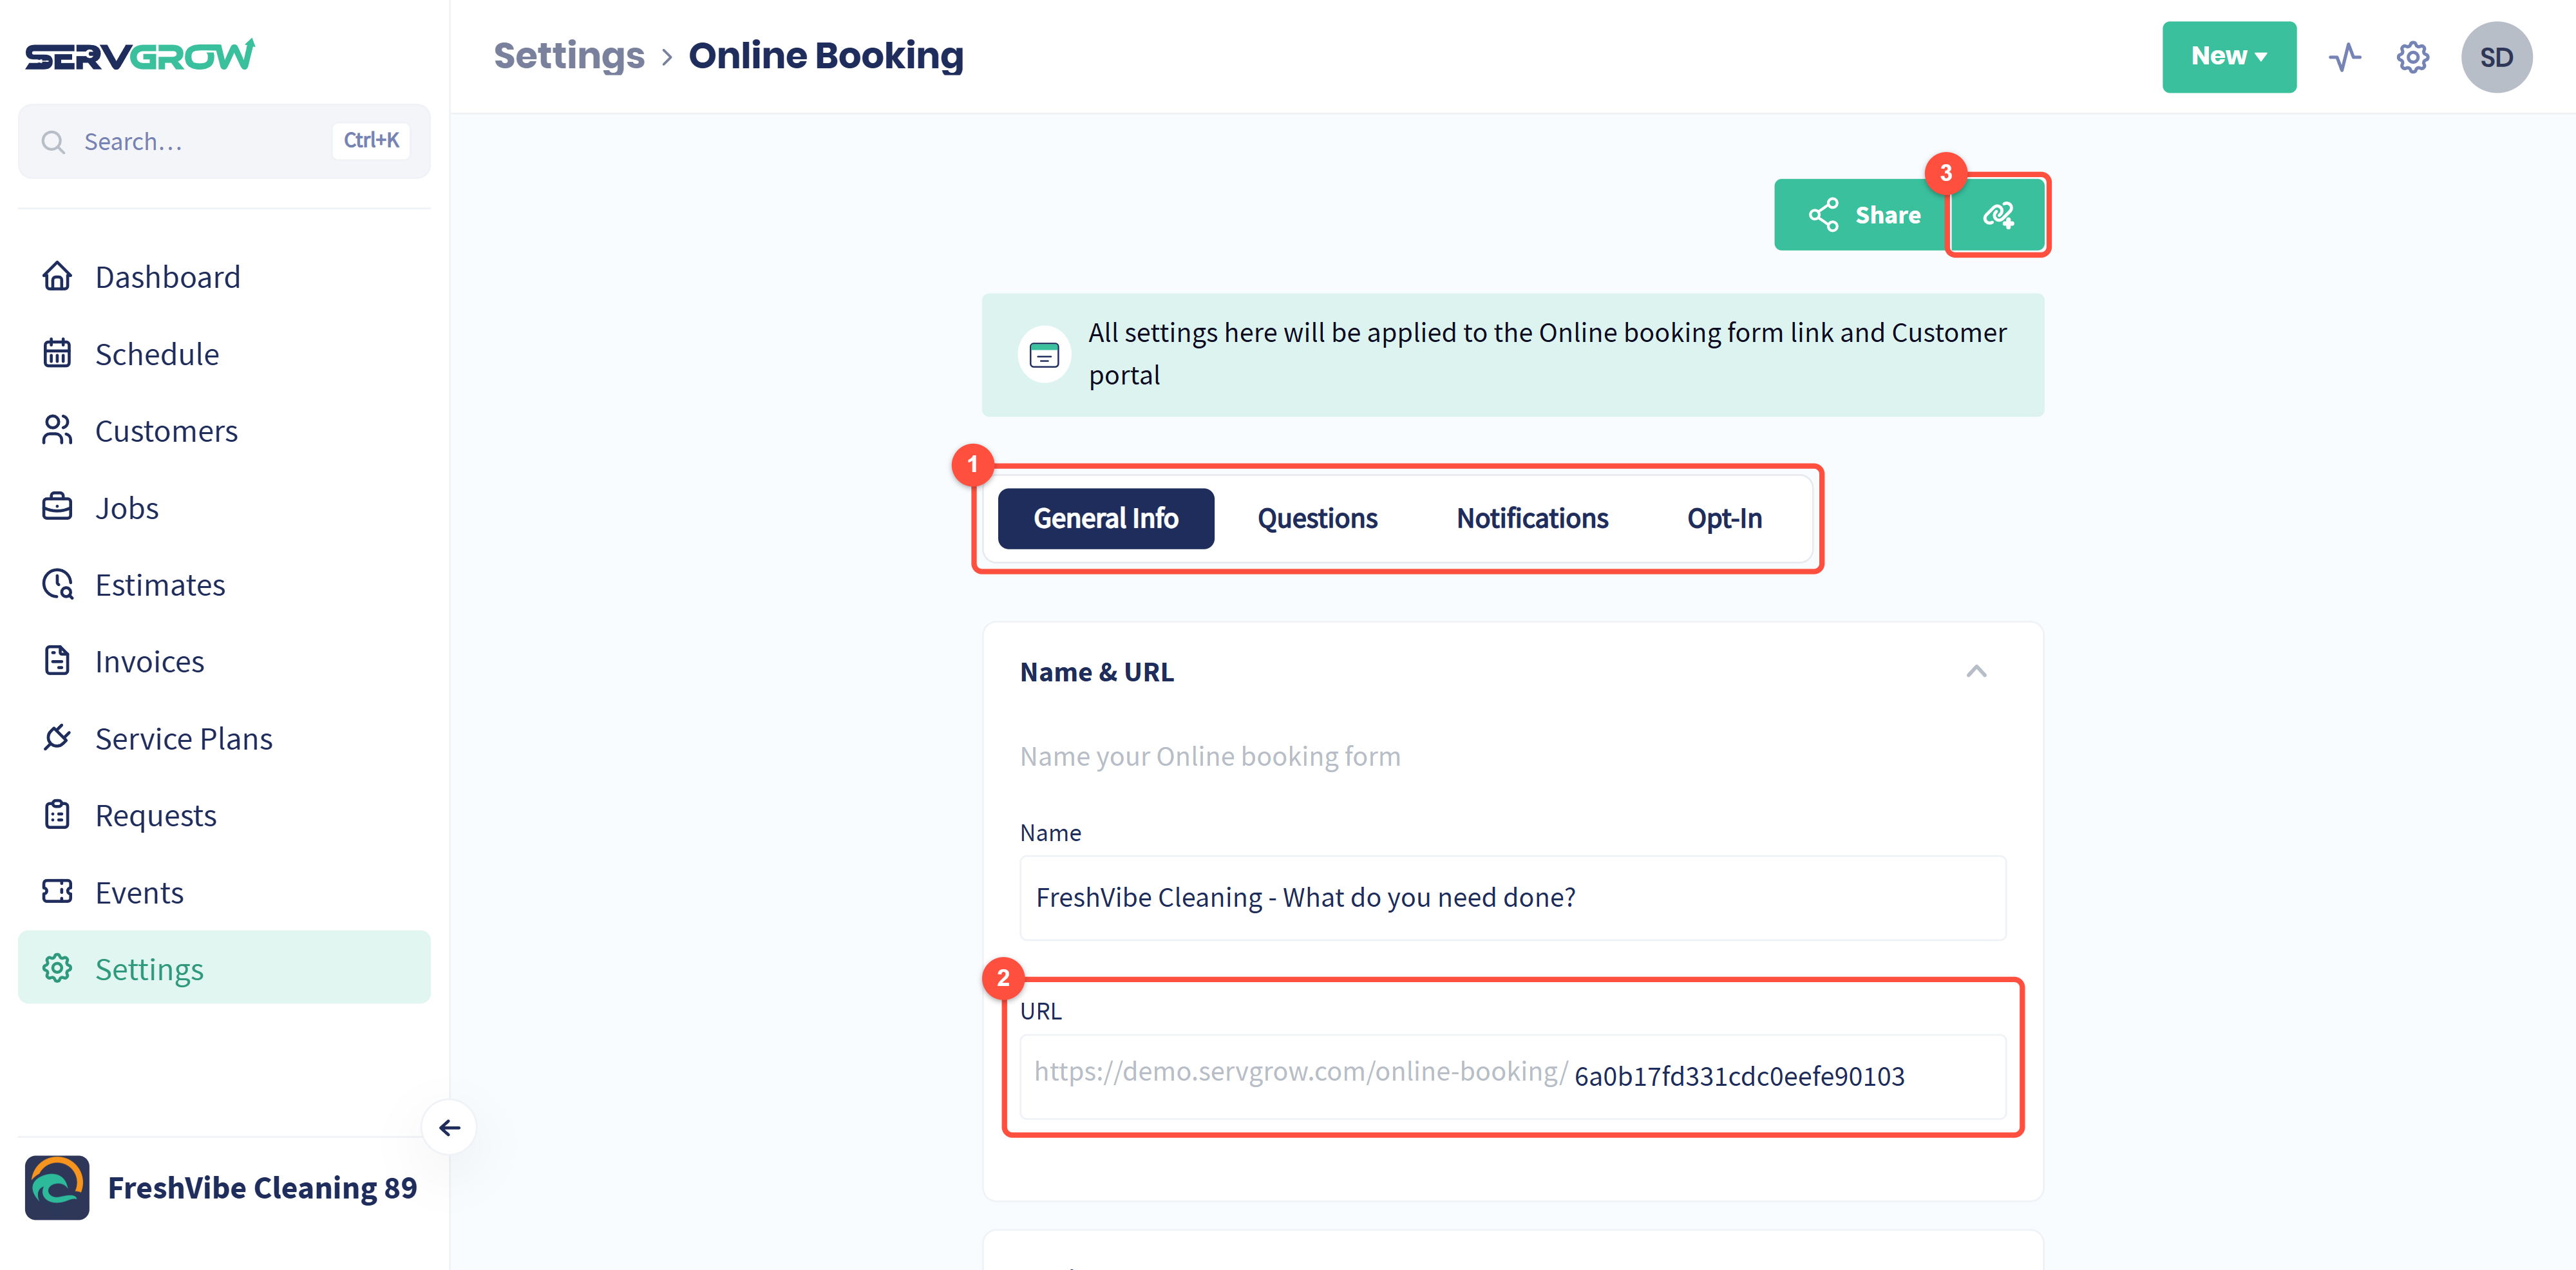
Give the form a Name. Under it is your form's URL, the public link customers use to book. Everything in Part 5 points at that link.
Tip: the link button right next to Share copies your booking link in one click, which is handy when you are replying to a customer who asked how to book.
Redirect to Thank You page is off by default, so customers see a Servgrow confirmation message after they submit. Turn it on and enter a Thank You page URL to send them to a page on your own website instead. It is also the simplest way to count bookings as conversions in your website analytics or ad accounts.
Time Ranges: let customers pick when
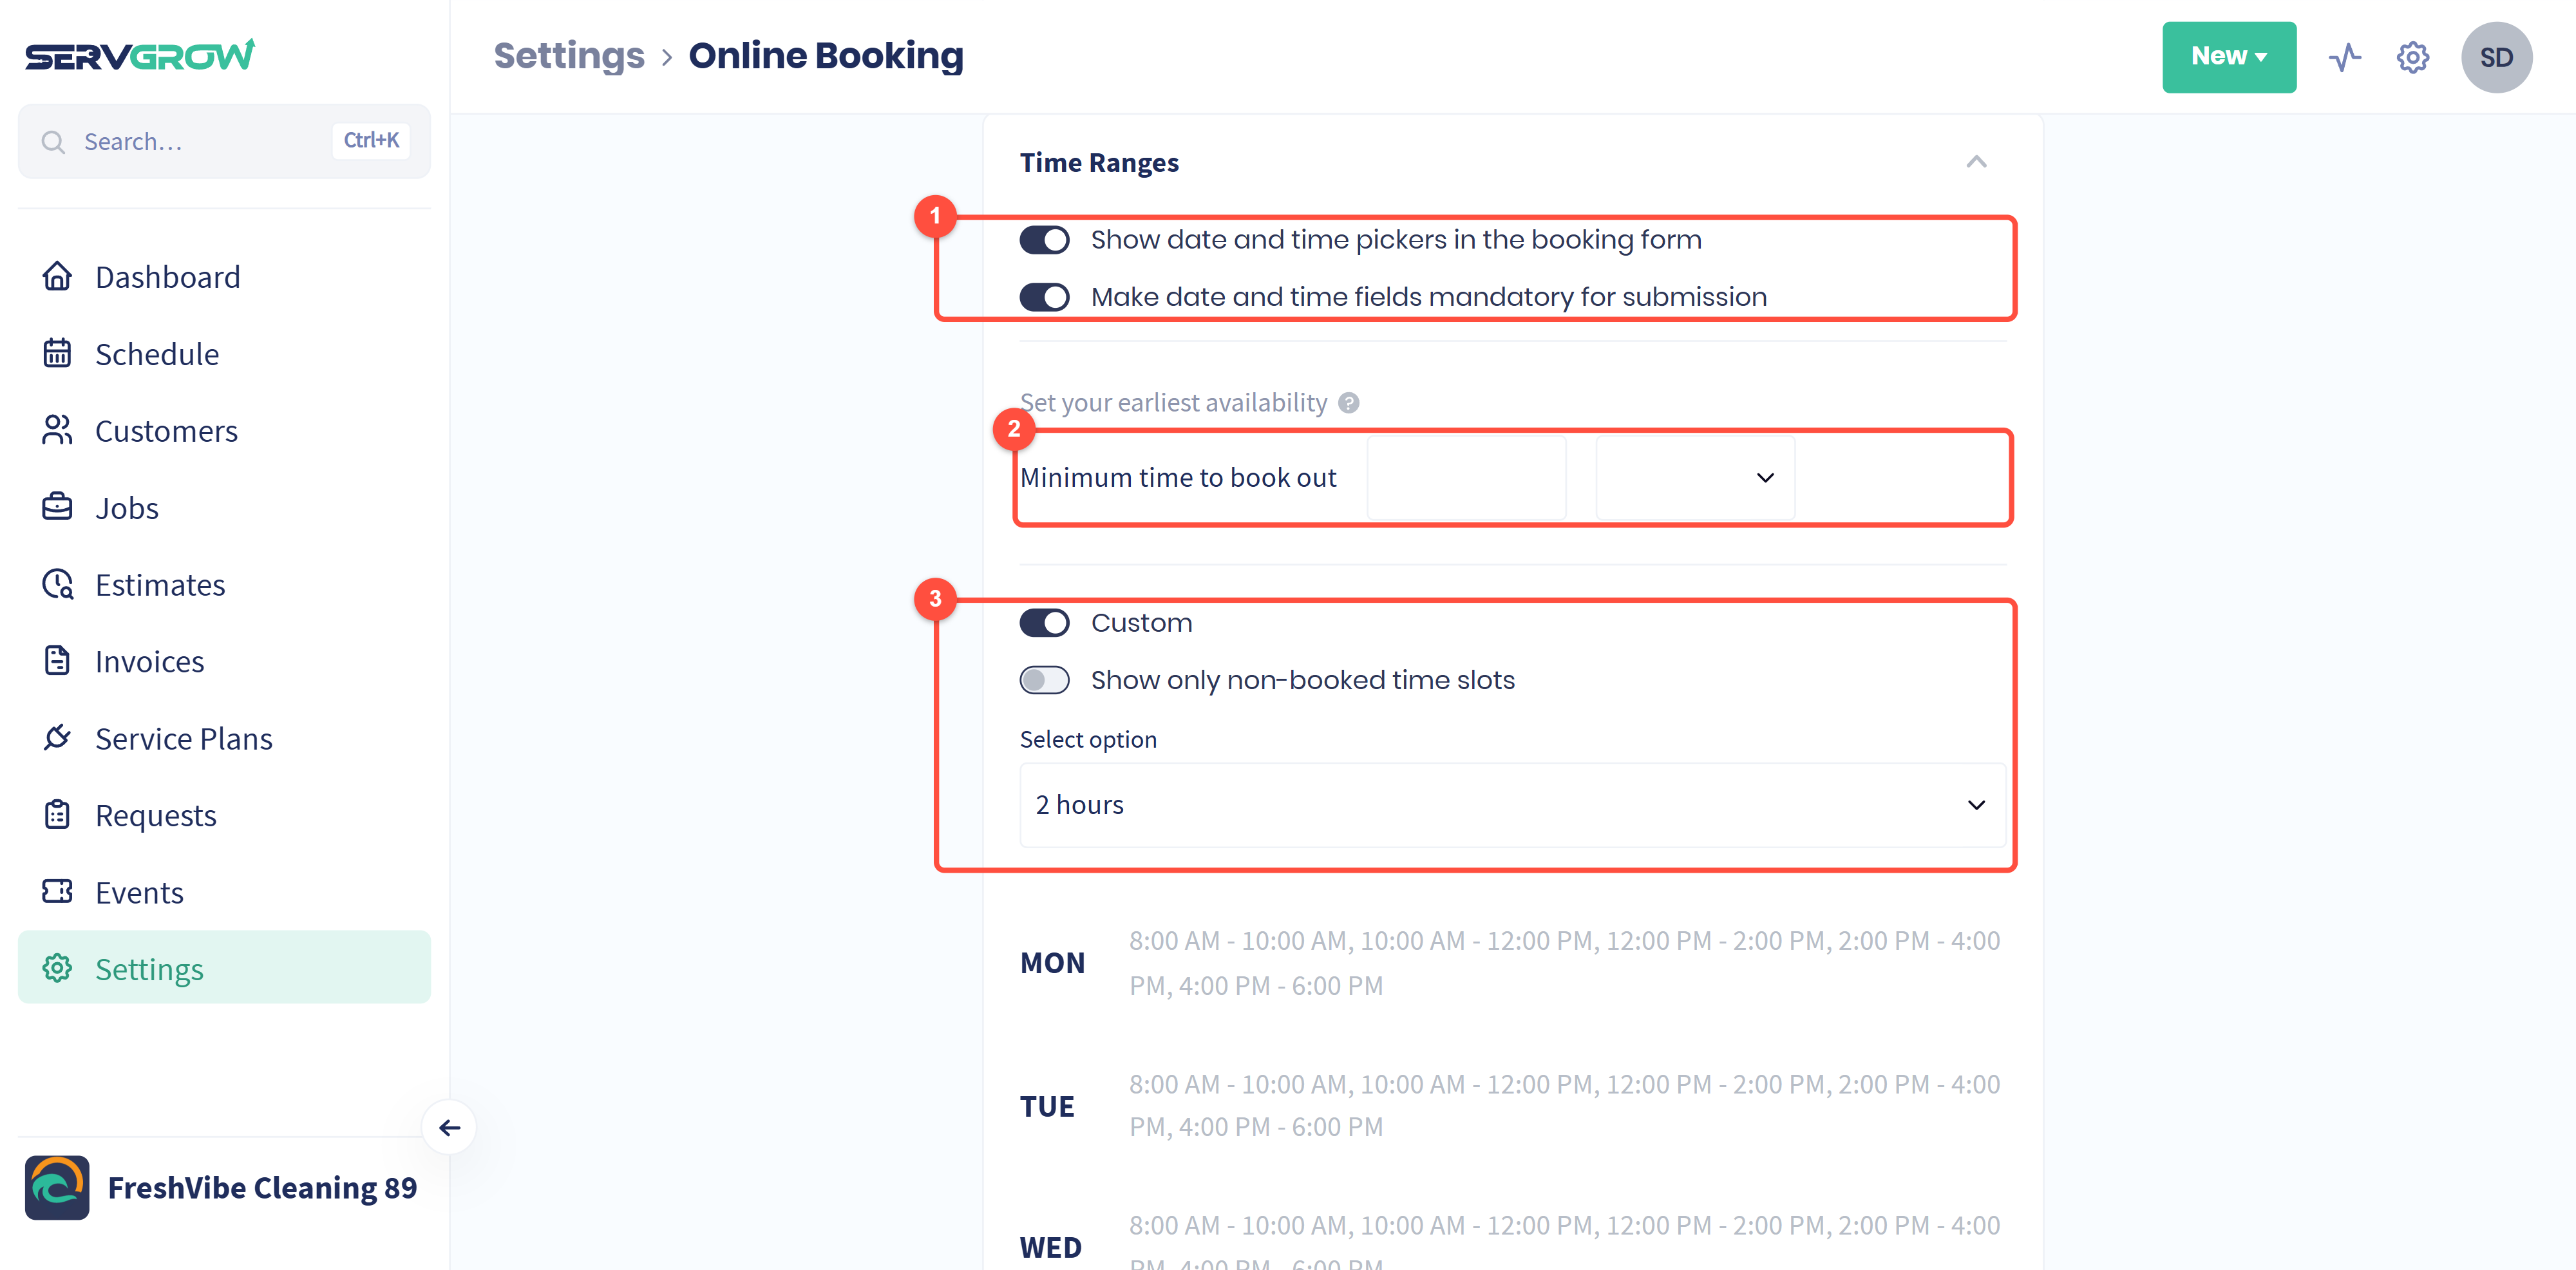
Show date and time pickers in the booking form adds the Date & time step, where customers choose a day and an arrival window.
Make date and time fields mandatory for submission means no request comes in without a preferred day and window. Leave it on unless you would rather settle timing by phone.
Minimum time to book out sets your earliest availability, in hours or days. If you need a day's notice to staff a job, set it to 1 day and nobody can request a slot you cannot cover.
Custom switches to fixed time slots of the length you choose: 1, 1.5, 2 or 3 hours, laid out for each weekday. Turn on Show only non-booked time slots so customers only see times your schedule has not already filled.
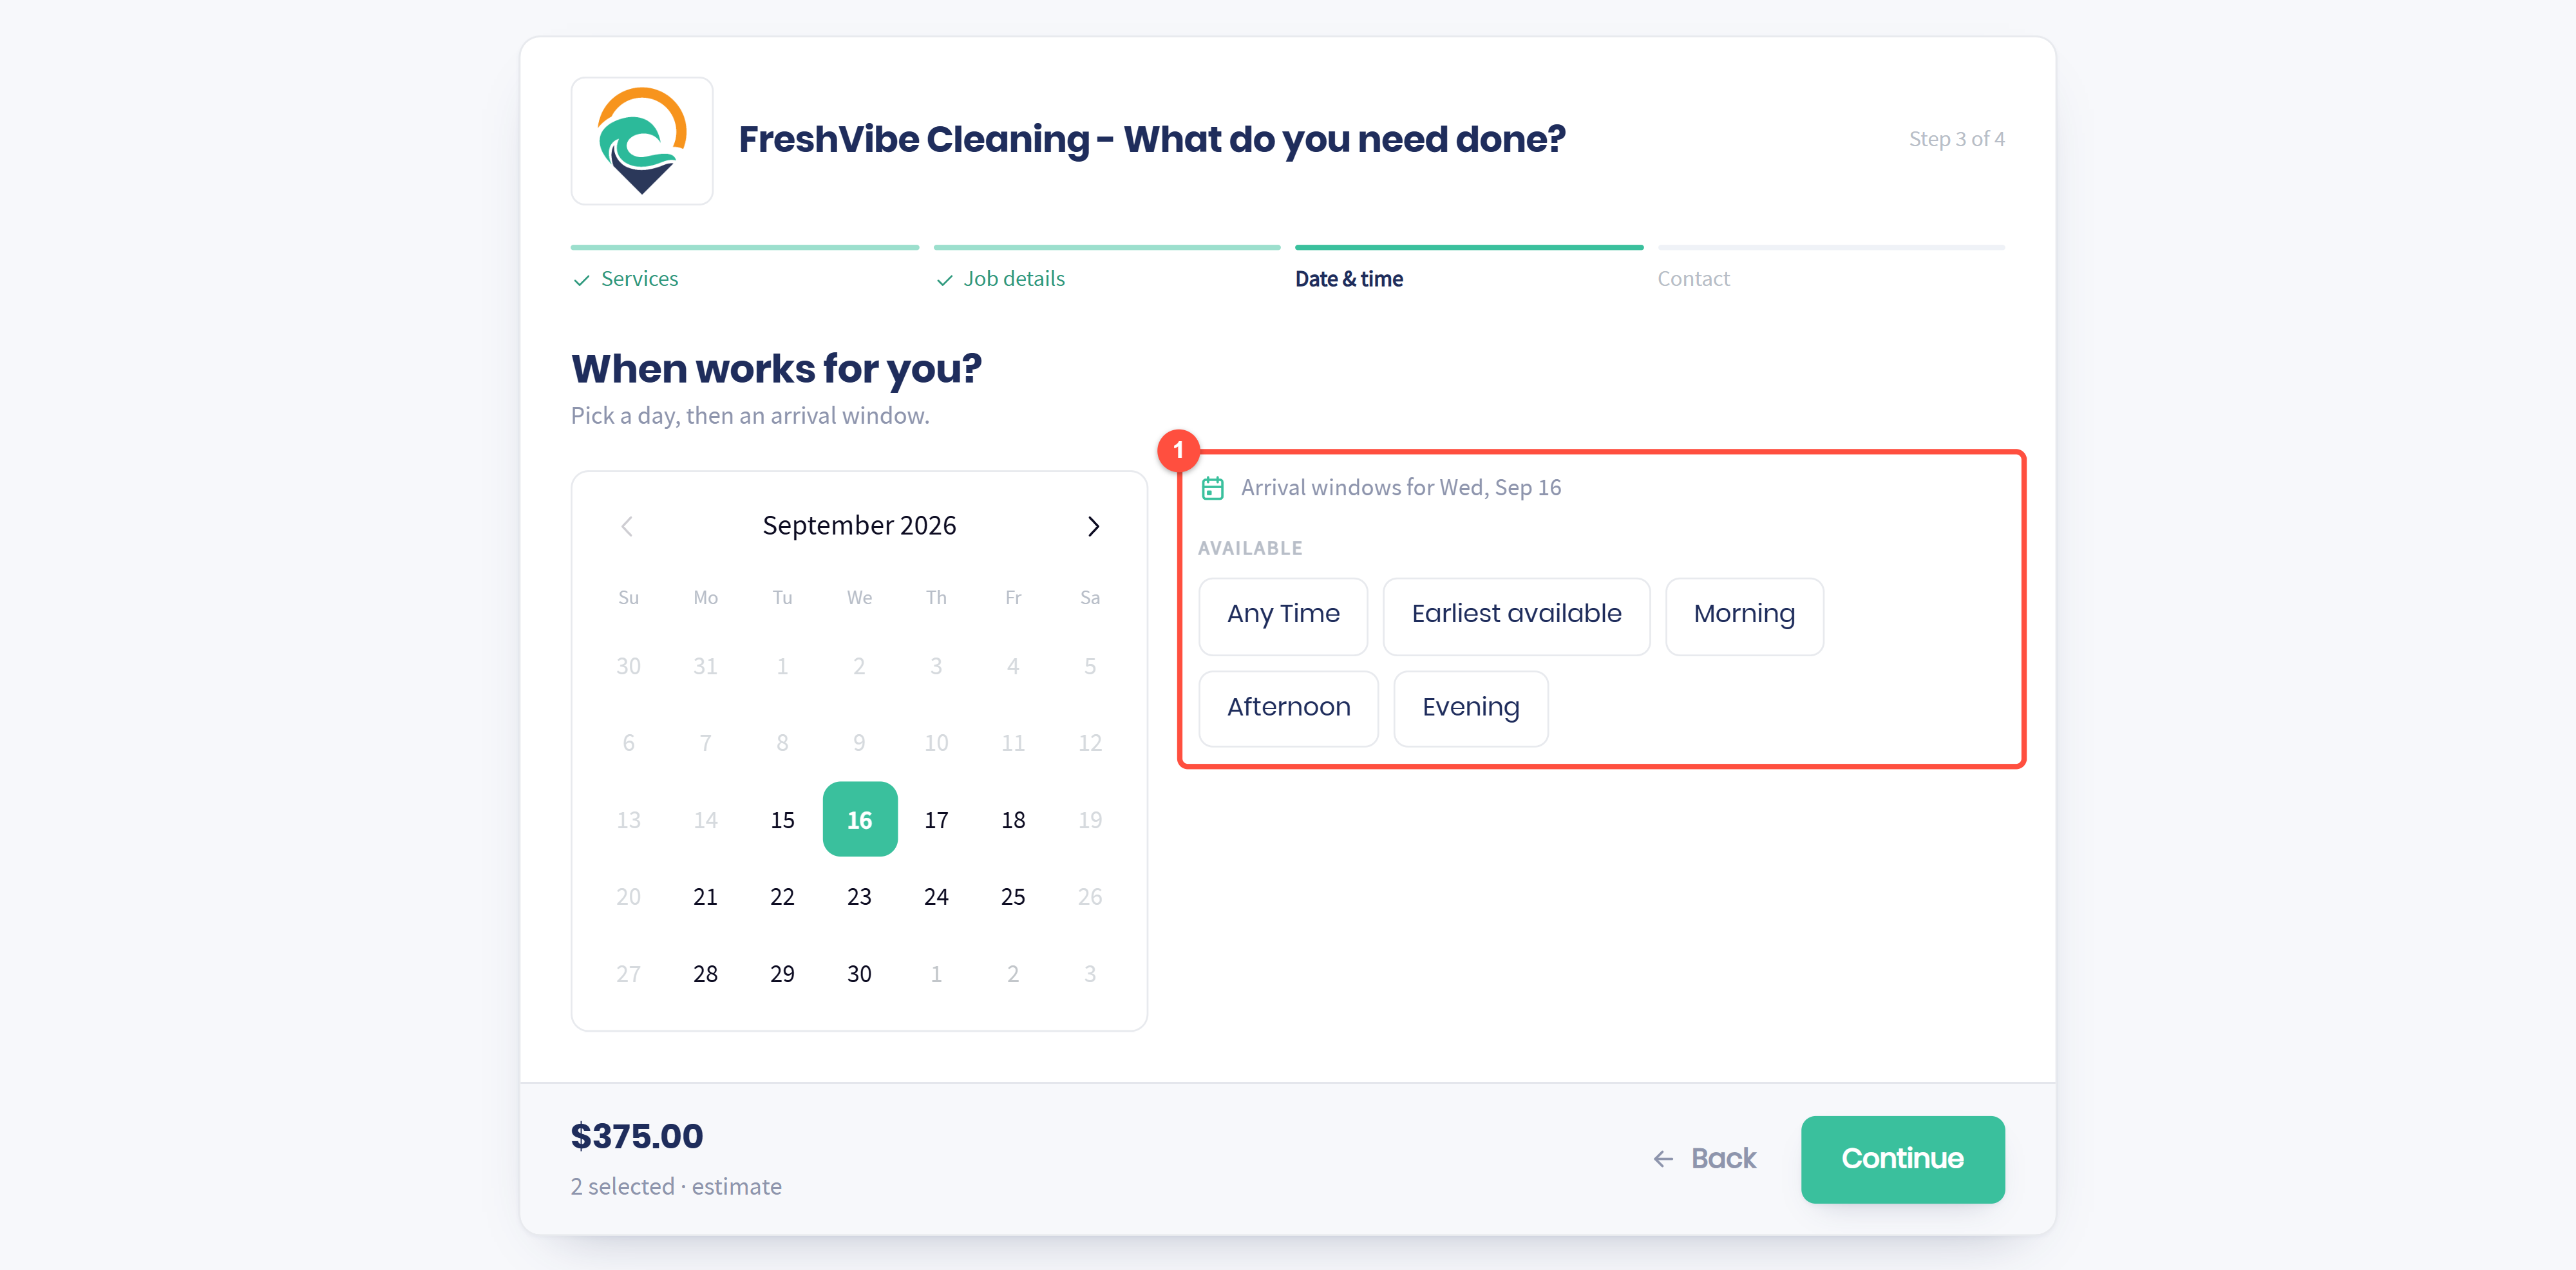
Here is the Date & time step with the standard windows. Customers pick a day, then Any Time, Earliest available, Morning, Afternoon or Evening. Days that cannot be booked are greyed out.
Services and the fields every booking collects
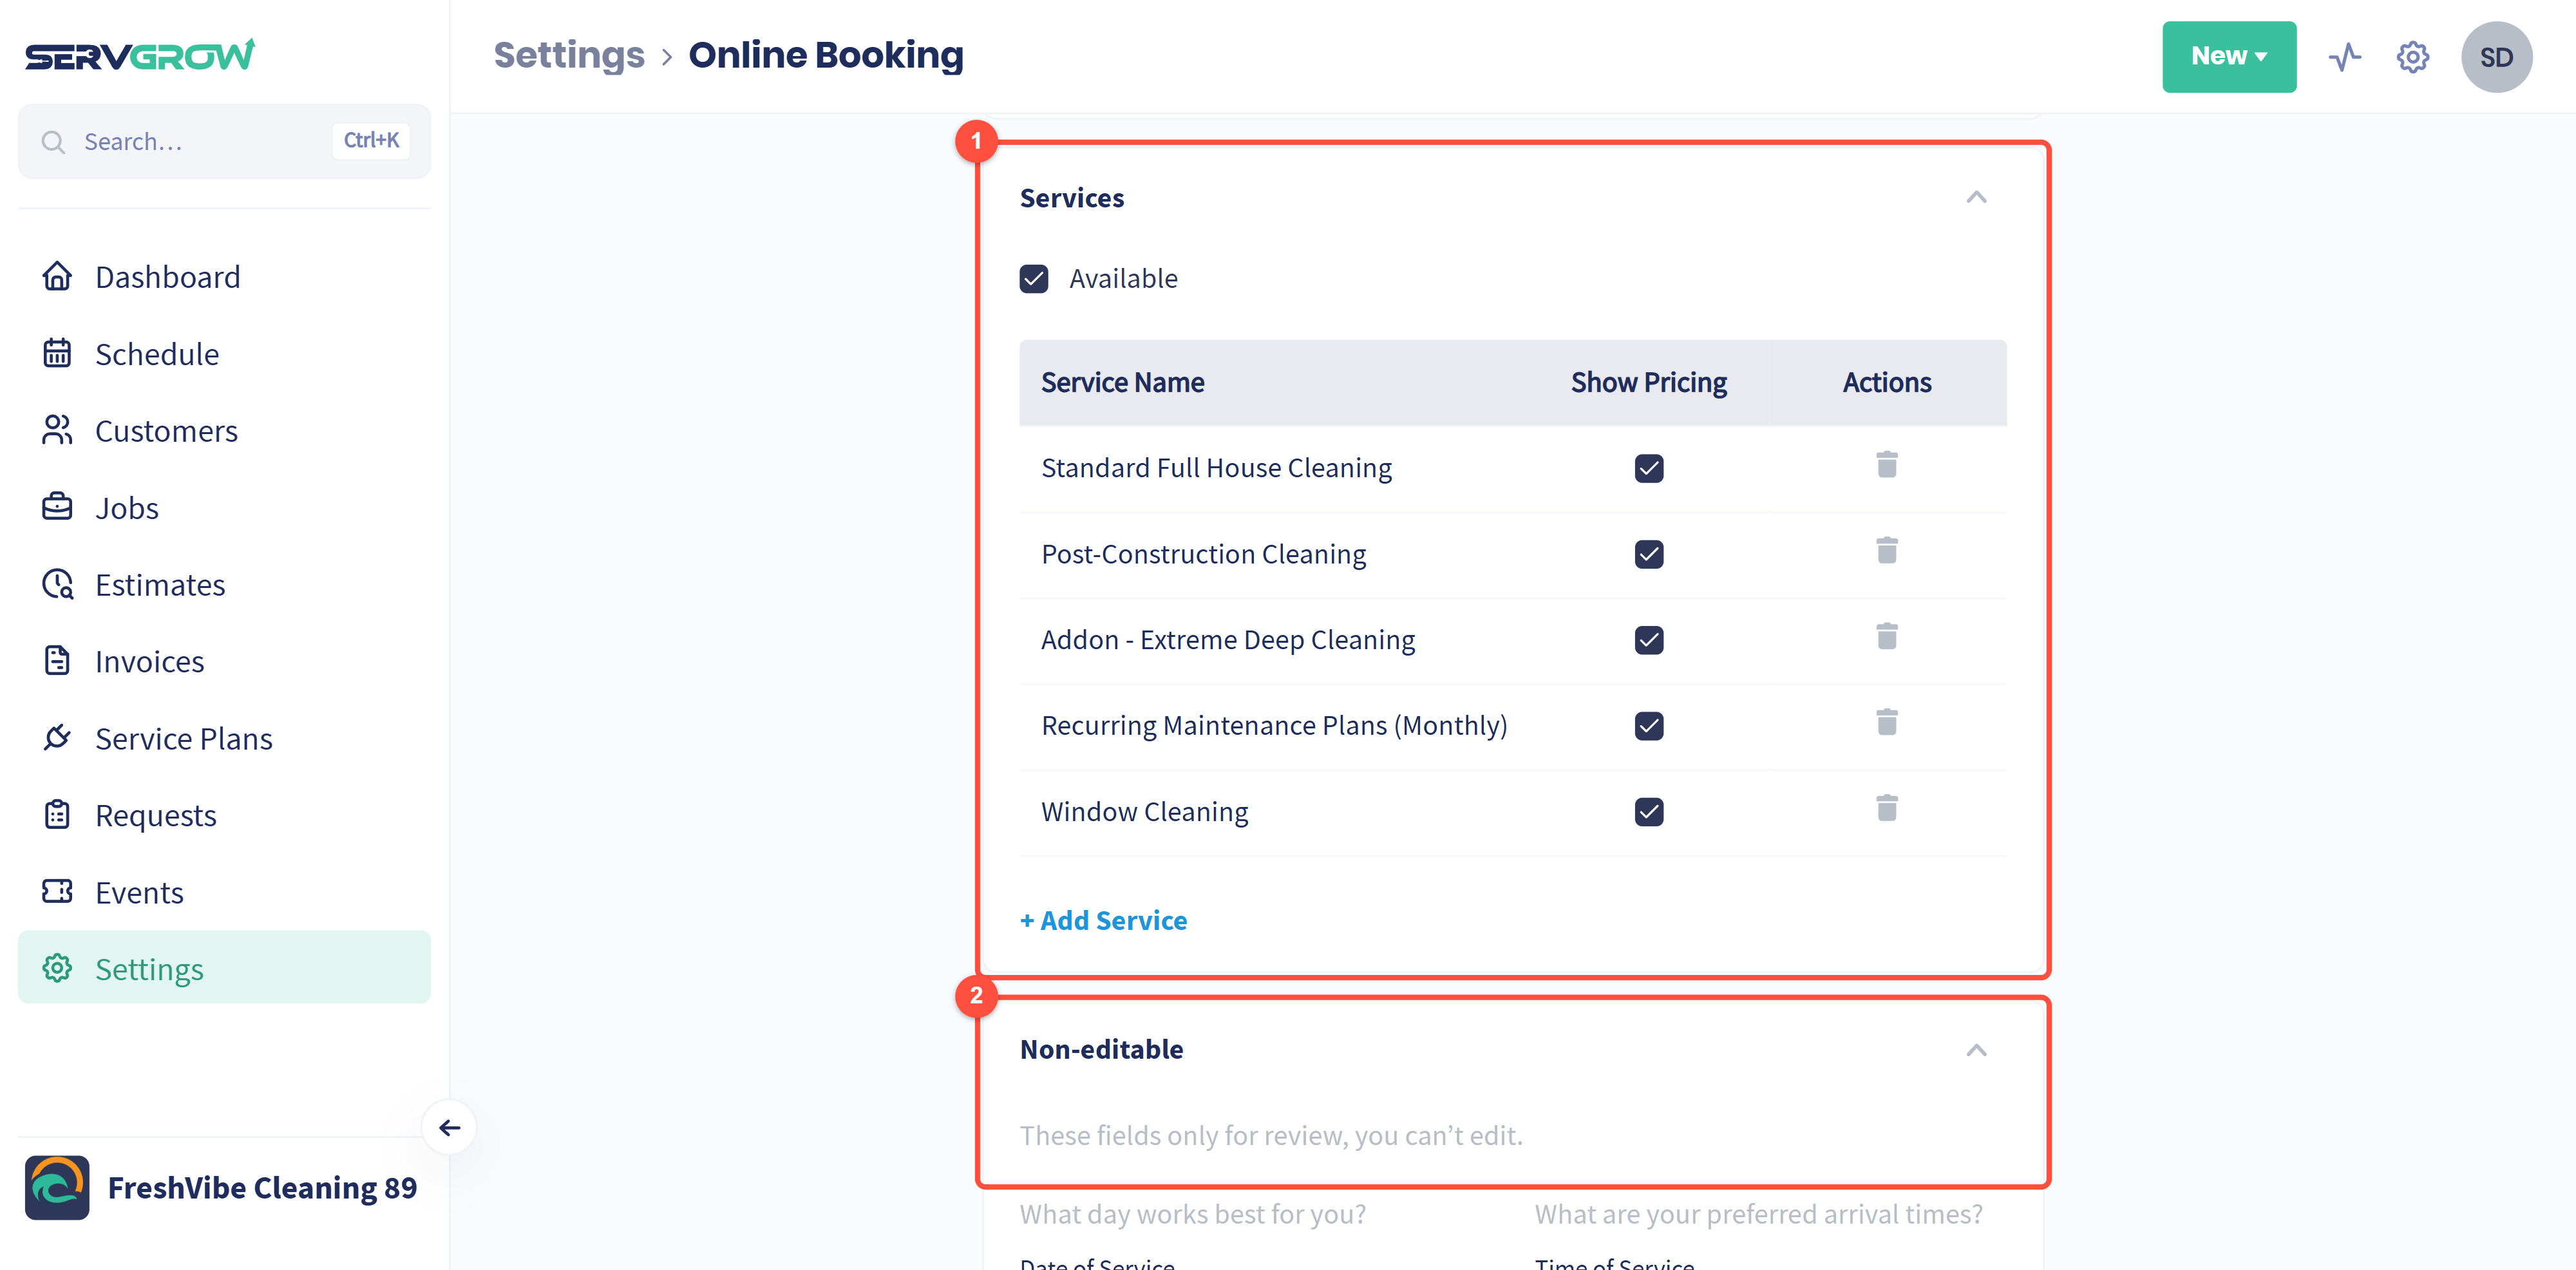
Tick Available under Services, then click + Add Service to choose services from your Price Book. They appear on the form's first step, What do you need done?, with the description from your Price Book, and customers can pick one or more before describing the job. For each service you choose whether to Show Pricing. Showing prices up front sets expectations early, so the requests that come in are from customers who already like the number. Use the bin icon under Actions to take a service off the form.
The Non-editable section shows the built-in fields that come with the form: date and time of service, address, name, last name, email and phone. You do not need to add questions for any of these.
Part 2: Questions, where the real value is
Every question you ask here is a phone call you do not have to make. Your questions appear on the form's Job details step. The example below asks for a photo of the issue and anything else the team should know. Add the few questions you would otherwise ask on the phone.
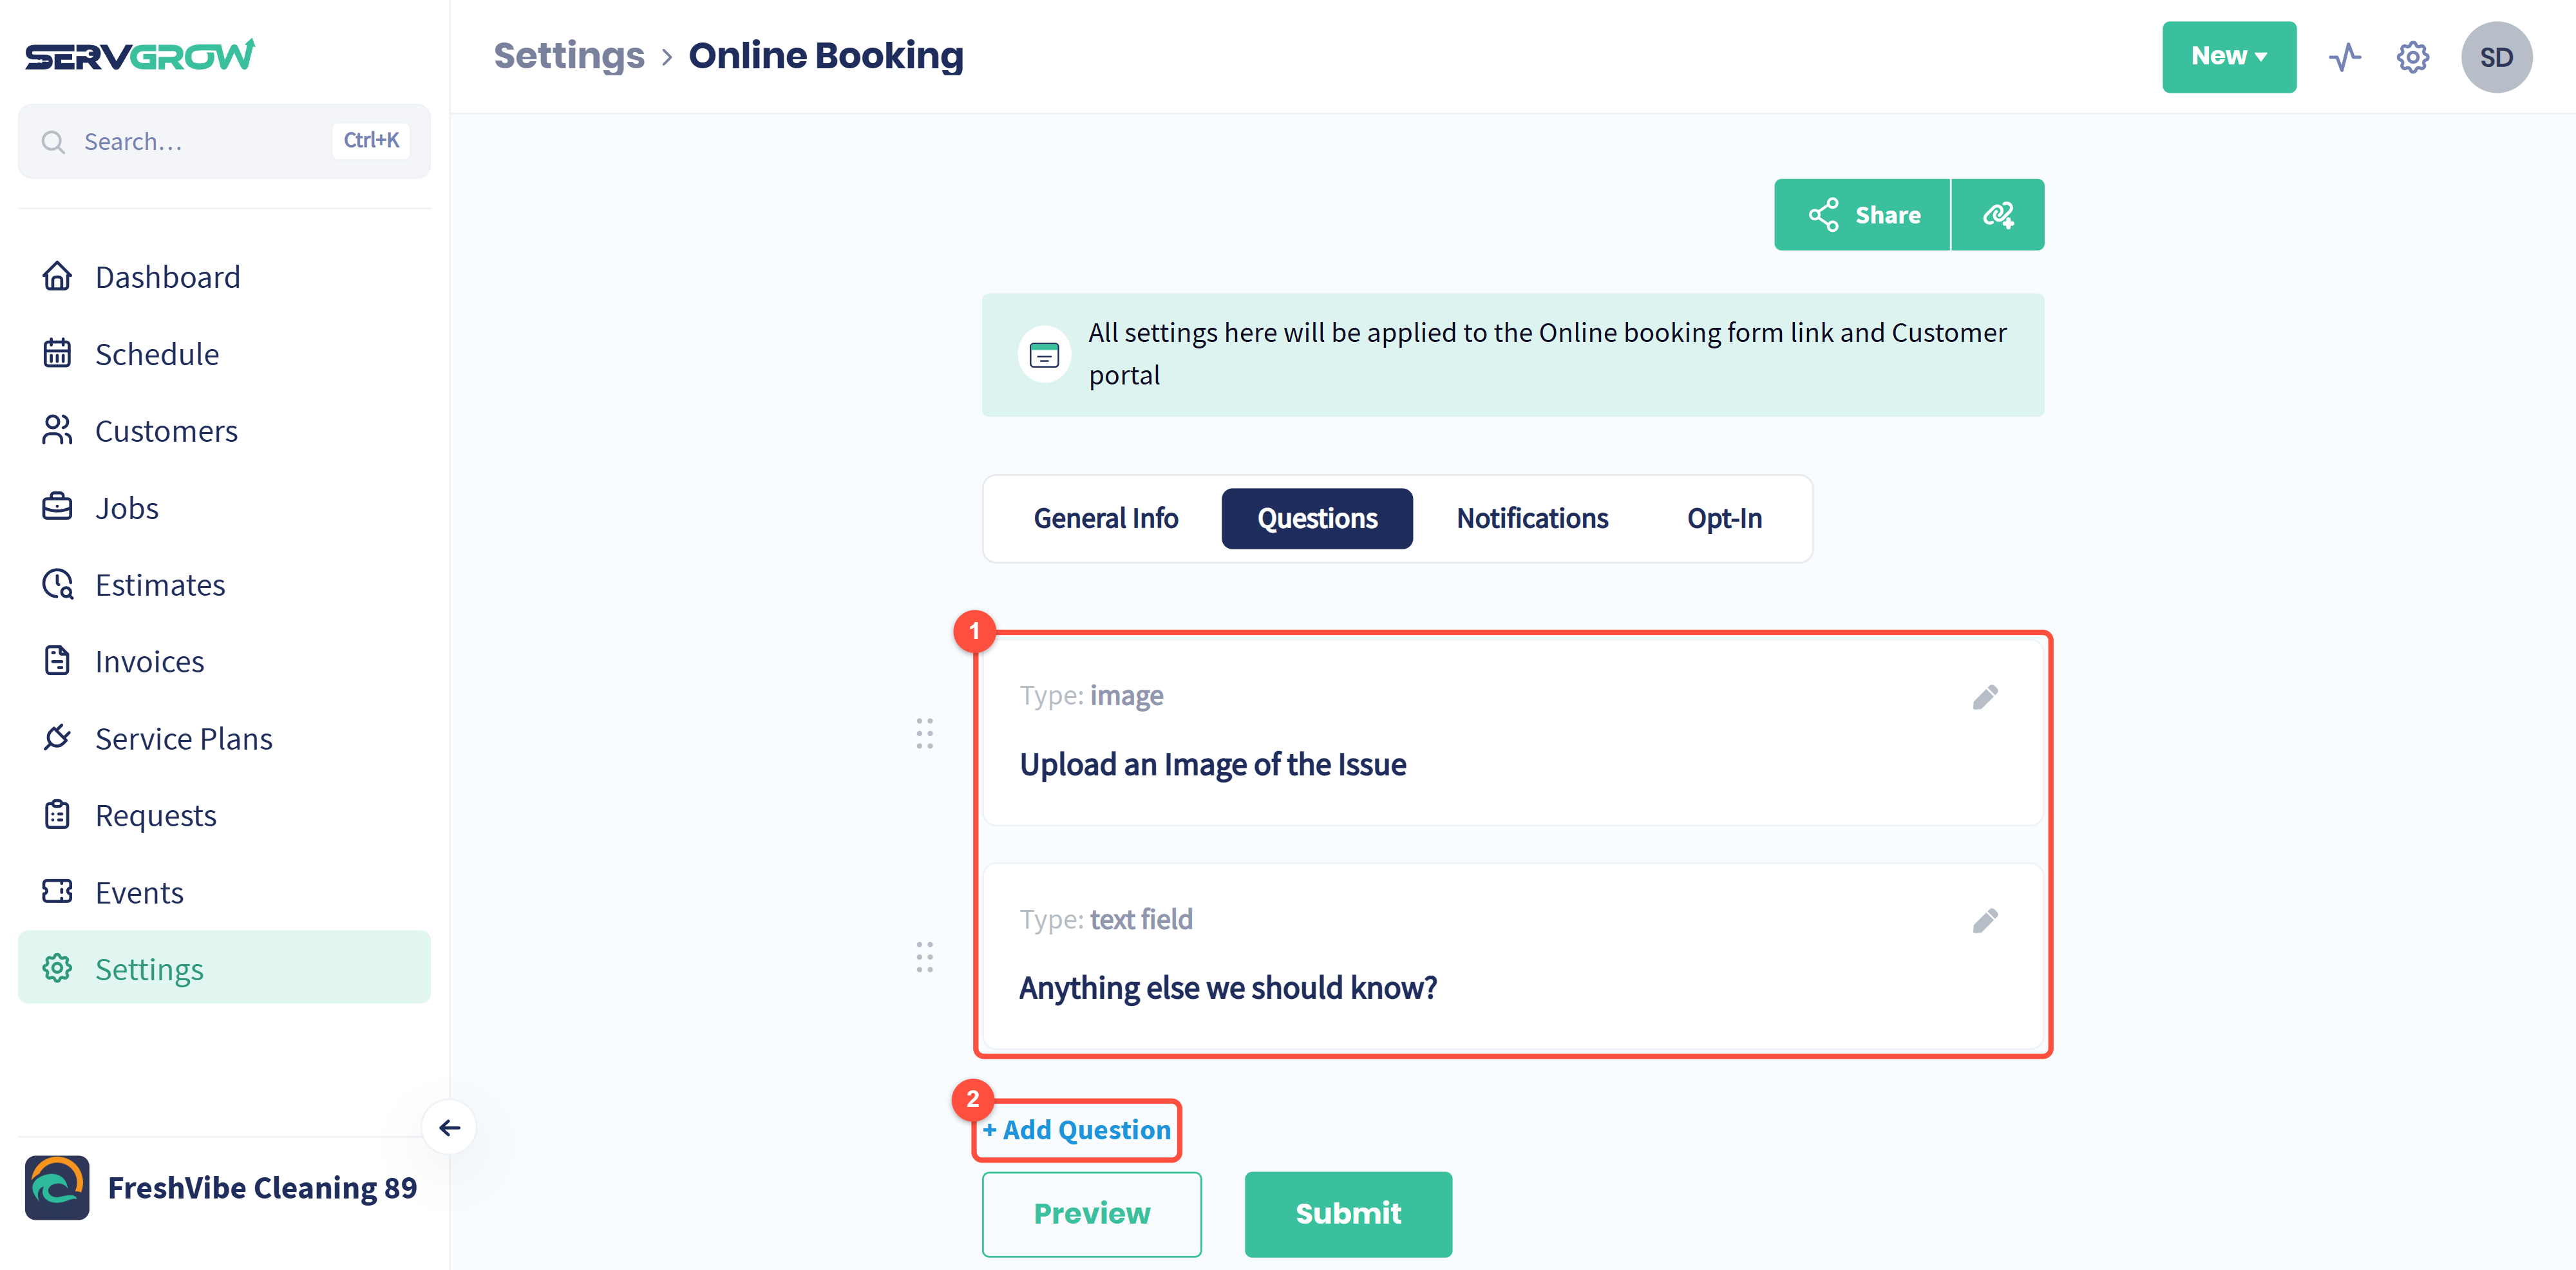
Click a question to edit it, or click + Add Question to add one. Drag the handle on the left of a question to change the order, and use the bin icon inside a question to delete it.
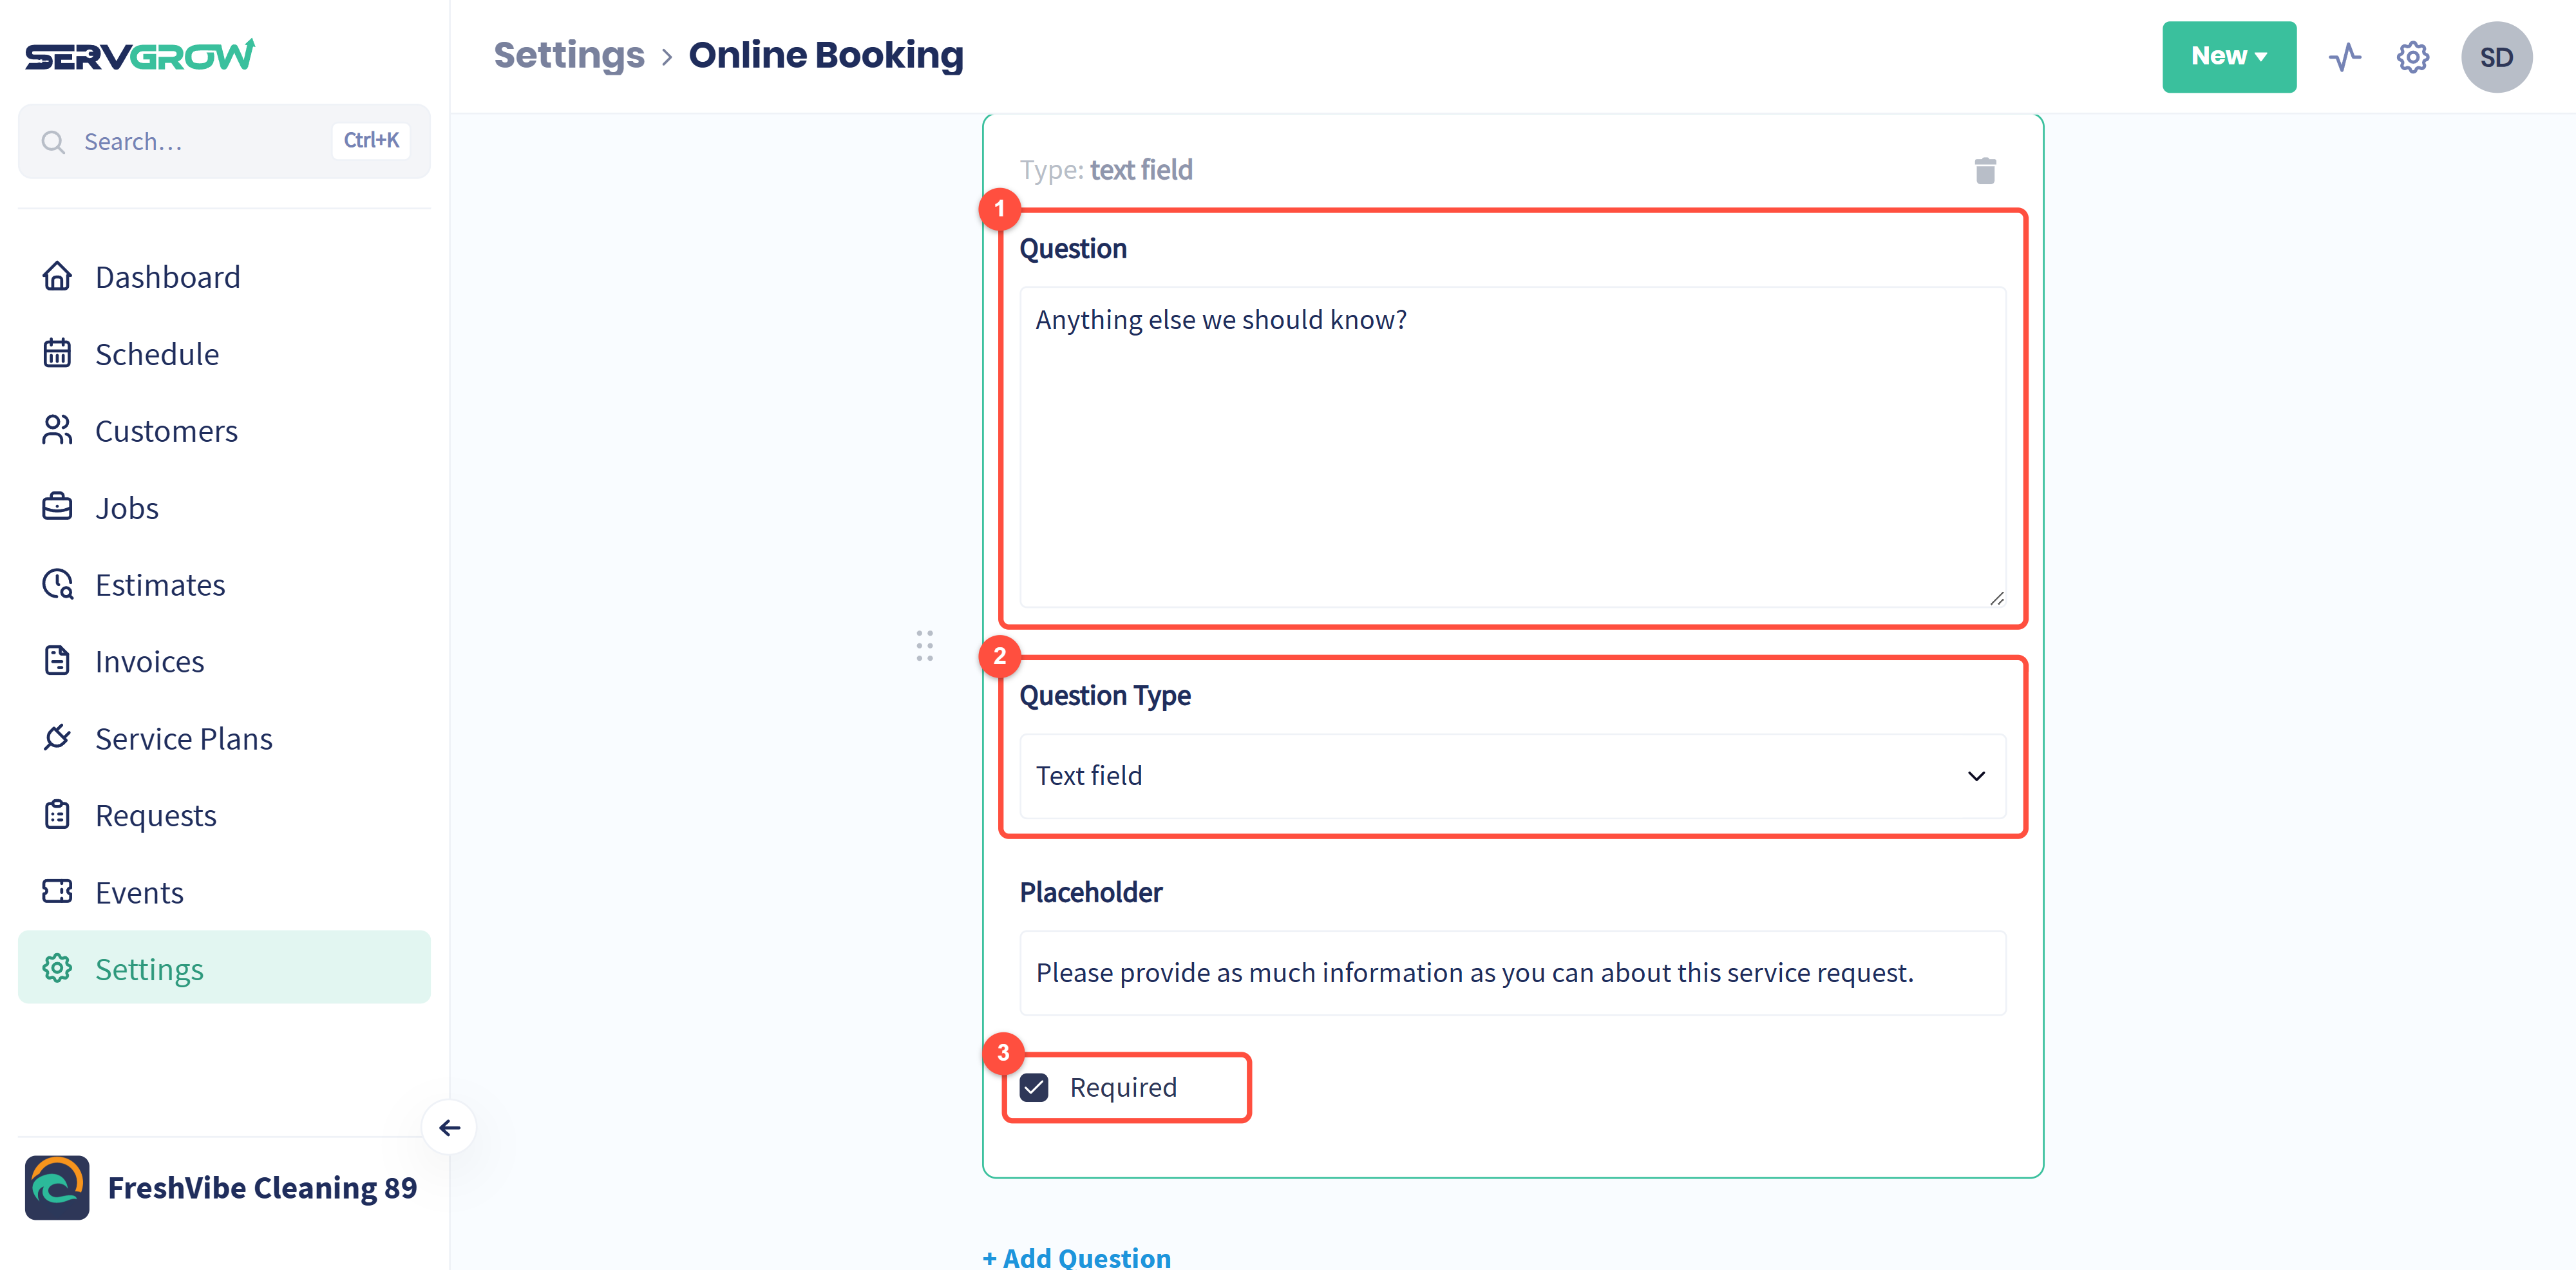
Question is what you are asking.
Question Type is how they answer.
Placeholder is the grey hint inside the field. Use it to show what a good answer looks like.
Required decides whether they can move on without answering.
The five question types
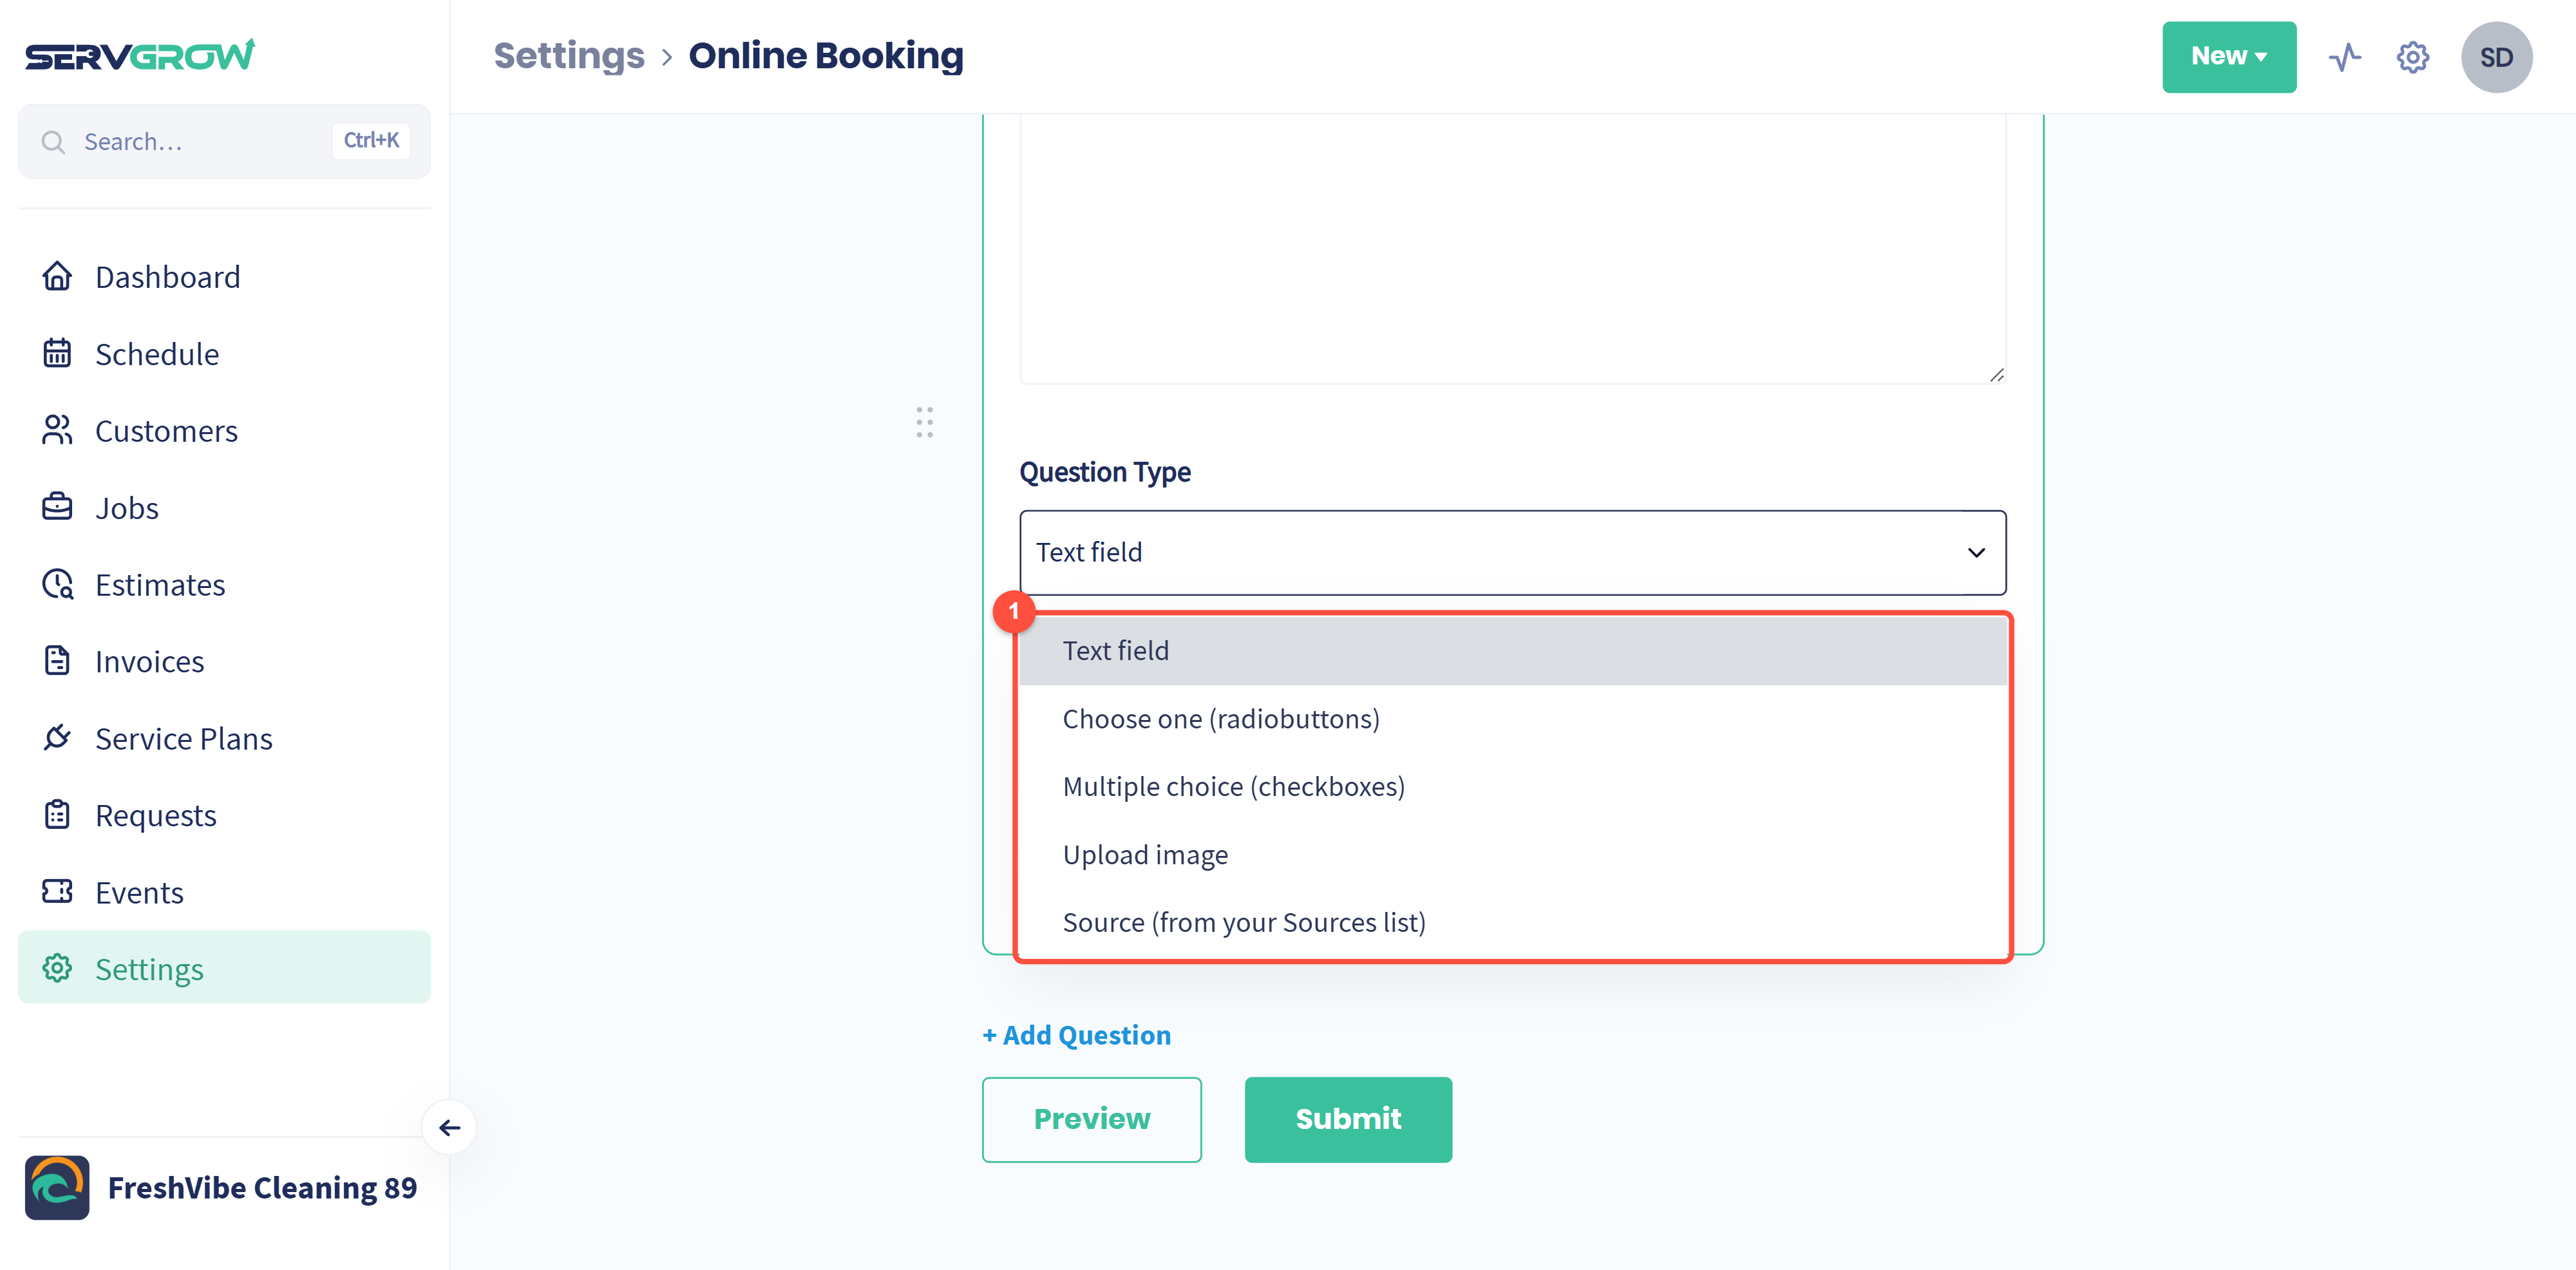
Text field for open answers, like describing the problem.
Choose one (radiobuttons) for a single answer from a list, like the type of property or how urgent the job is.
Multiple choice (checkboxes) when several answers can apply.
Upload image lets the customer attach a photo. On most forms this is the most useful question you can ask, because a picture of the job tells you what to quote and what to bring.
Source (from your Sources list) asks how they heard about you. It feeds the Source column in your Sales Report, so you can see which marketing brings in paying work, not just enquiries.
Keep it short. Every extra required question costs you a few bookings. Ask only what changes how you would price or schedule the job.
Part 3: Notifications
On the Notifications tab, choose who hears about new requests. There is an Email and a Phone, each with an Additional field for a second person.
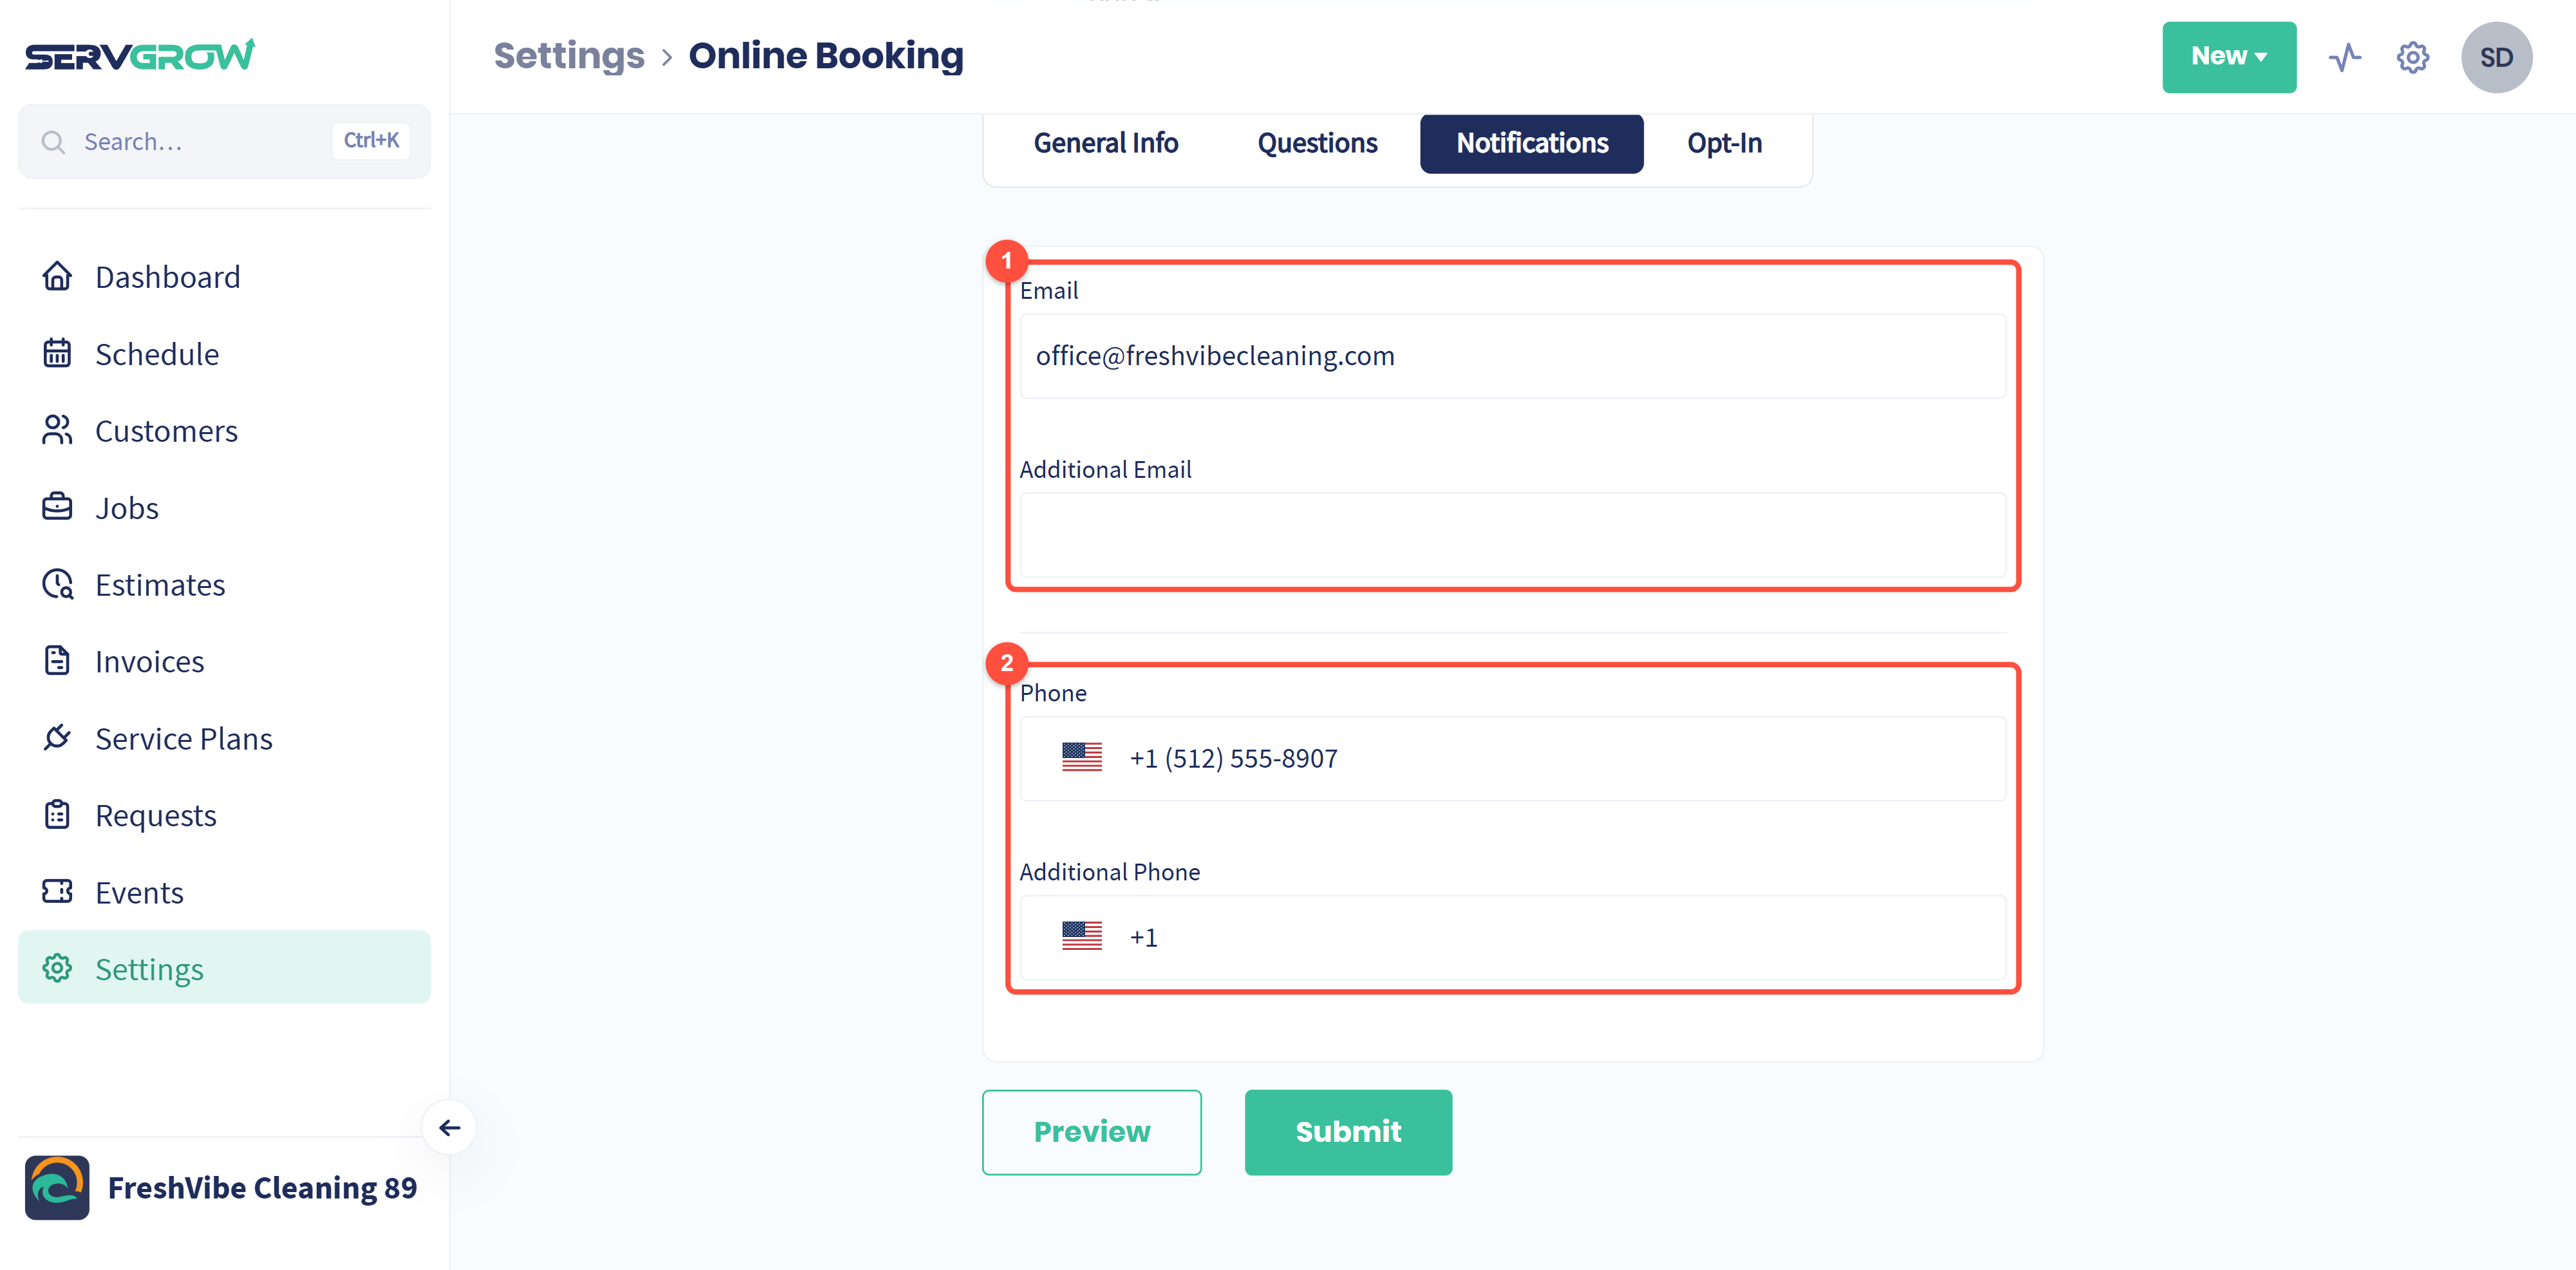
Fill in both additional fields. A request that sits in one person's inbox while they are on a job or on holiday is a lost booking, and the whole point of taking requests around the clock is answering them fast.
Part 4: Opt-In
The Opt-In tab controls the consent checkboxes customers see before they send a request.
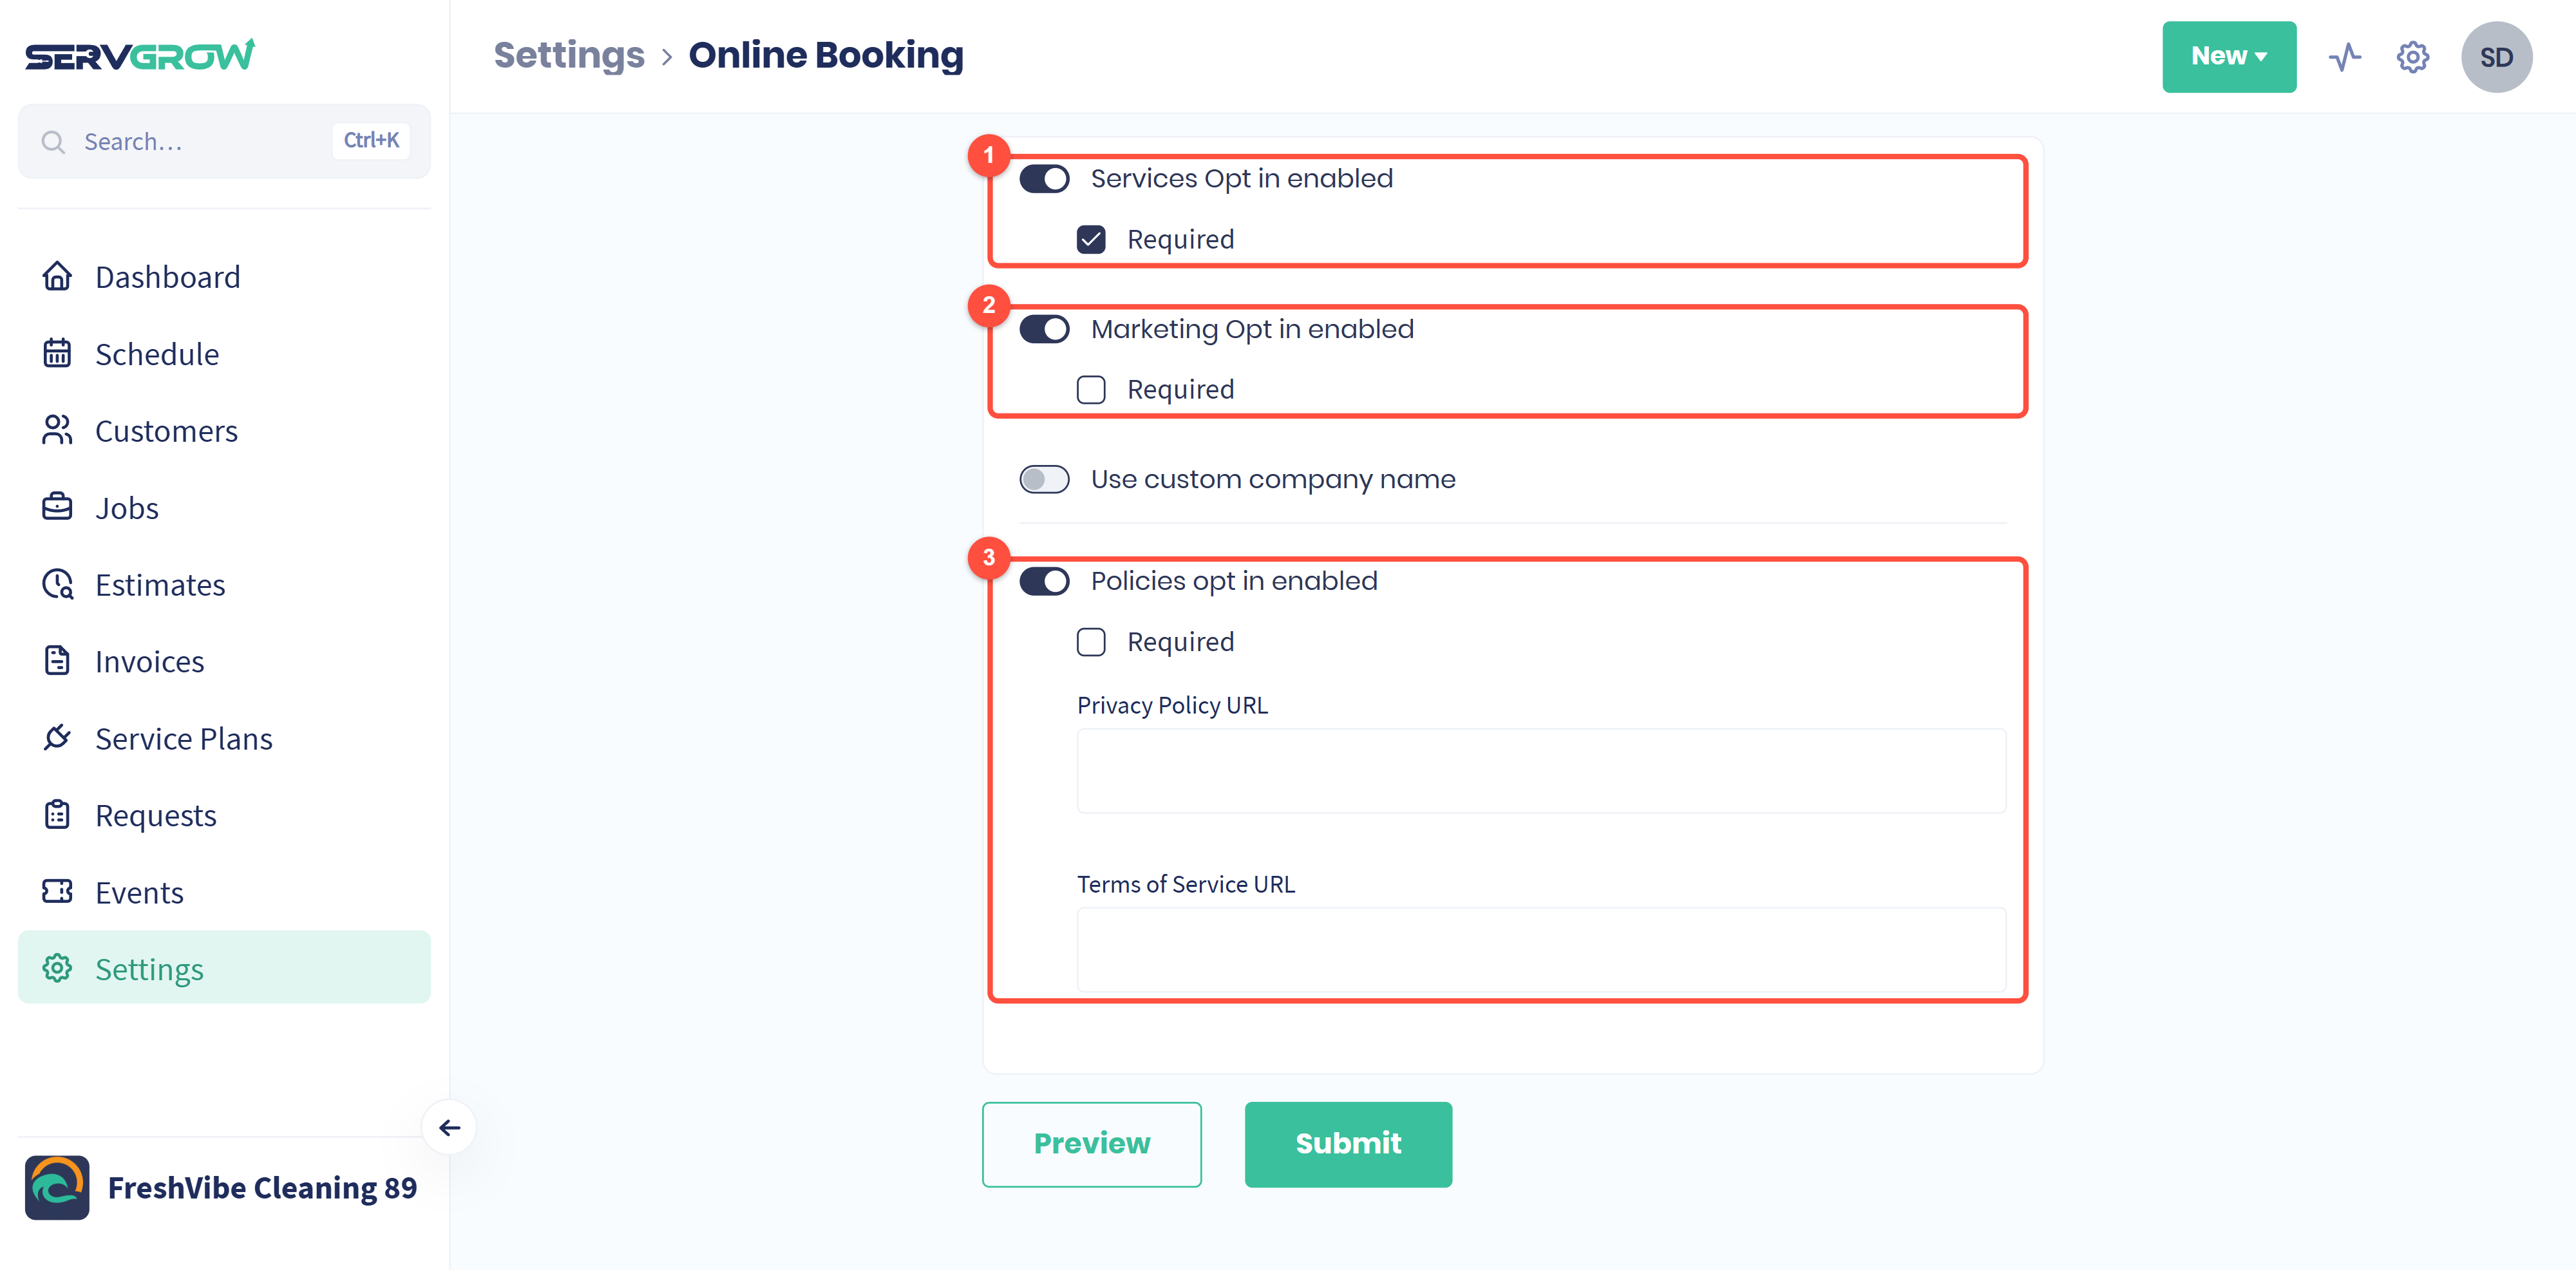
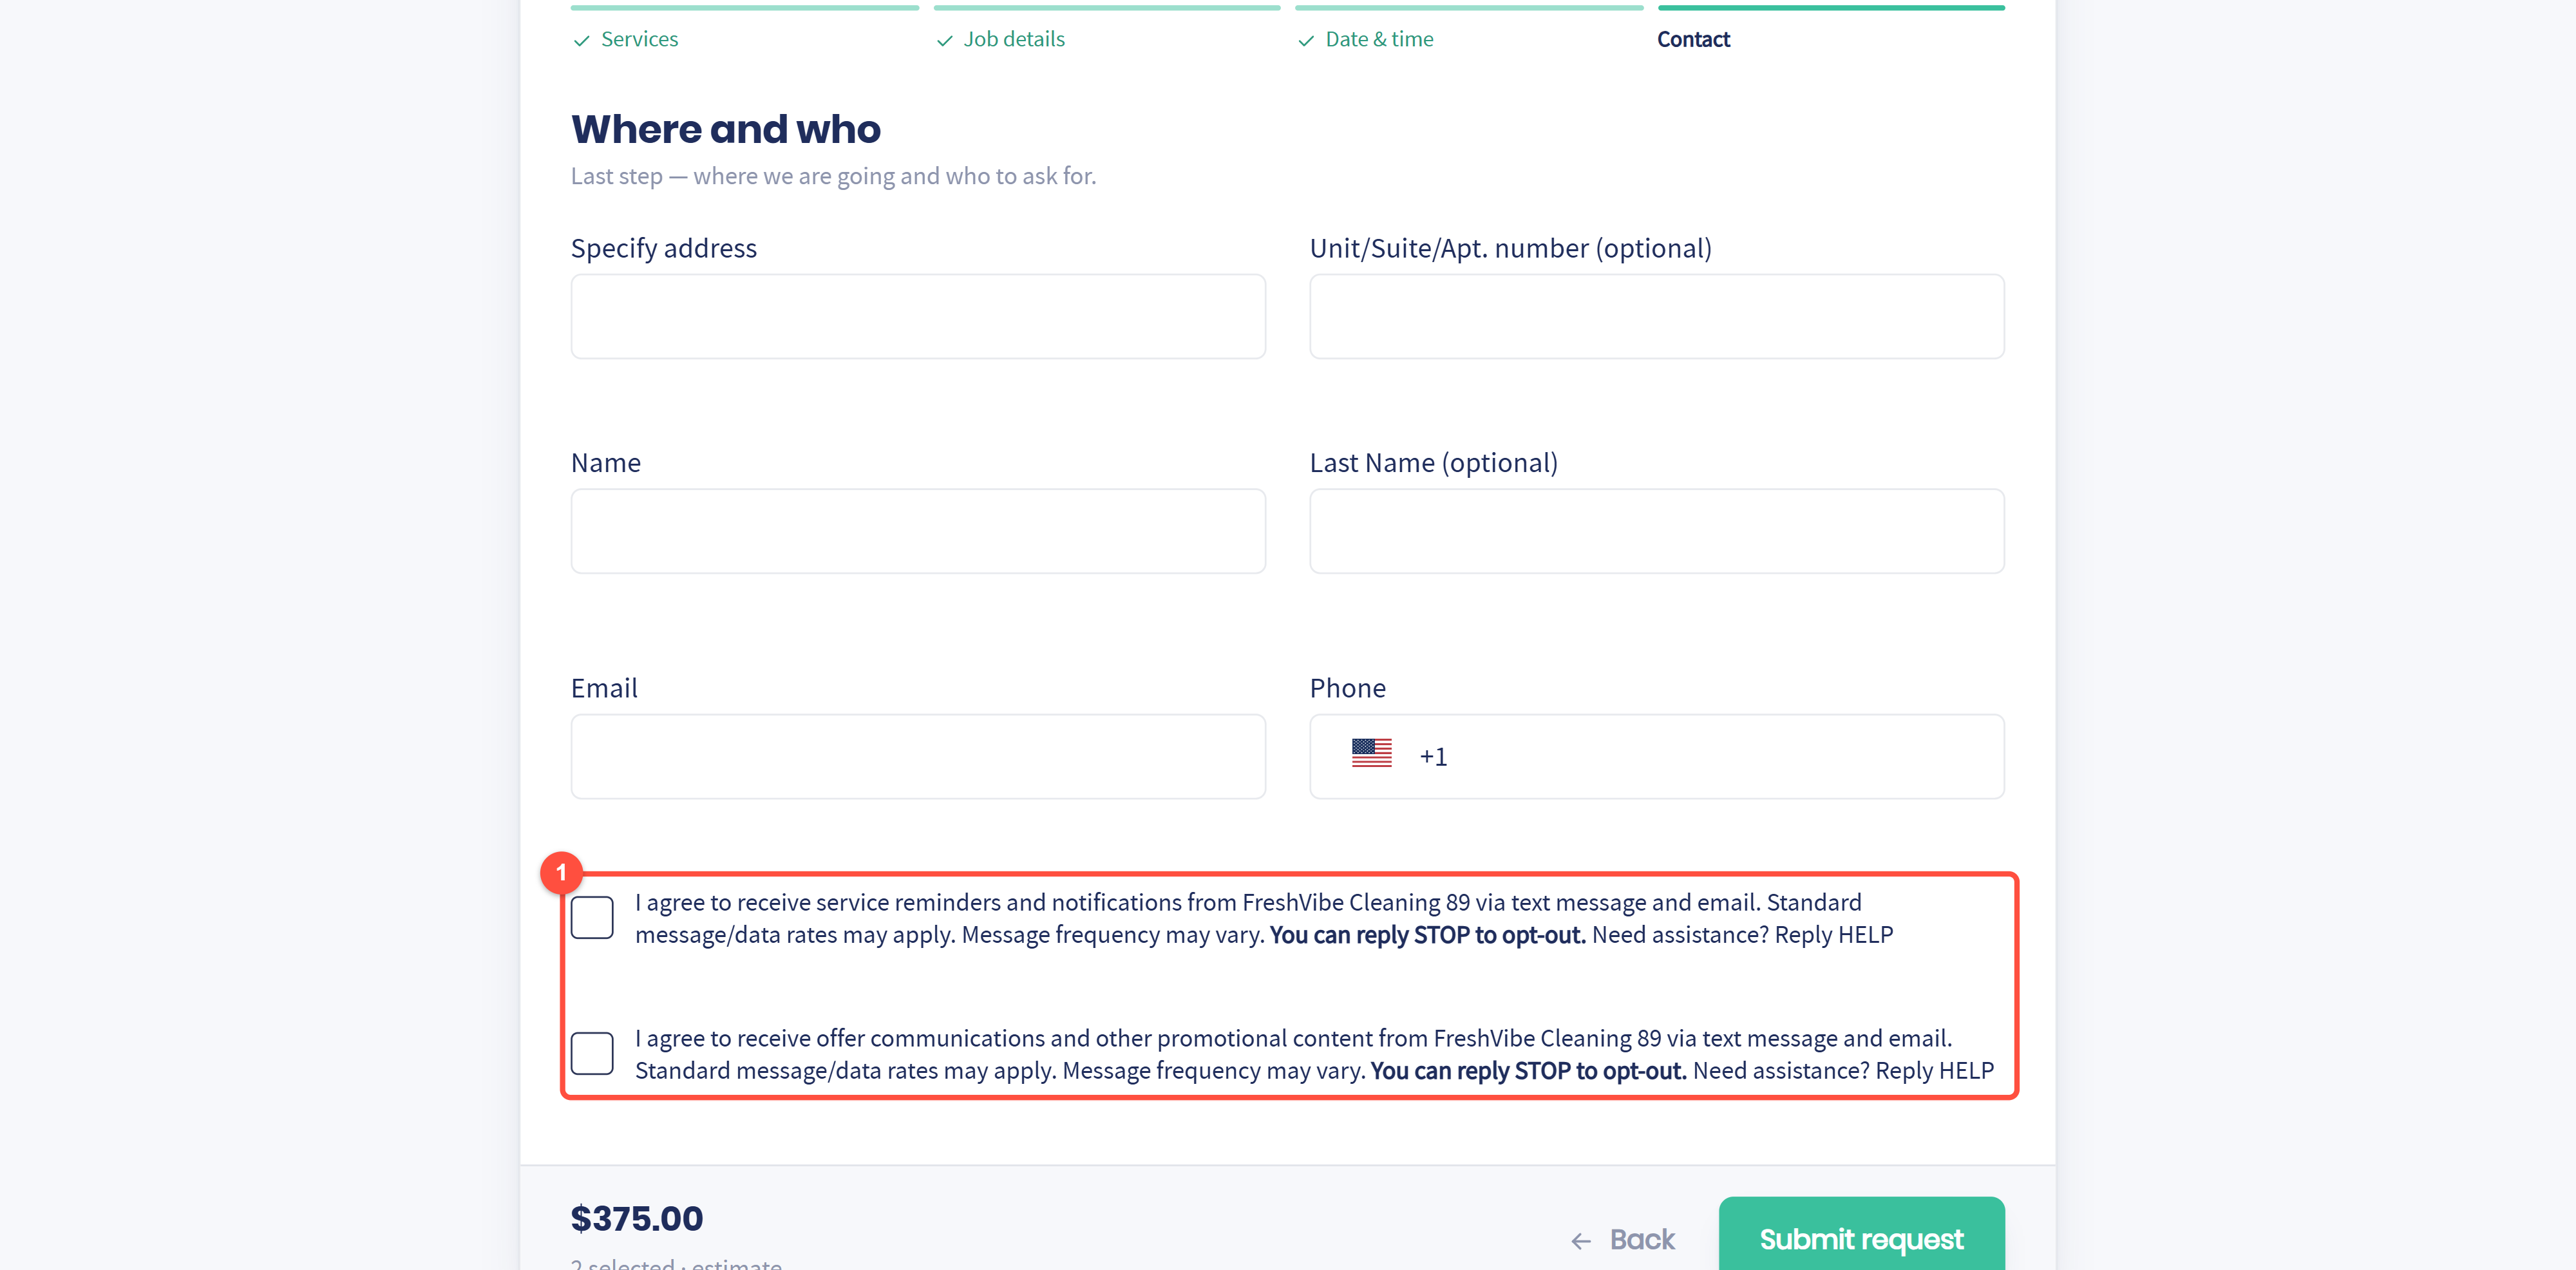
Services Opt in asks permission to send service reminders and notifications by text and email. Keep it on and required, since you cannot run the job without contacting the customer.
Marketing Opt in asks permission to send offers and promotions. Keep it on but not required. Text messaging rules generally do not let you make marketing consent a condition of booking, and customers trust a form that does not force it.
Use custom company name lets you enter your Company Legal Name and a DBA/Trade Name/Operating Name, for when you trade under a different name than the one you are registered under.
Policies opt in adds a checkbox for your policies, linked to your Privacy Policy URL and Terms of Service URL.
This is how the consent appears on the last step of the form, under the customer's contact details.
If you are unsure how to set these, check with whoever handles your compliance. The defaults are sensible, but the rules depend on where you operate.
Part 5: Put the form in front of customers
Click Share at the top of the page. There are three ways to use the form, and each suits a different spot.
Option 1: Share the link
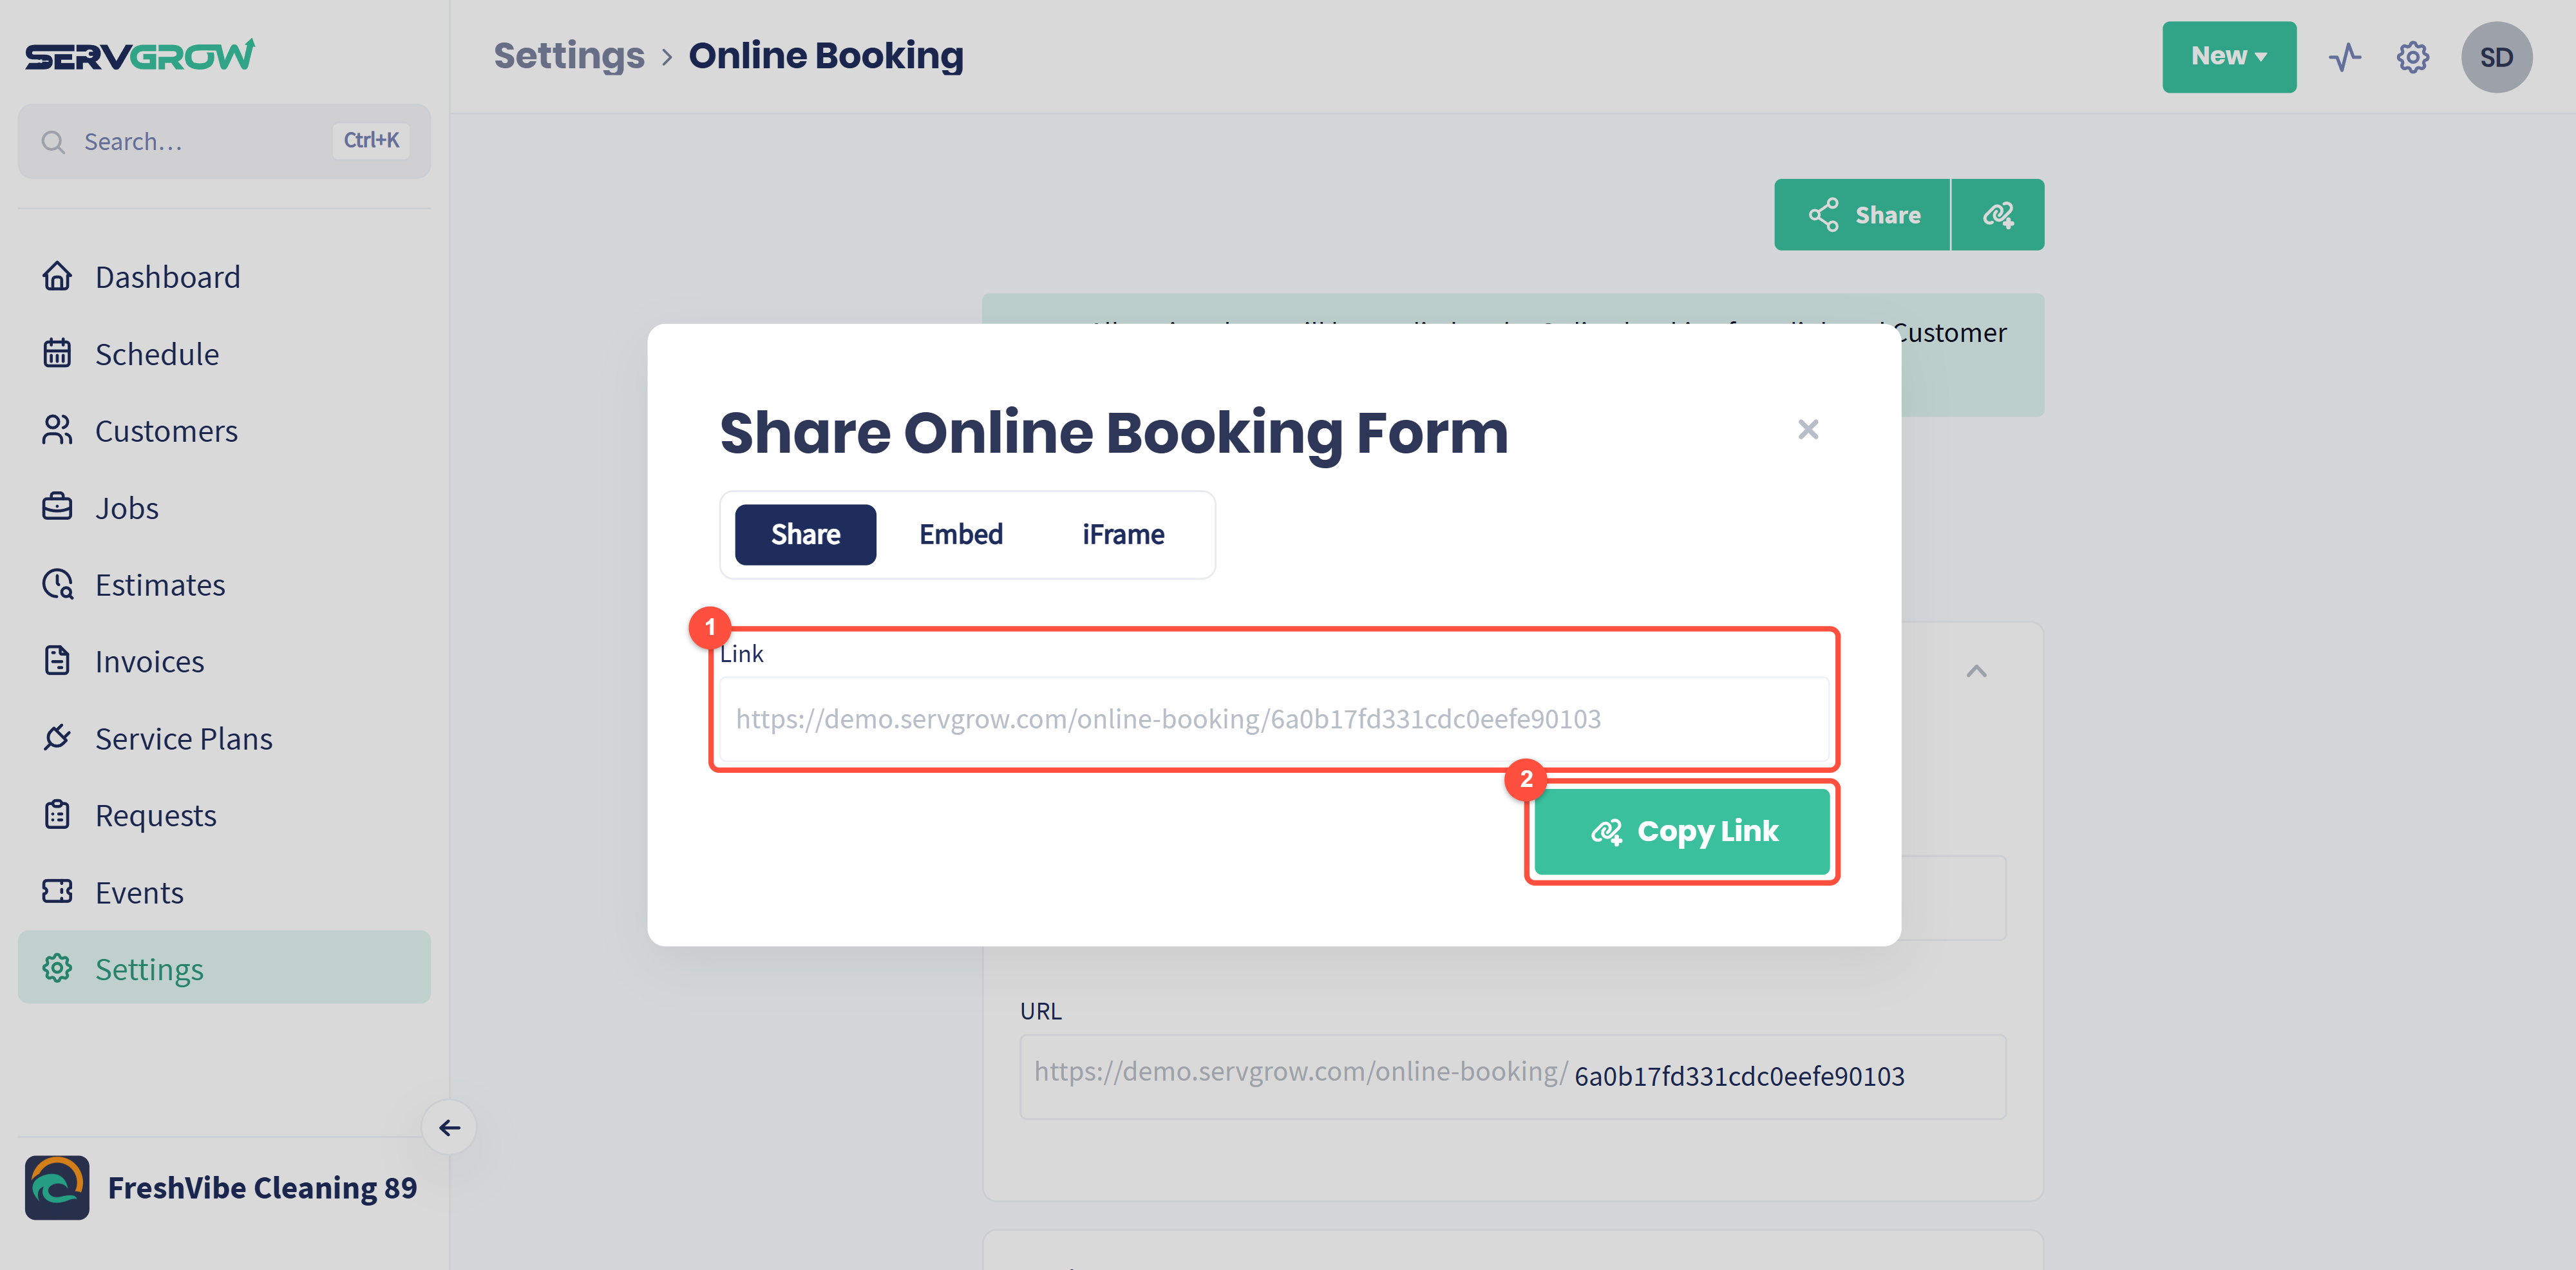
Click Copy Link and paste it anywhere: your Google Business Profile, your Instagram bio, a Facebook page button, your email signature or a text reply. There is nothing to install. Start here, since you can be live in about thirty seconds.
Option 2: Add a Book Online button to your website
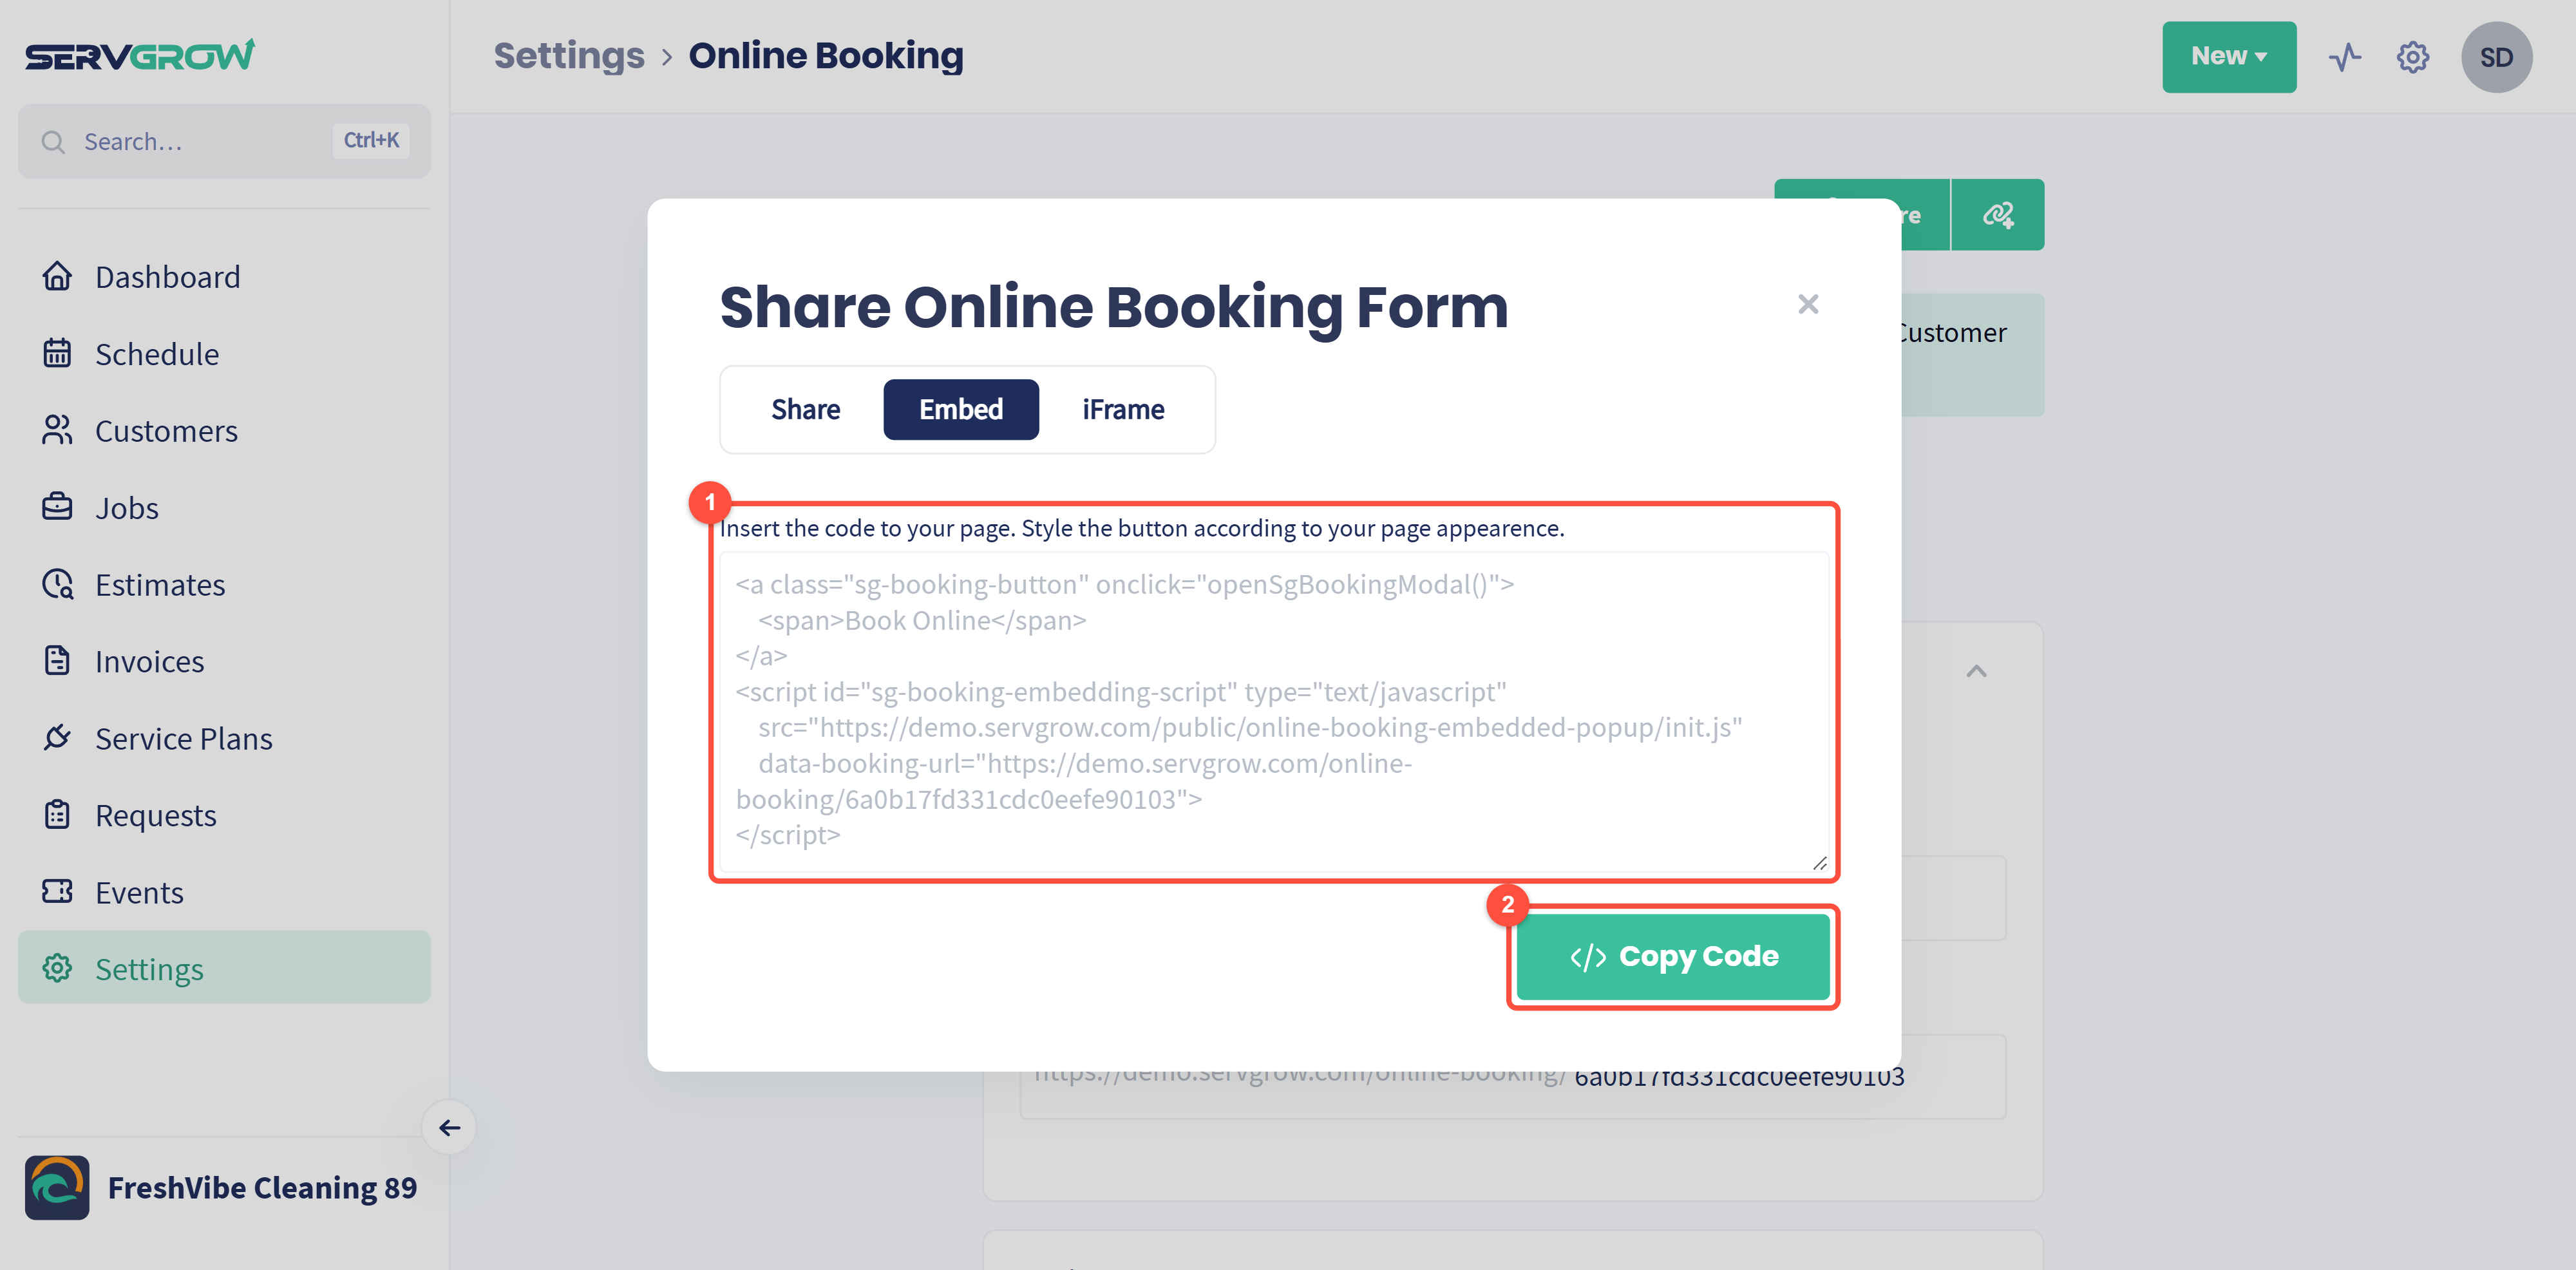
The Embed tab gives you code for a Book Online button. When a visitor clicks it, the form opens in a popup over your page, so they never leave your site. Click Copy Code and paste it into your page where you want the button to appear.
The button arrives unstyled so it can match your site. Target the sg-booking-button class in your CSS to give it your colors, padding and font.
Option 3: Put the whole form on a page
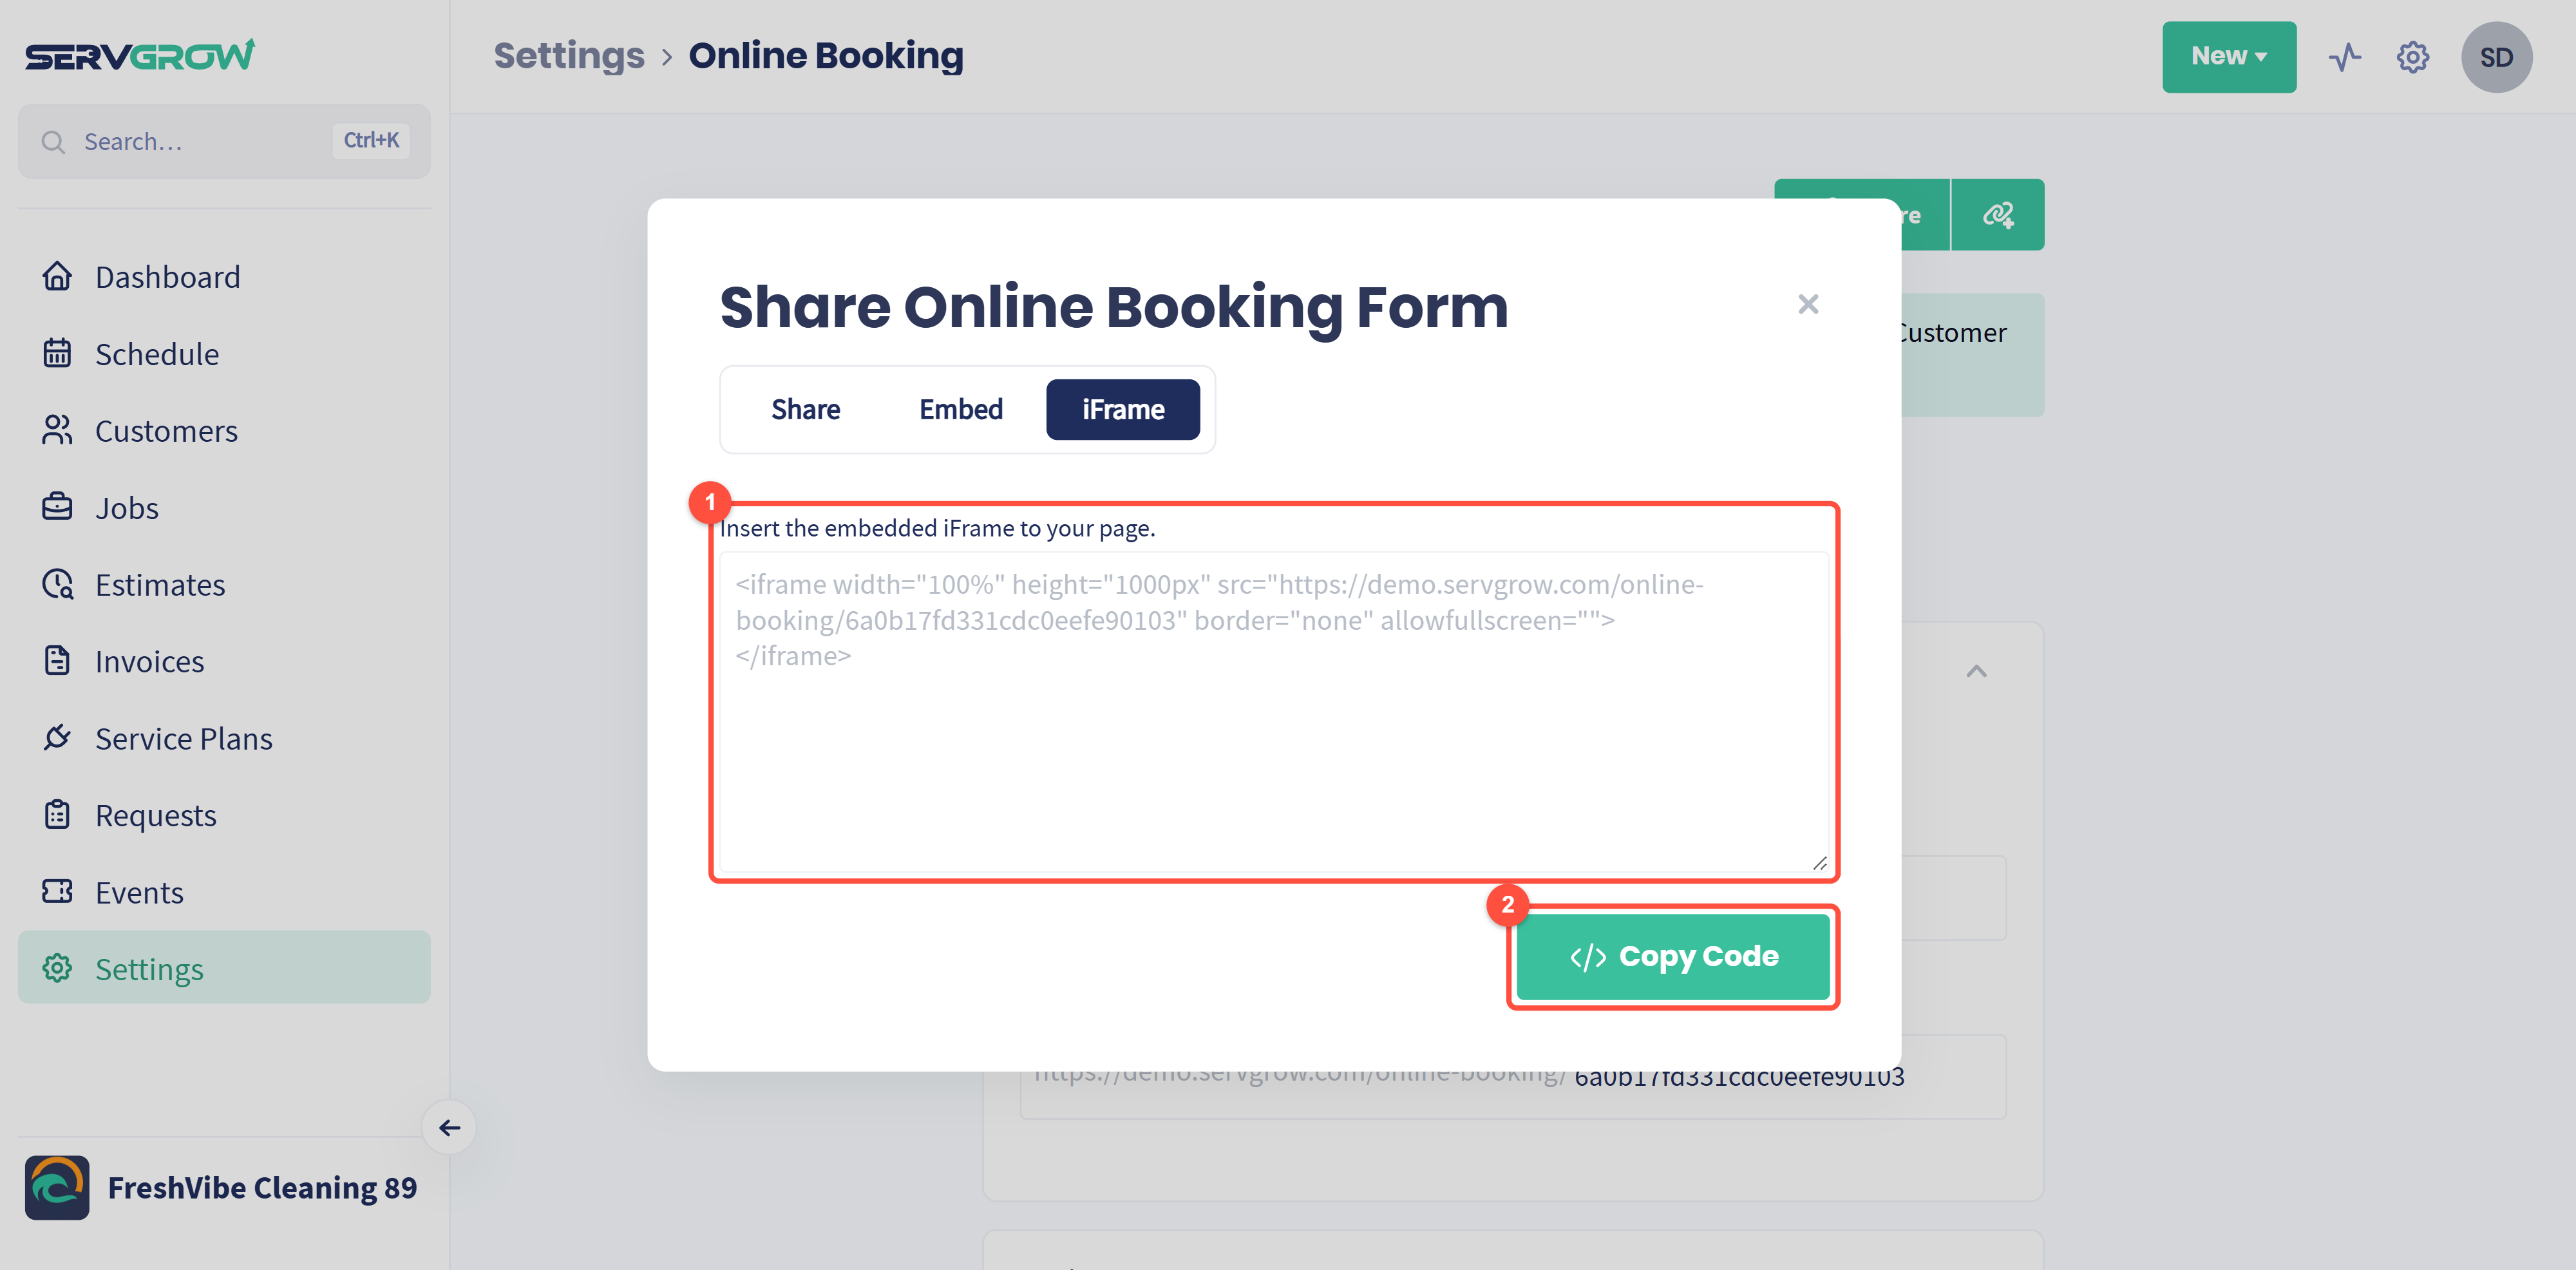
The iFrame tab gives you code that places the full form directly on a page, at full width and 1000 pixels tall. Use it for a dedicated "Book a Service" or "Request an Estimate" page, and change the height if your form is shorter or longer.
Which one should you use?
Posting on Google or social media: the link.
Adding booking to pages you already have: the Book Online button.
Building a dedicated booking page: the iFrame.
You can use all three at once. It is the same form, the same questions and the same notifications however customers reach it.
When a request comes in
New requests appear under Requests in the left menu, showing the customer, the services, the date of the request, the date of service they asked for, the status and the source. Your notification email and phone are alerted at the same time. From the request you can link it to an existing customer or add a new one, and turn it into an estimate or a job.
See Manage Online Booking Requests for handling requests once they arrive.
Related articles