
An estimate is often the first real impression a customer gets of your business. A quick number in a text message looks like every other quote they got. A clear, itemized estimate with your prices, a description of the work and a few upgrades to choose from looks like a company that knows what it is doing, and it wins more jobs.
Servgrow estimates do the selling for you. Build the quote from your Price Book so prices are consistent, add optional extras the customer can tick to raise the total themselves, and ask for a deposit so approved work is committed work. When the customer approves, the estimate can turn into a job automatically. Most estimates take a few minutes to build.
Where to start
Go to Estimates in the left menu, click Add Estimate and choose New Estimate.
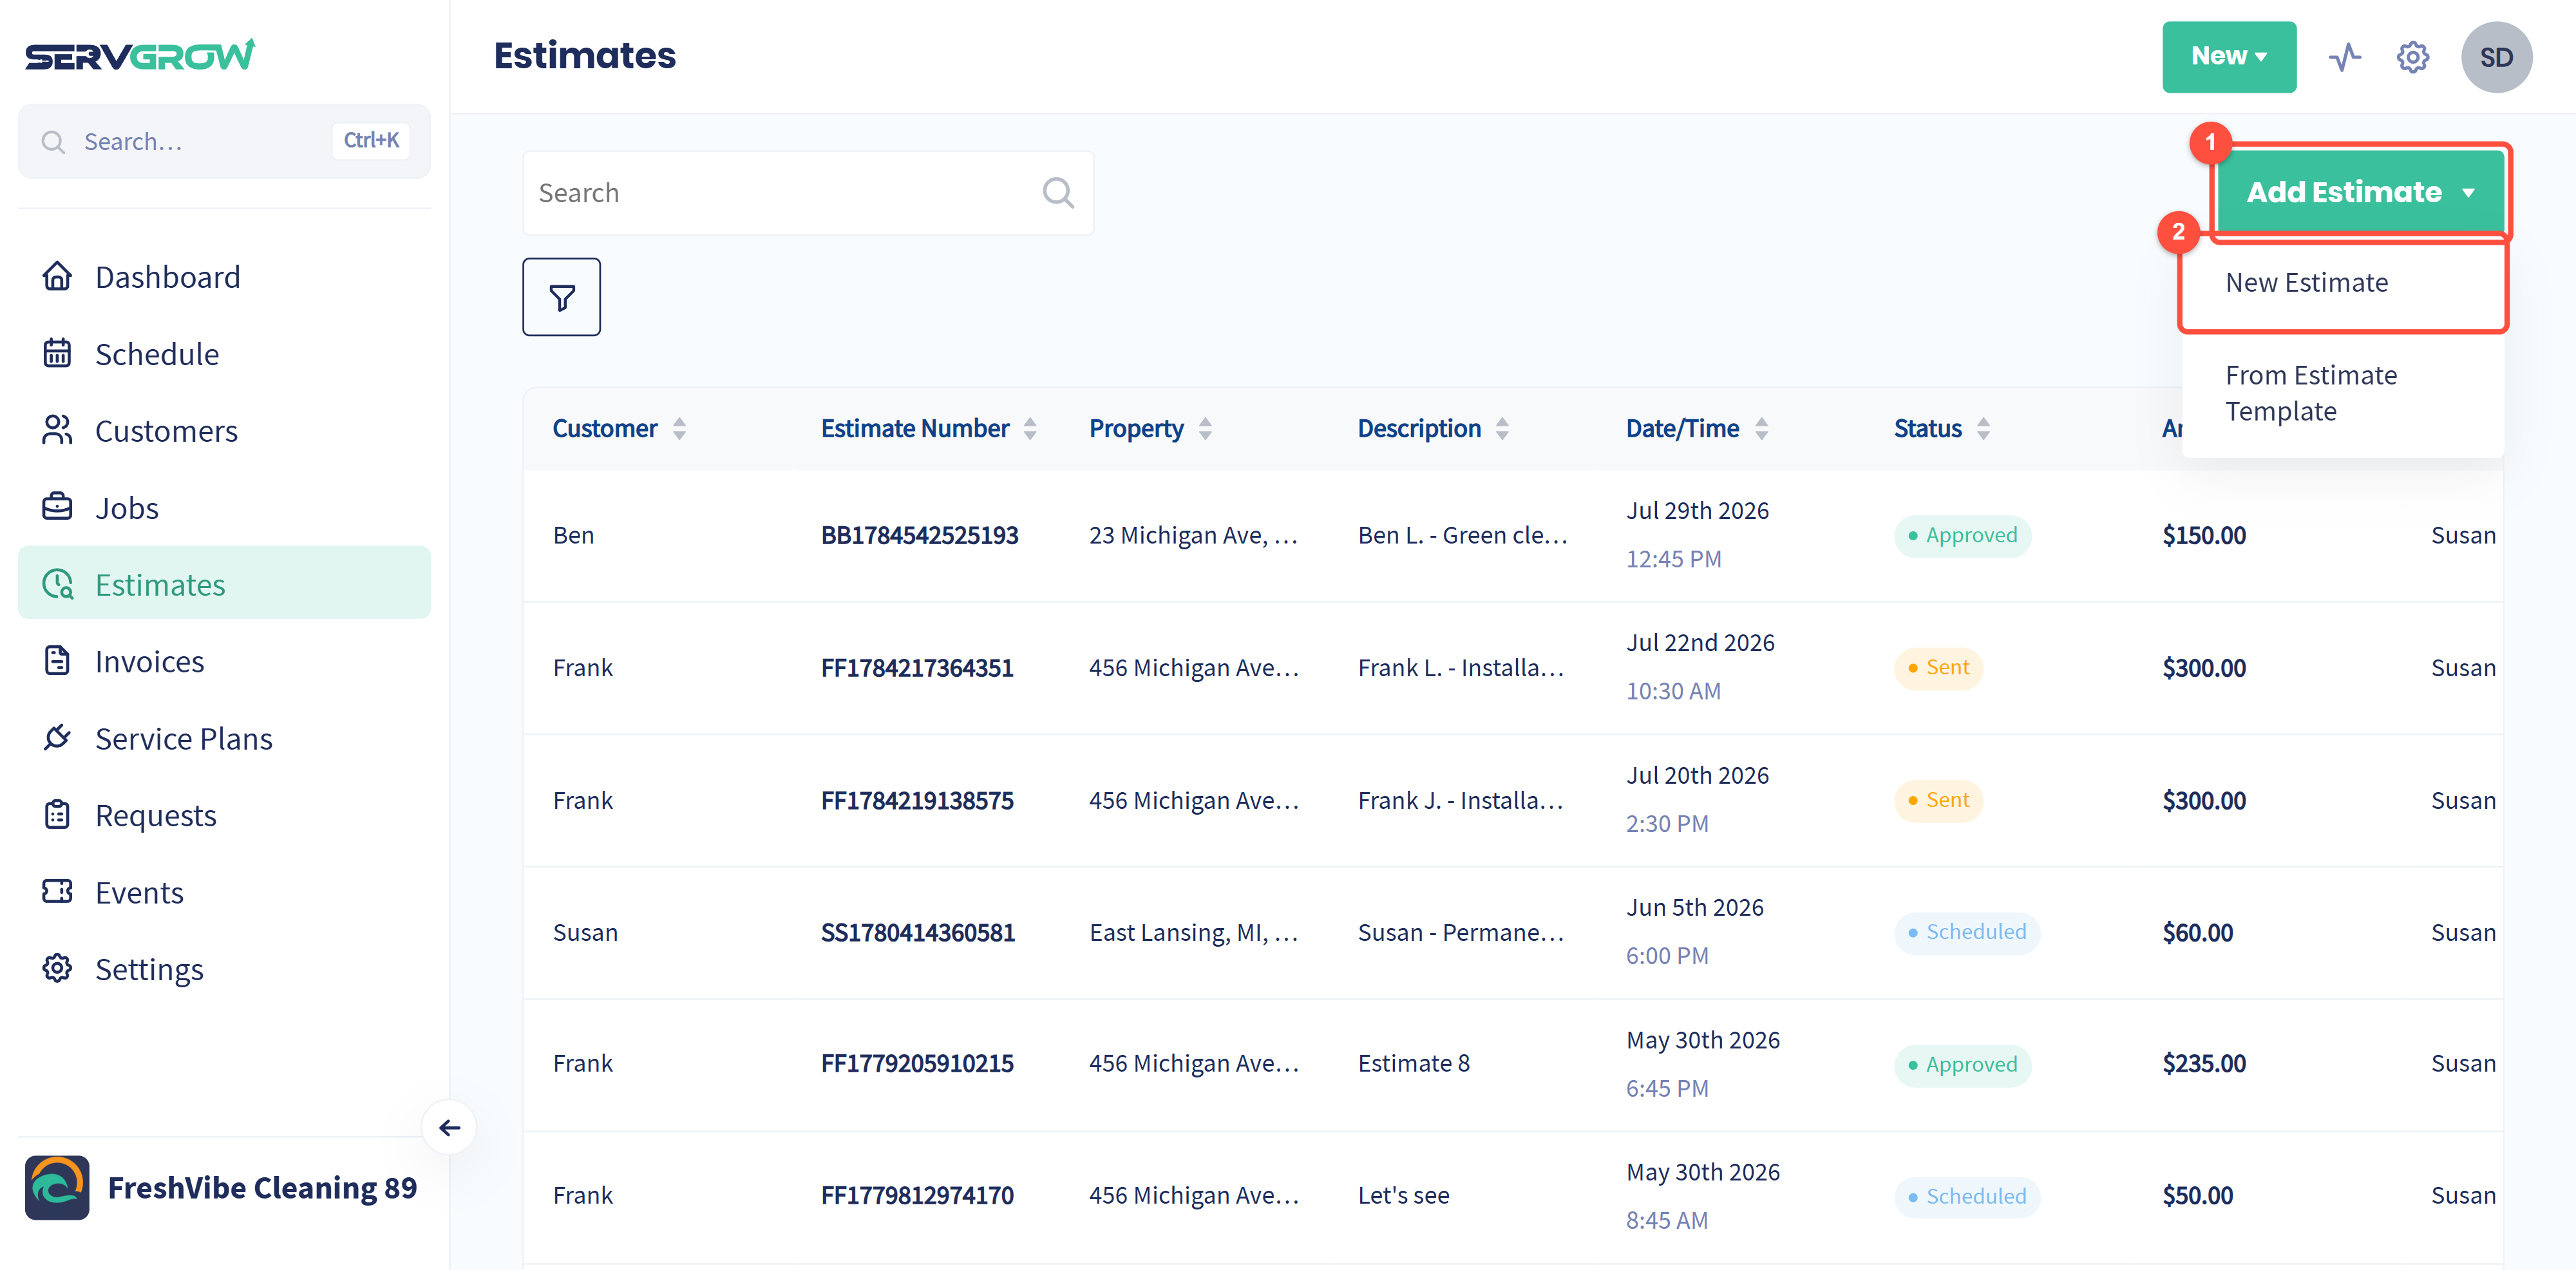
You can also click New at the top of any page and choose Estimate, or click an open time on the Schedule. Quoting the same kind of work again and again? Choose From Estimate Template to start from a saved template. See Job & Estimate Templates.
Creating an estimate takes four steps: Customer Info, Schedule time, Line Items and Additional Info.
To create estimates, your role needs the Show Pricing permission. Company Admins, Office Staff and Field Techs have it by default.
Step 1: Customer Info
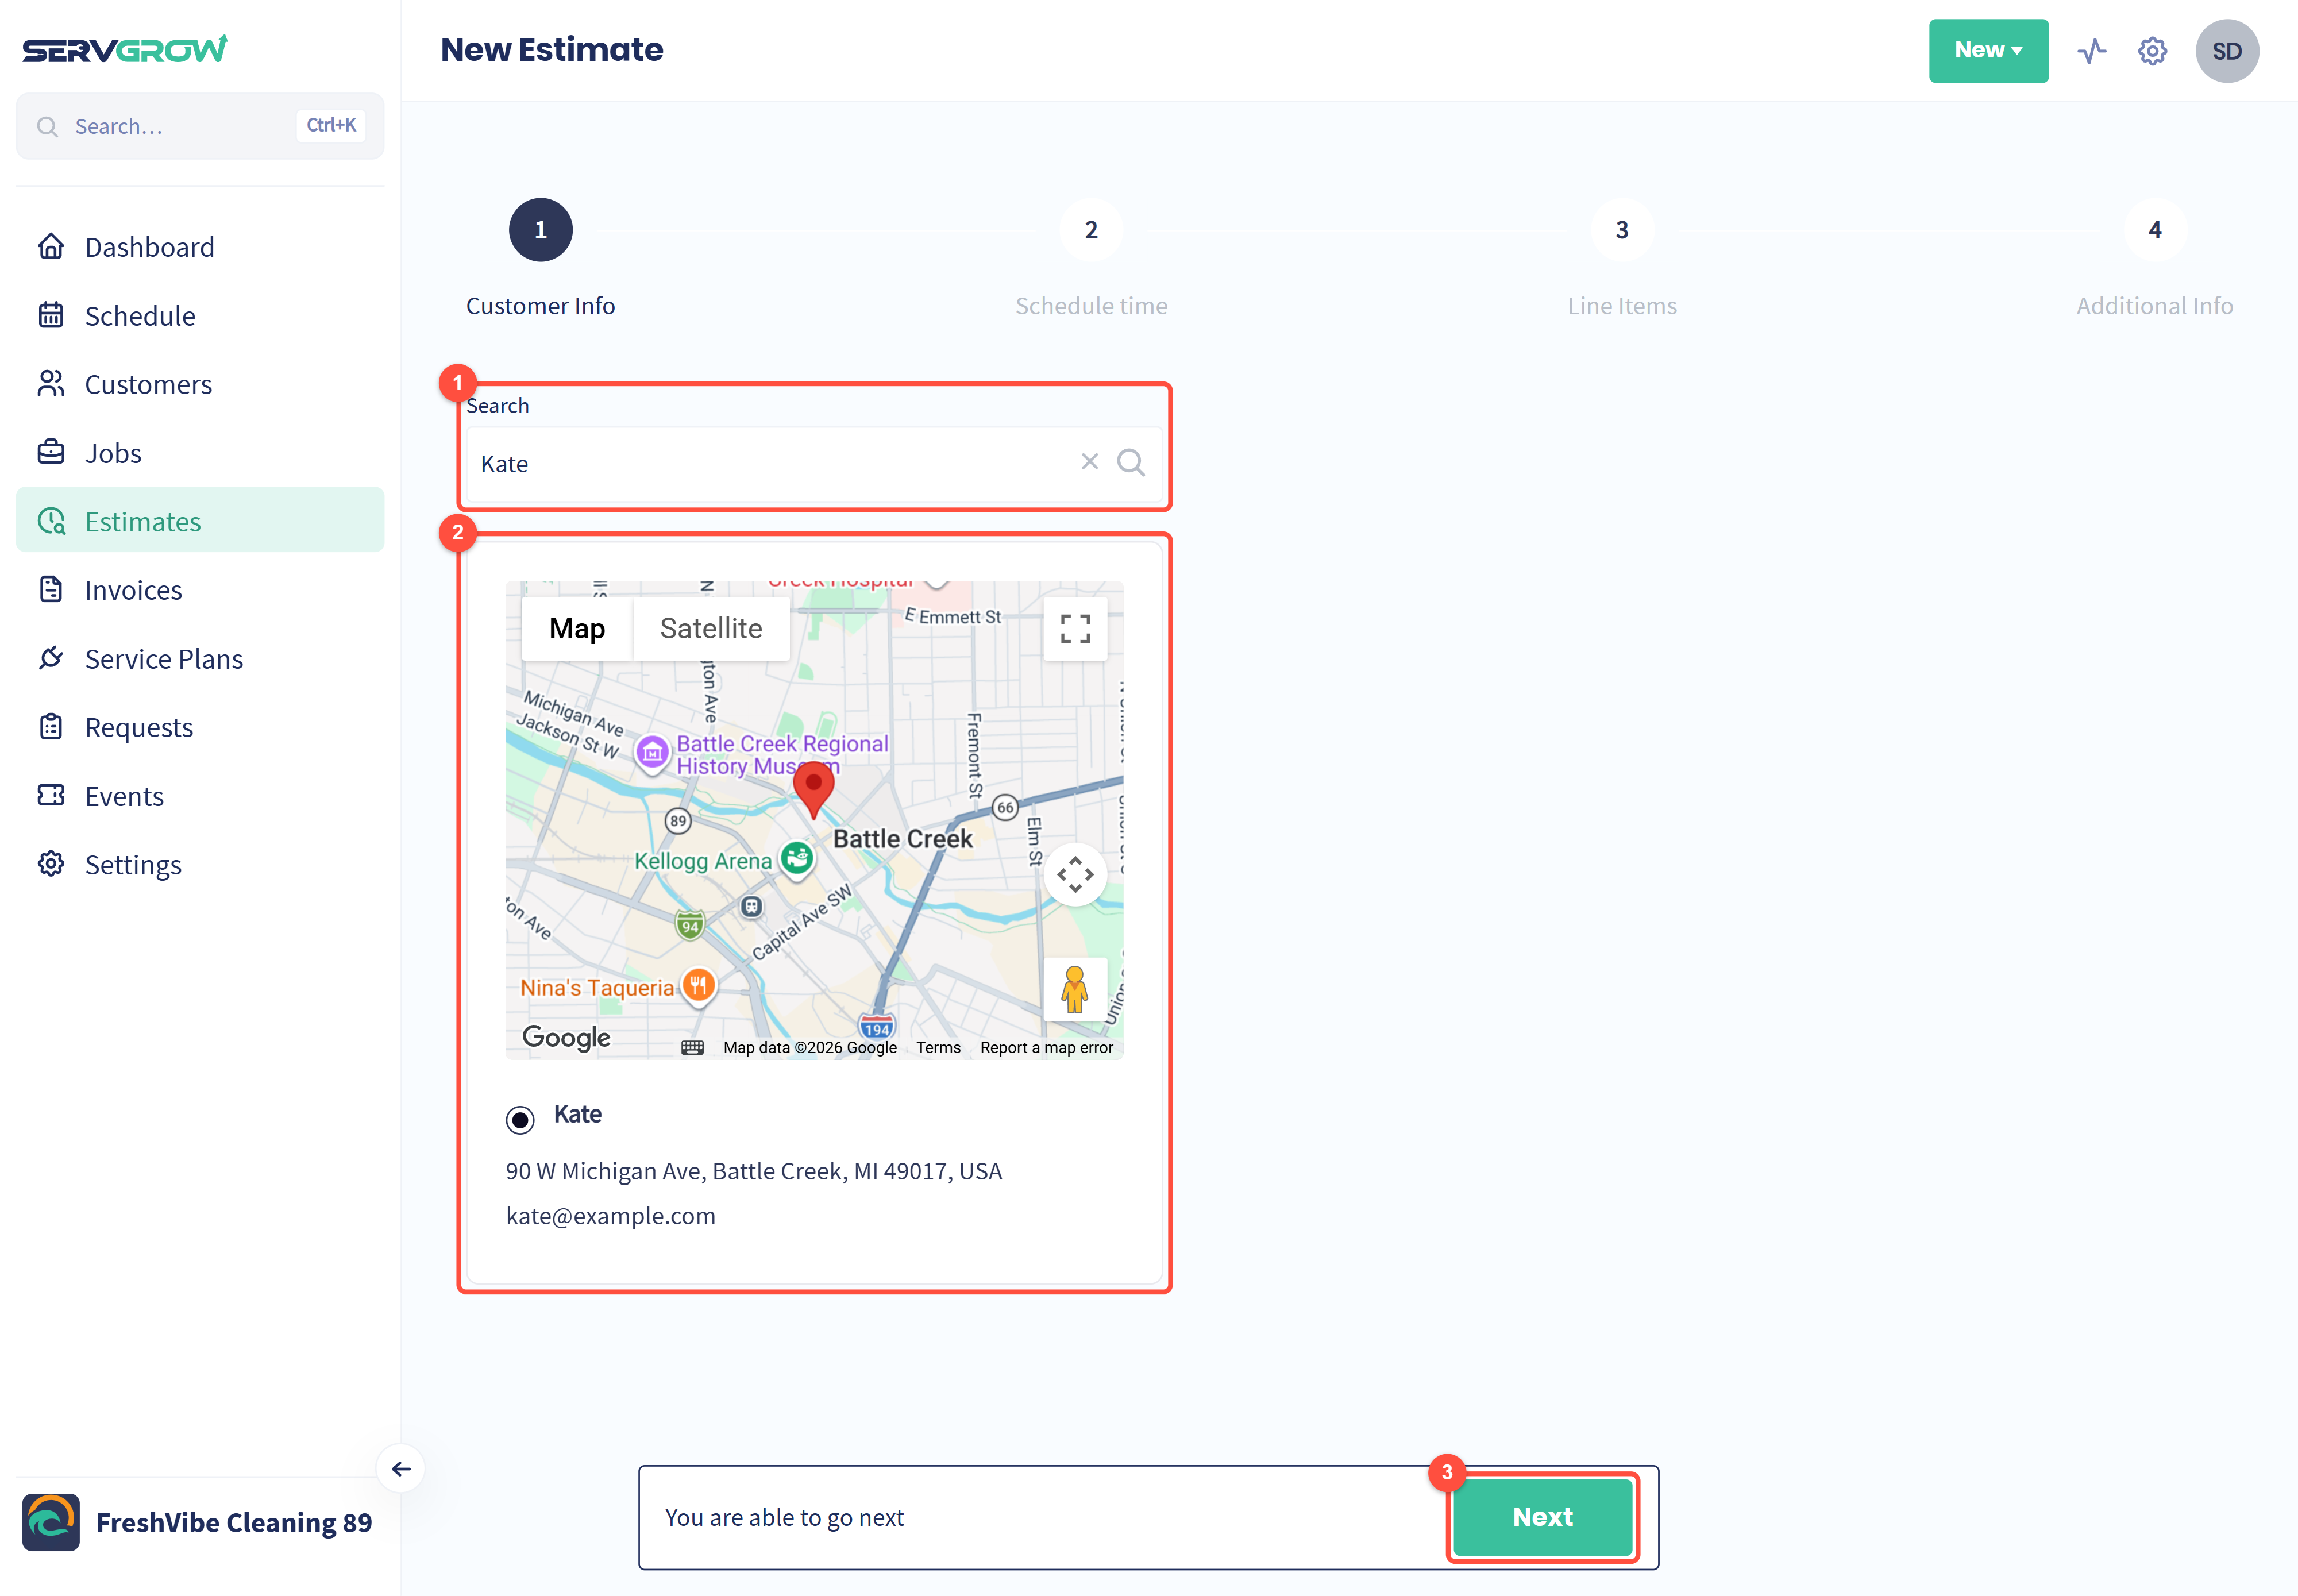
Type the customer's name in Search and click them in the results. New customer? Click + Add Customer in the results to add them without leaving the estimate.
Check the property and contact details. If the customer has more than one property, pick the one you are quoting for.
Click Next.
Step 2: Schedule time (optional)
If you are visiting the property to give the estimate, book that visit here. If not, skip it.
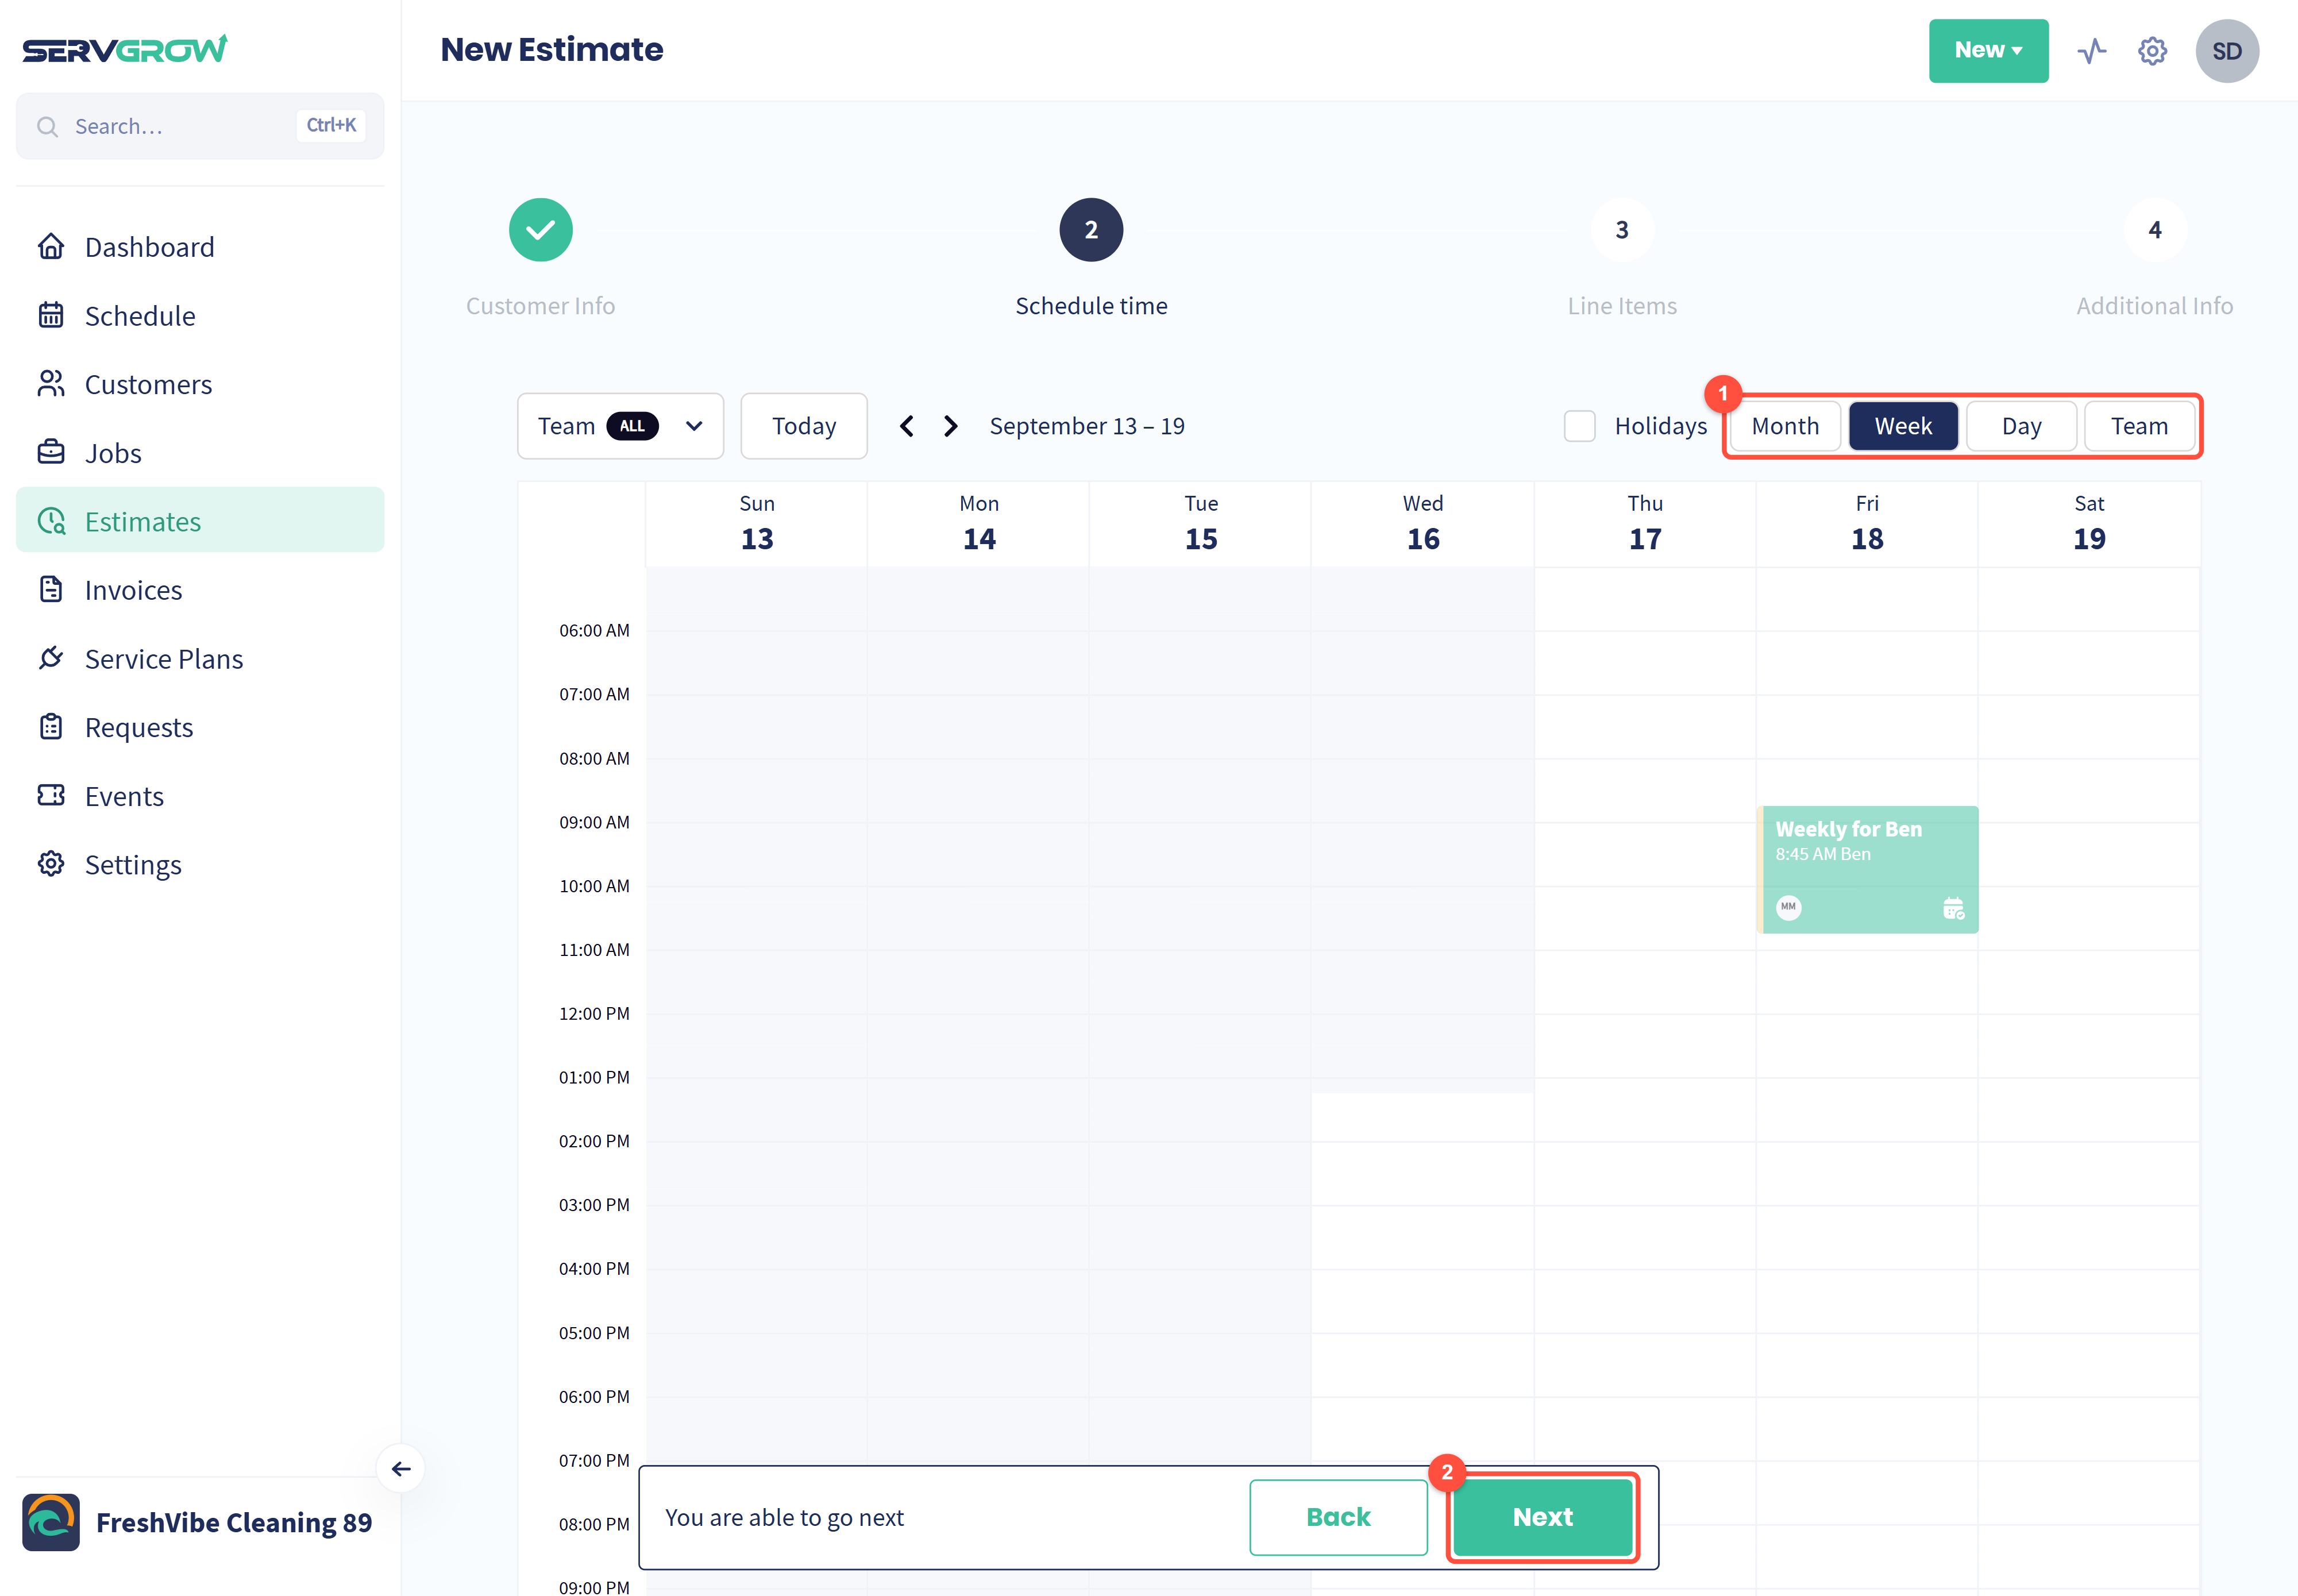
Switch between Month, Week, Day and Team to find a time that works.
No visit needed? Click Next to skip scheduling. You can schedule the estimate later from the Schedule.
To book the visit, click a time on the calendar. The Schedule Estimate window opens with that time filled in.
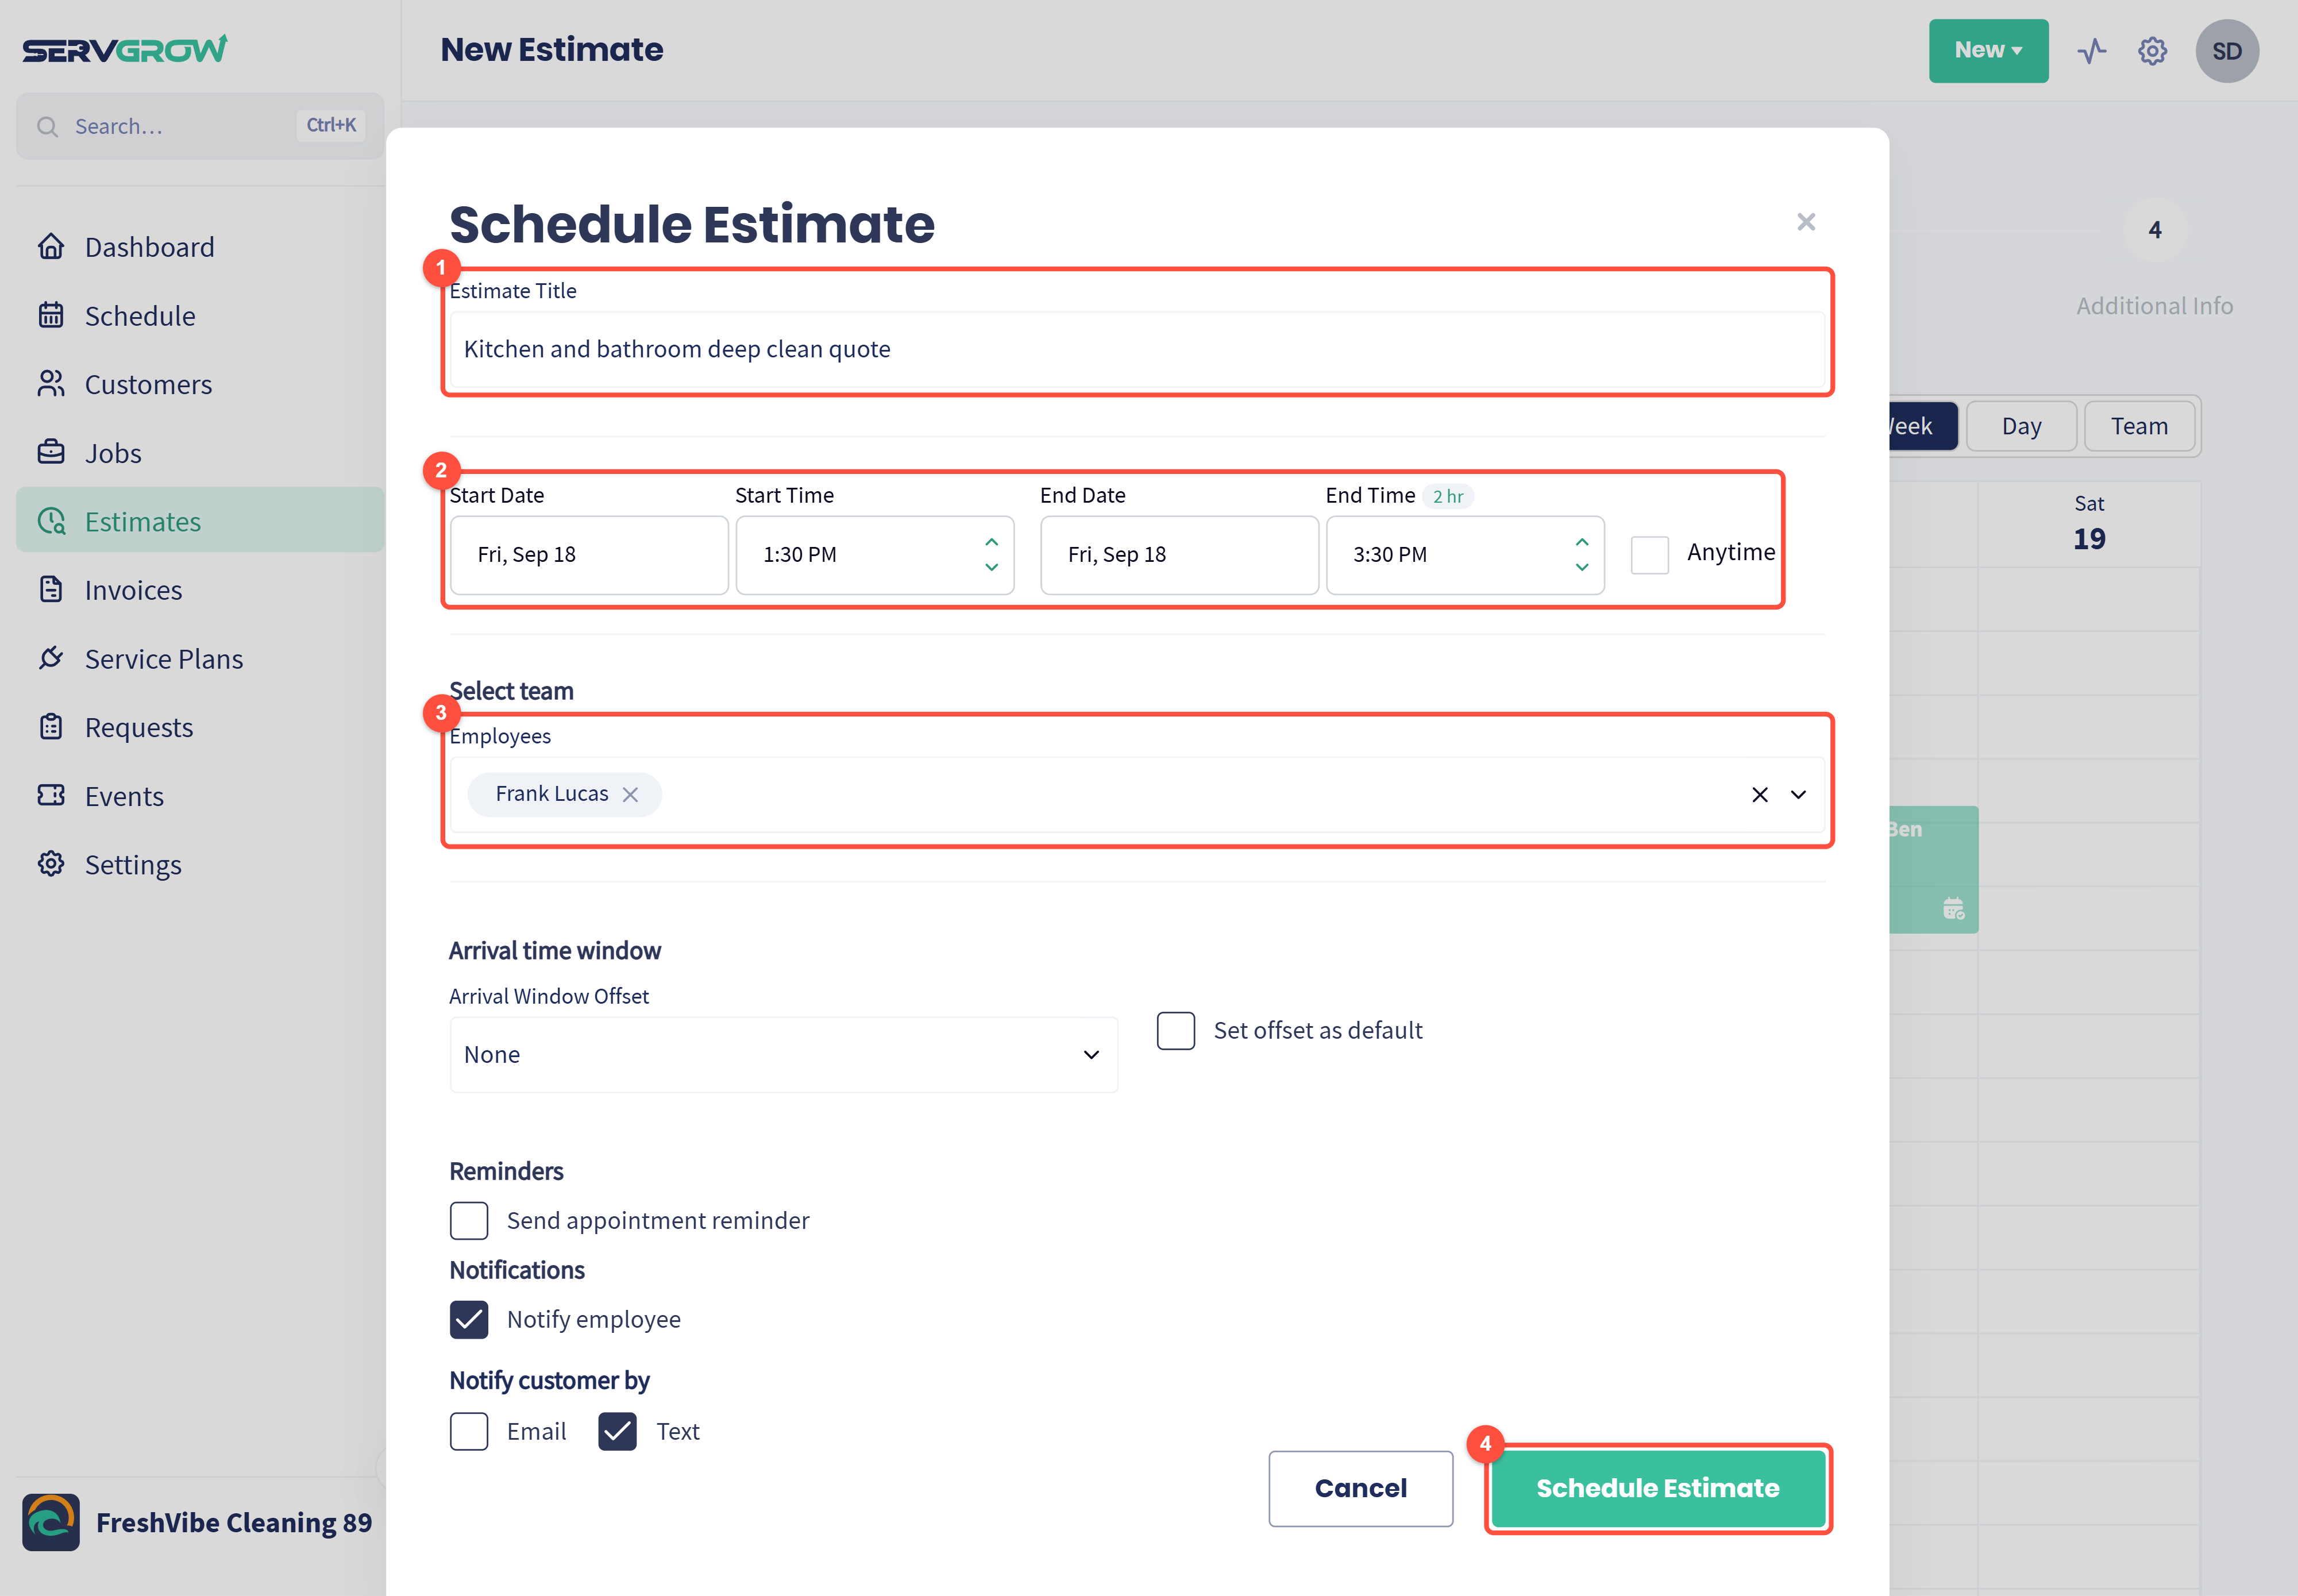
Estimate Title: a short name your team will see on the schedule.
Start Date, Start Time, End Date and End Time. Tick Anytime if the day matters but the time does not.
Employees: who is going out to give the estimate.
Set the arrival window, reminder and notifications as you would for a job, then click Schedule Estimate. Then click Next.
Step 3: Line Items
This is the quote itself. Items at the top are required: the work the customer is agreeing to. Items in the Optional section are extras the customer can choose to add.
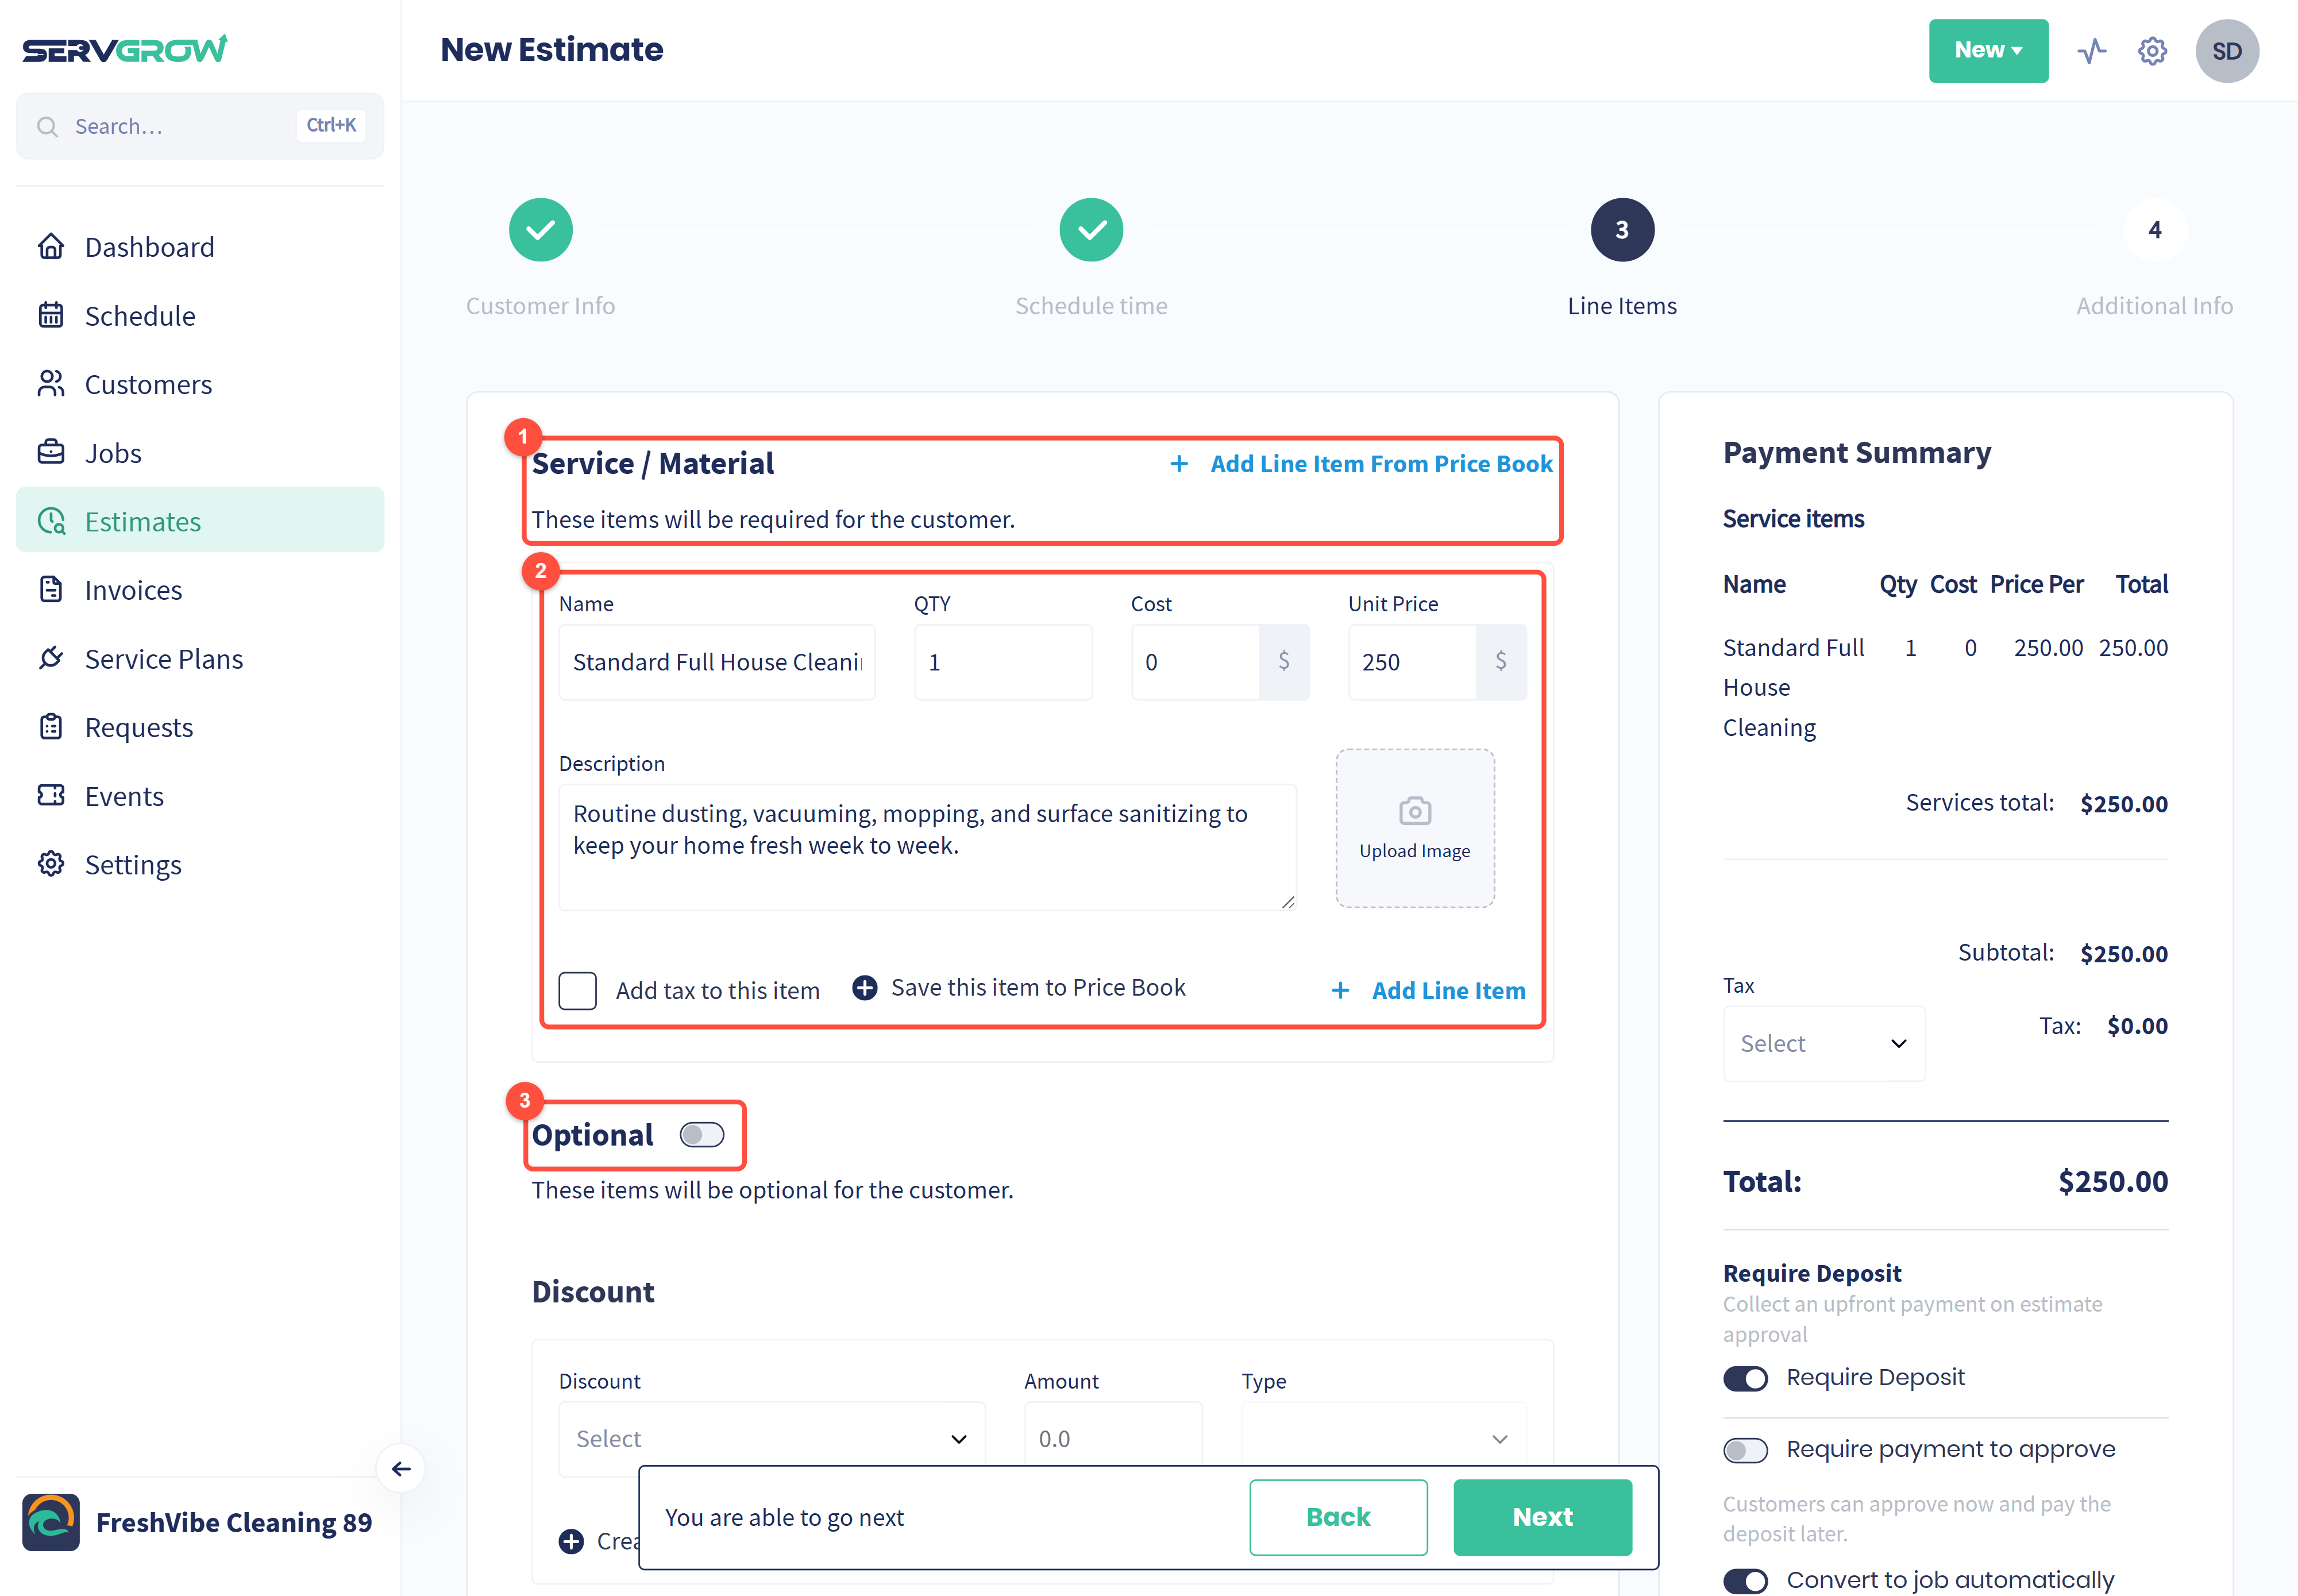
Click Add Line Item From Price Book to pick services and set their quantities, then click Add to Line Items. The note underneath confirms these items are required for the customer.
Each line has a Name, QTY, Cost (what the work costs you, never shown to the customer) and Unit Price (what you charge), plus a Description and an optional image. Tick Add tax to this item if it is taxable. Adding something new? Type it in and click Save this item to Price Book to reuse it. Add Line Item adds another line.
Turn on Optional to offer extras.
Offer optional extras
Optional items let the customer upgrade the job themselves, without a second conversation. They see a checkbox next to each optional item and can tick or untick it, and their total changes as they do.
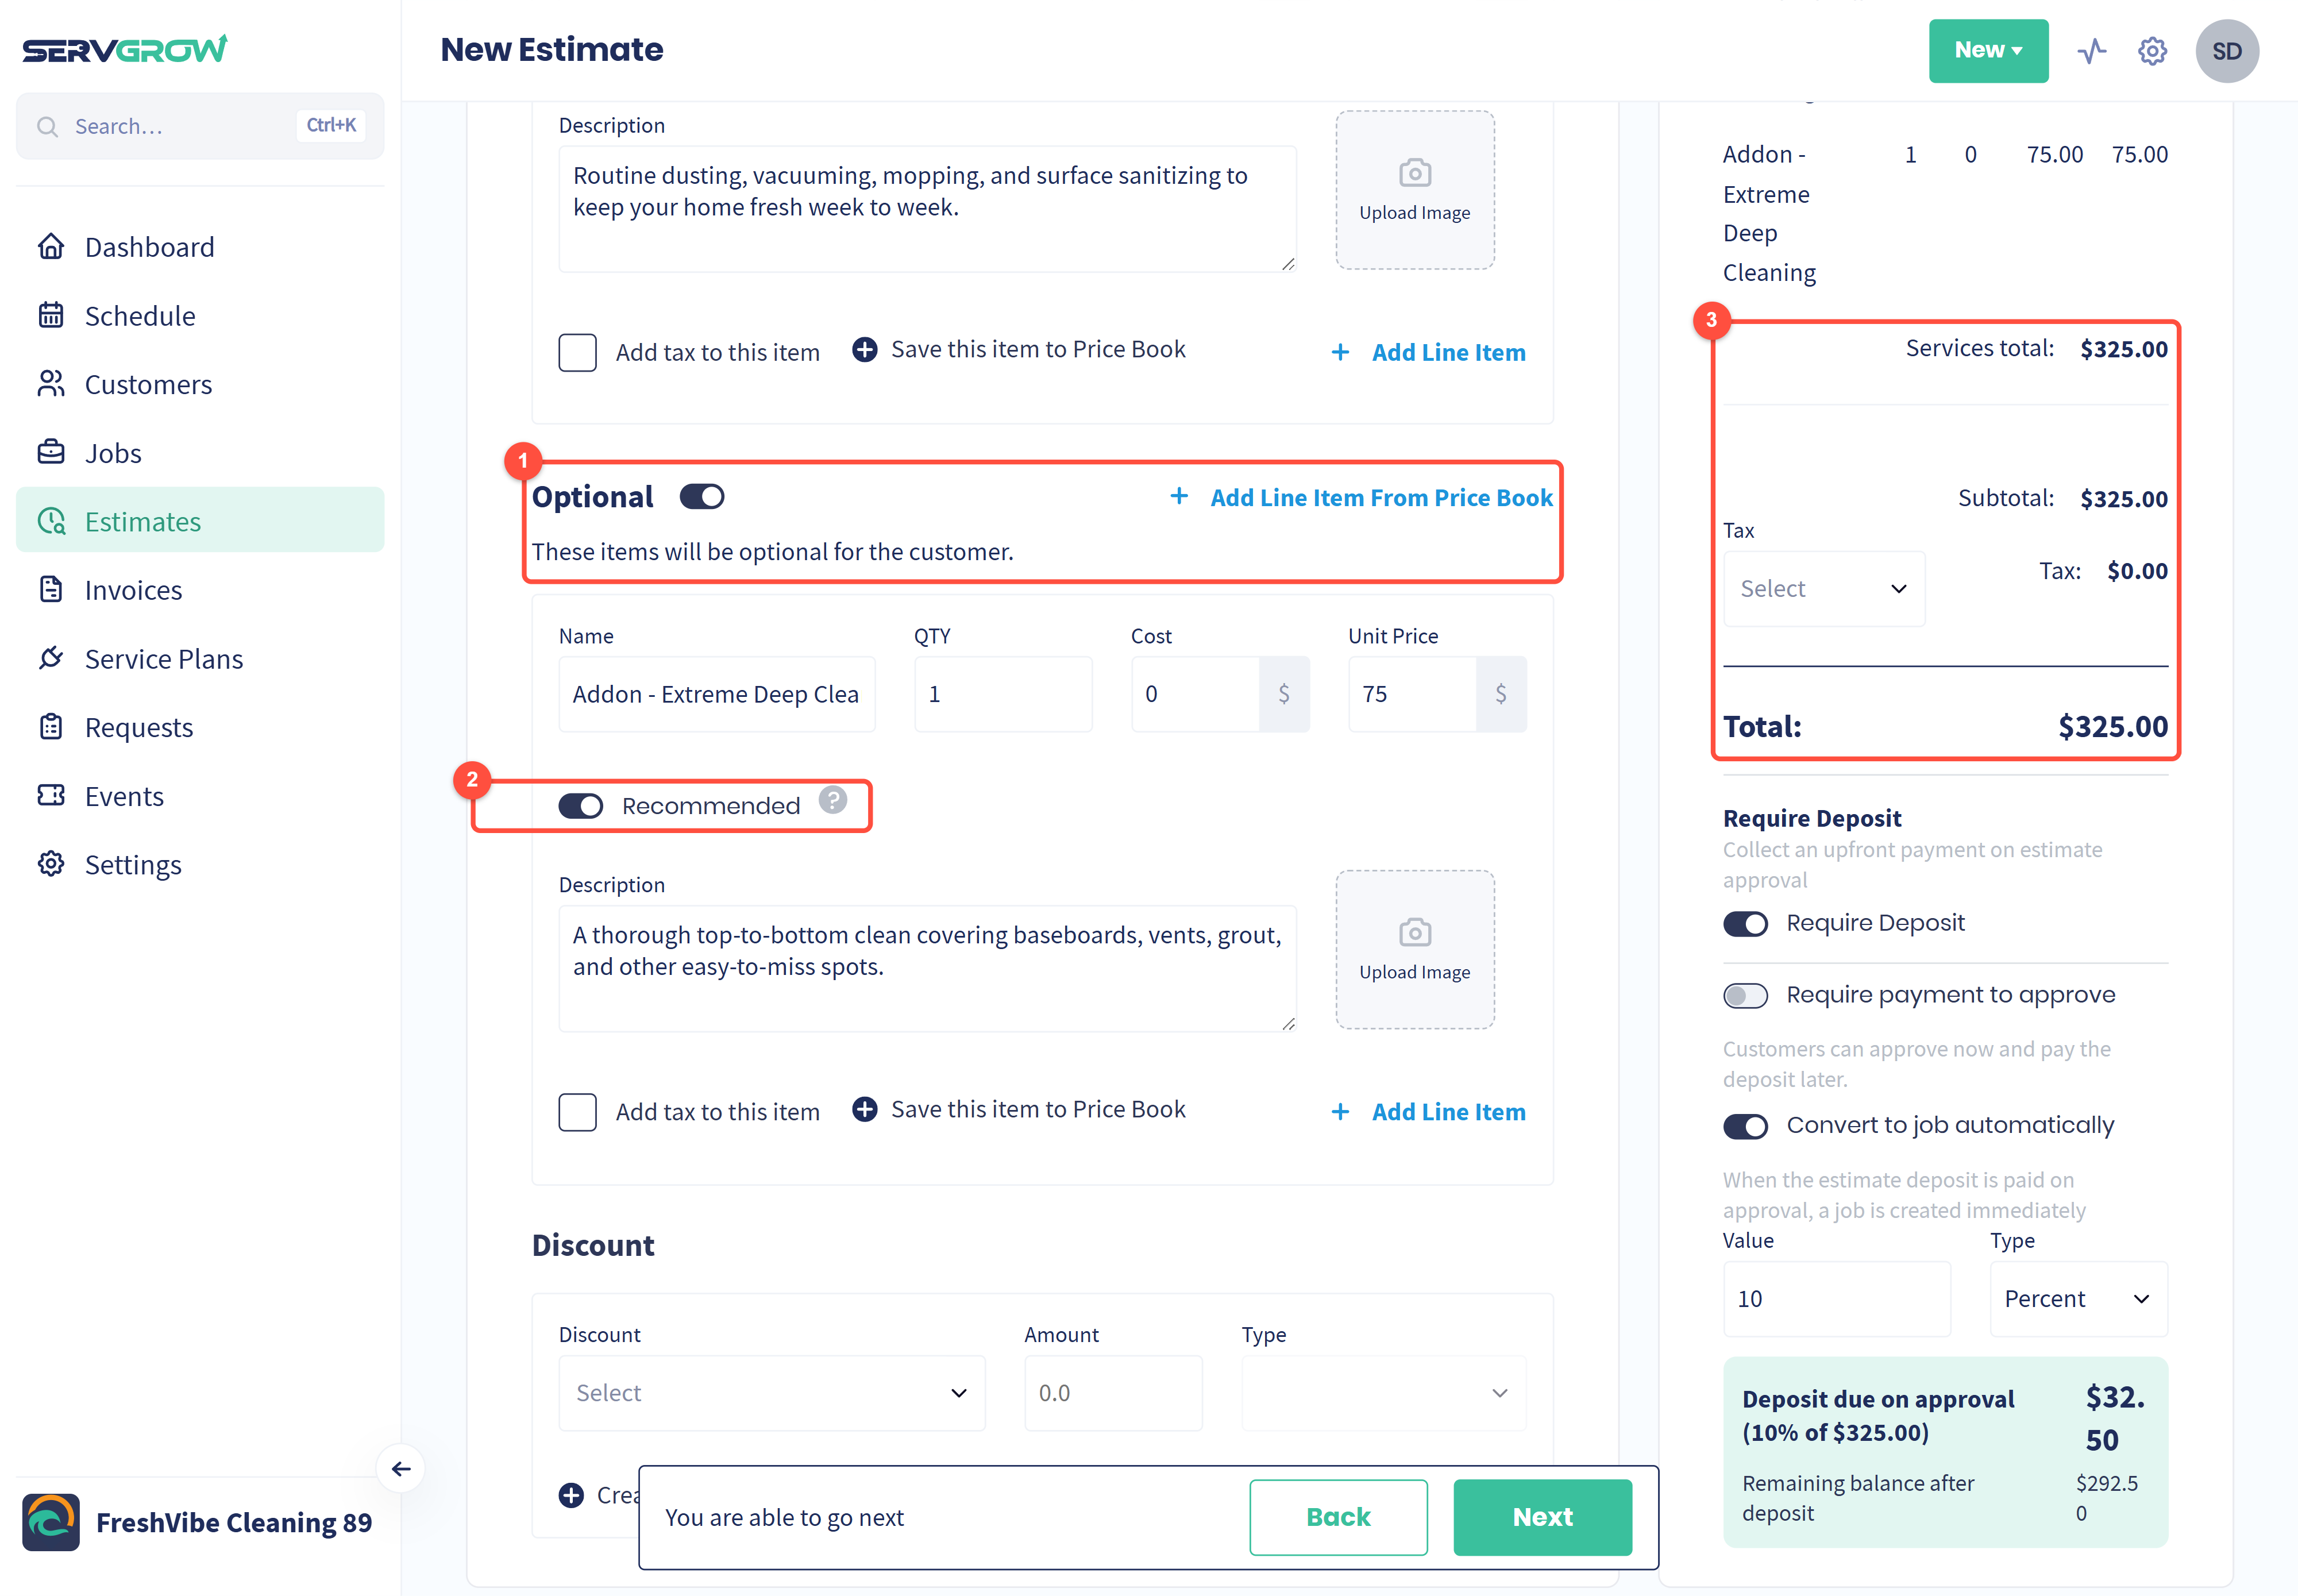
With Optional on, add items the same way. The note confirms these items are optional for the customer.
Turn on Recommended for any extra you want to suggest. Recommended items start out ticked for the customer, so they are included unless the customer takes them off. Other optional items start unticked.
While you build the estimate, the Total in the Payment Summary includes every optional item, so you can see the highest possible total.
Below the line items, add a company Discount if you are offering one, or click Create New Company Discount. Choose the Tax rate in the Payment Summary.
Ask for a deposit
A deposit turns a yes into a commitment. If you set up estimate deposits under Settings, Invoice settings, those settings are already filled in here. You can change them for this estimate.
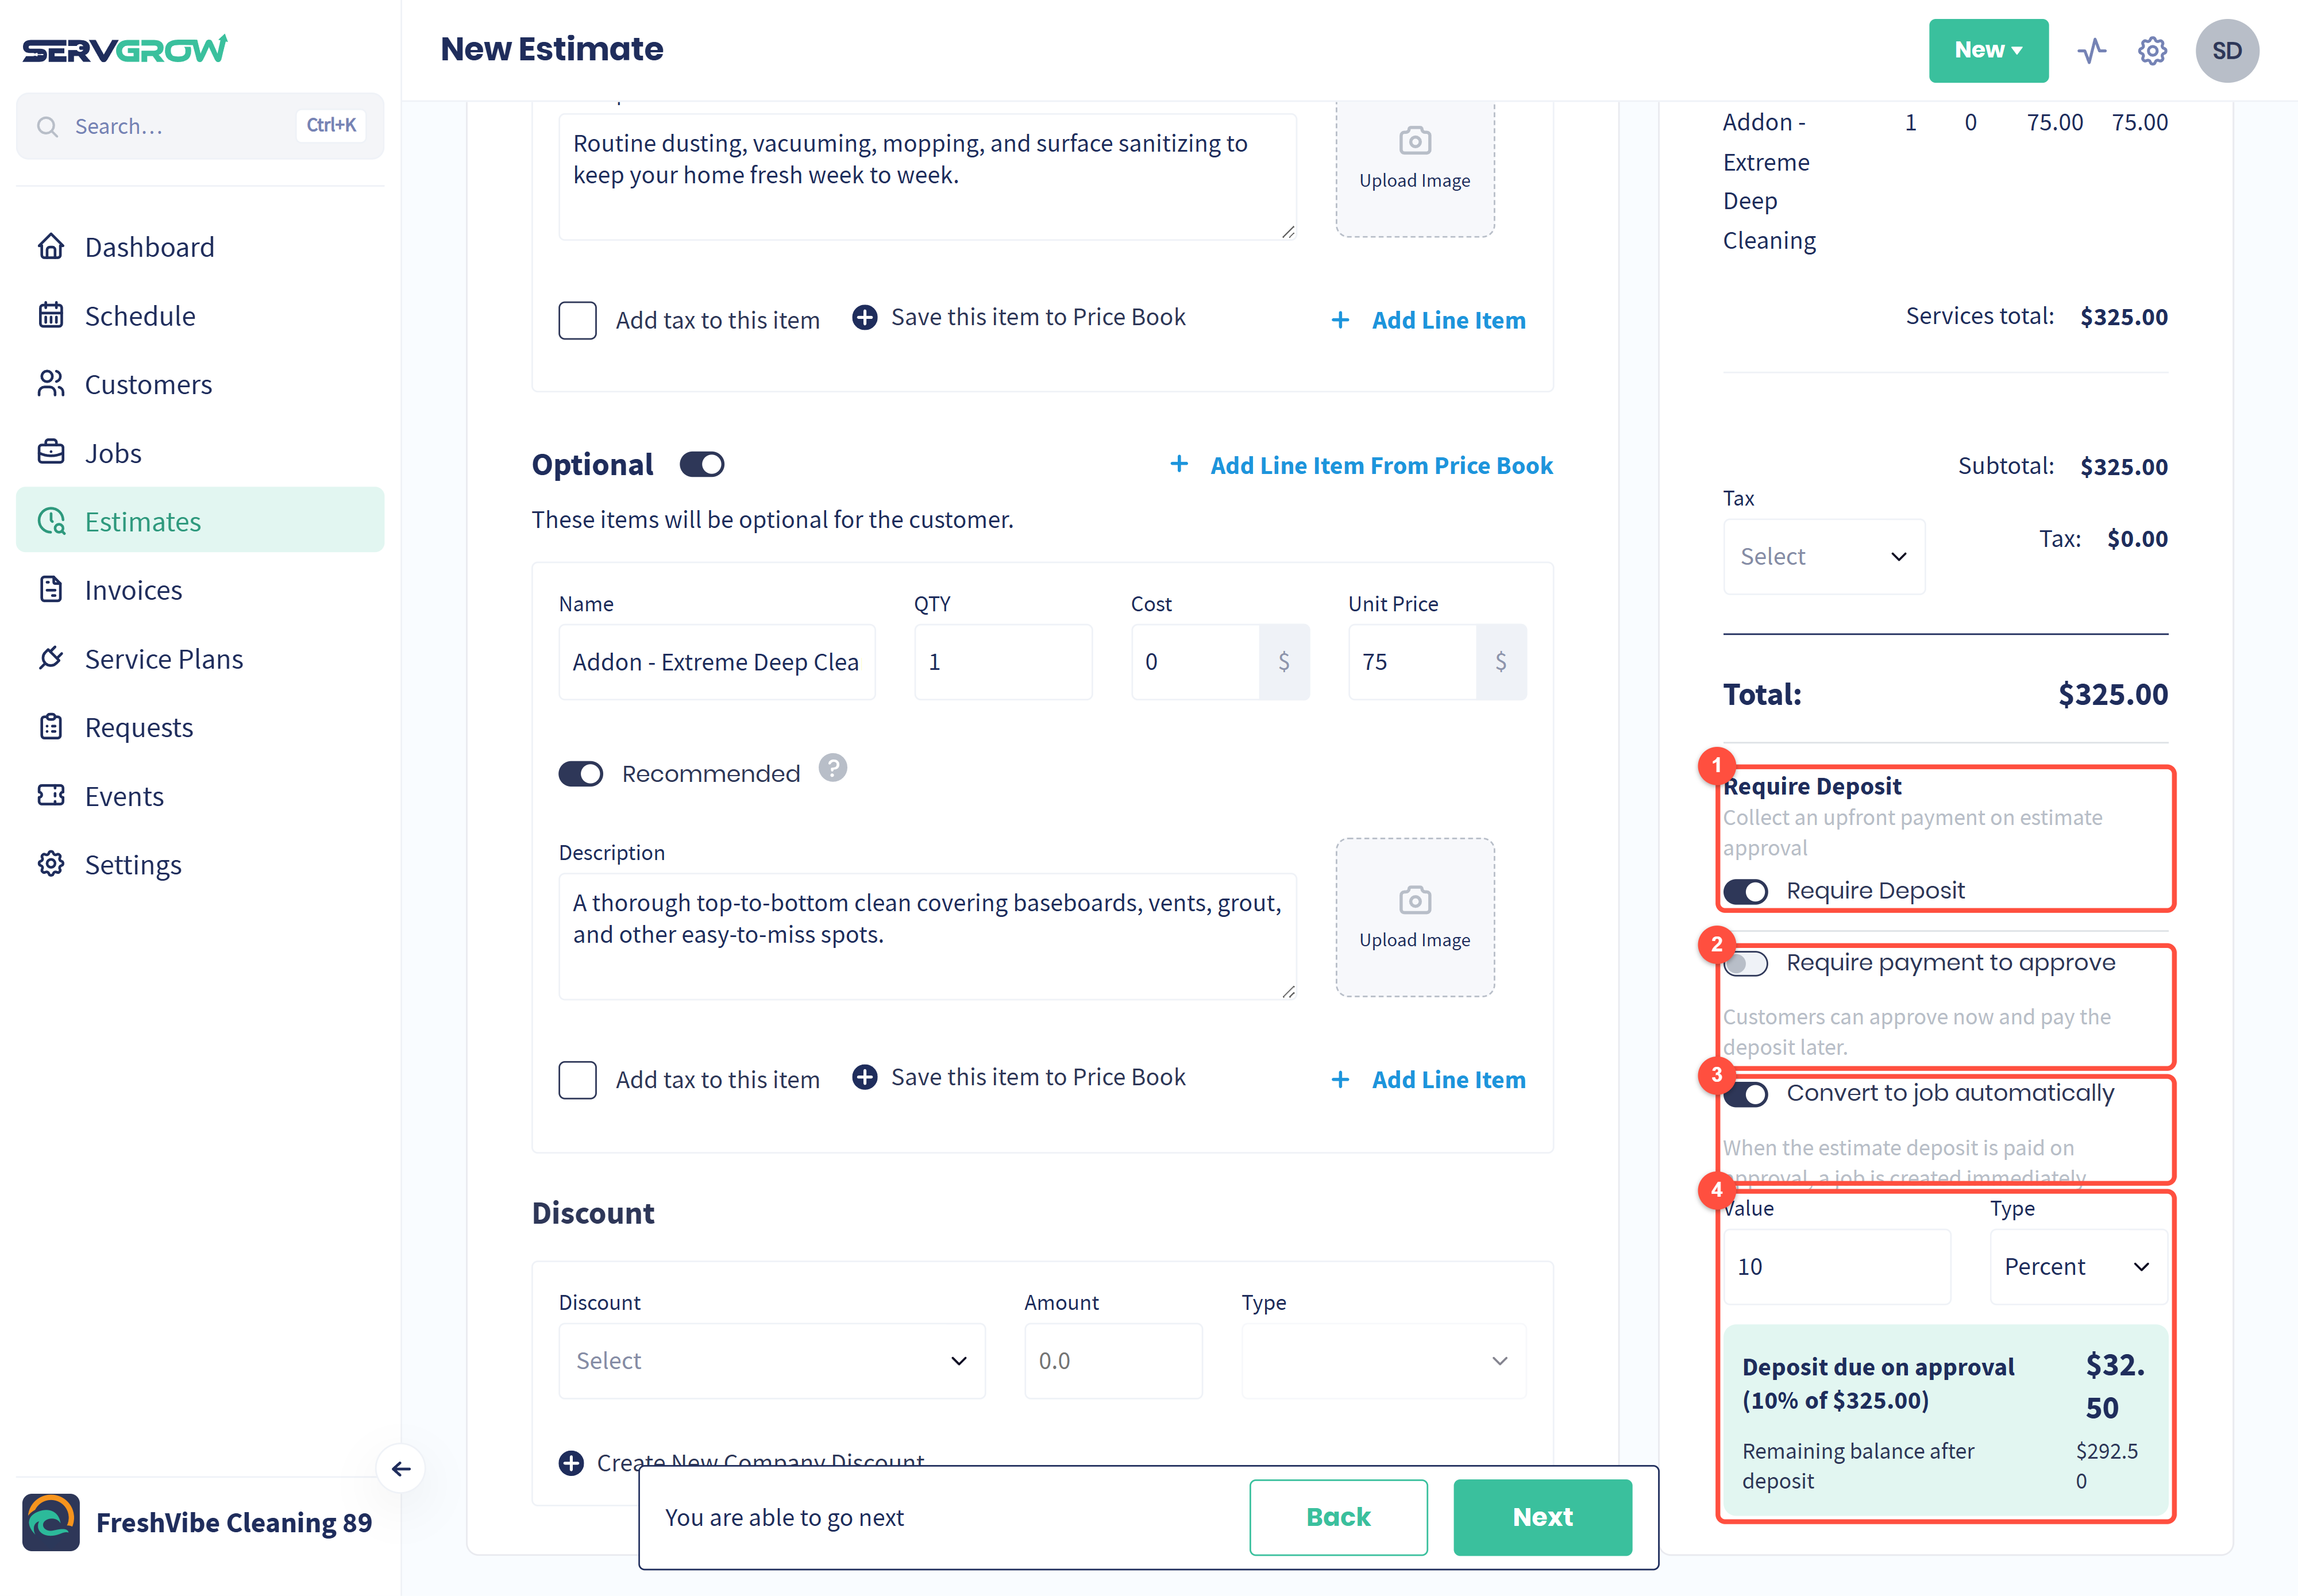
Require Deposit: collect an upfront payment when the customer approves the estimate.
Require payment to approve: when this is on, the customer must pay the deposit to approve. When it is off, they can approve now and pay the deposit later.
Convert to job automatically: when the customer pays the deposit on approval, Servgrow creates the job right away.
Set the deposit Value as a Percent of the total or a fixed amount. The summary shows the Deposit due on approval and the balance left after the deposit.
Click Next.
Step 4: Additional Info
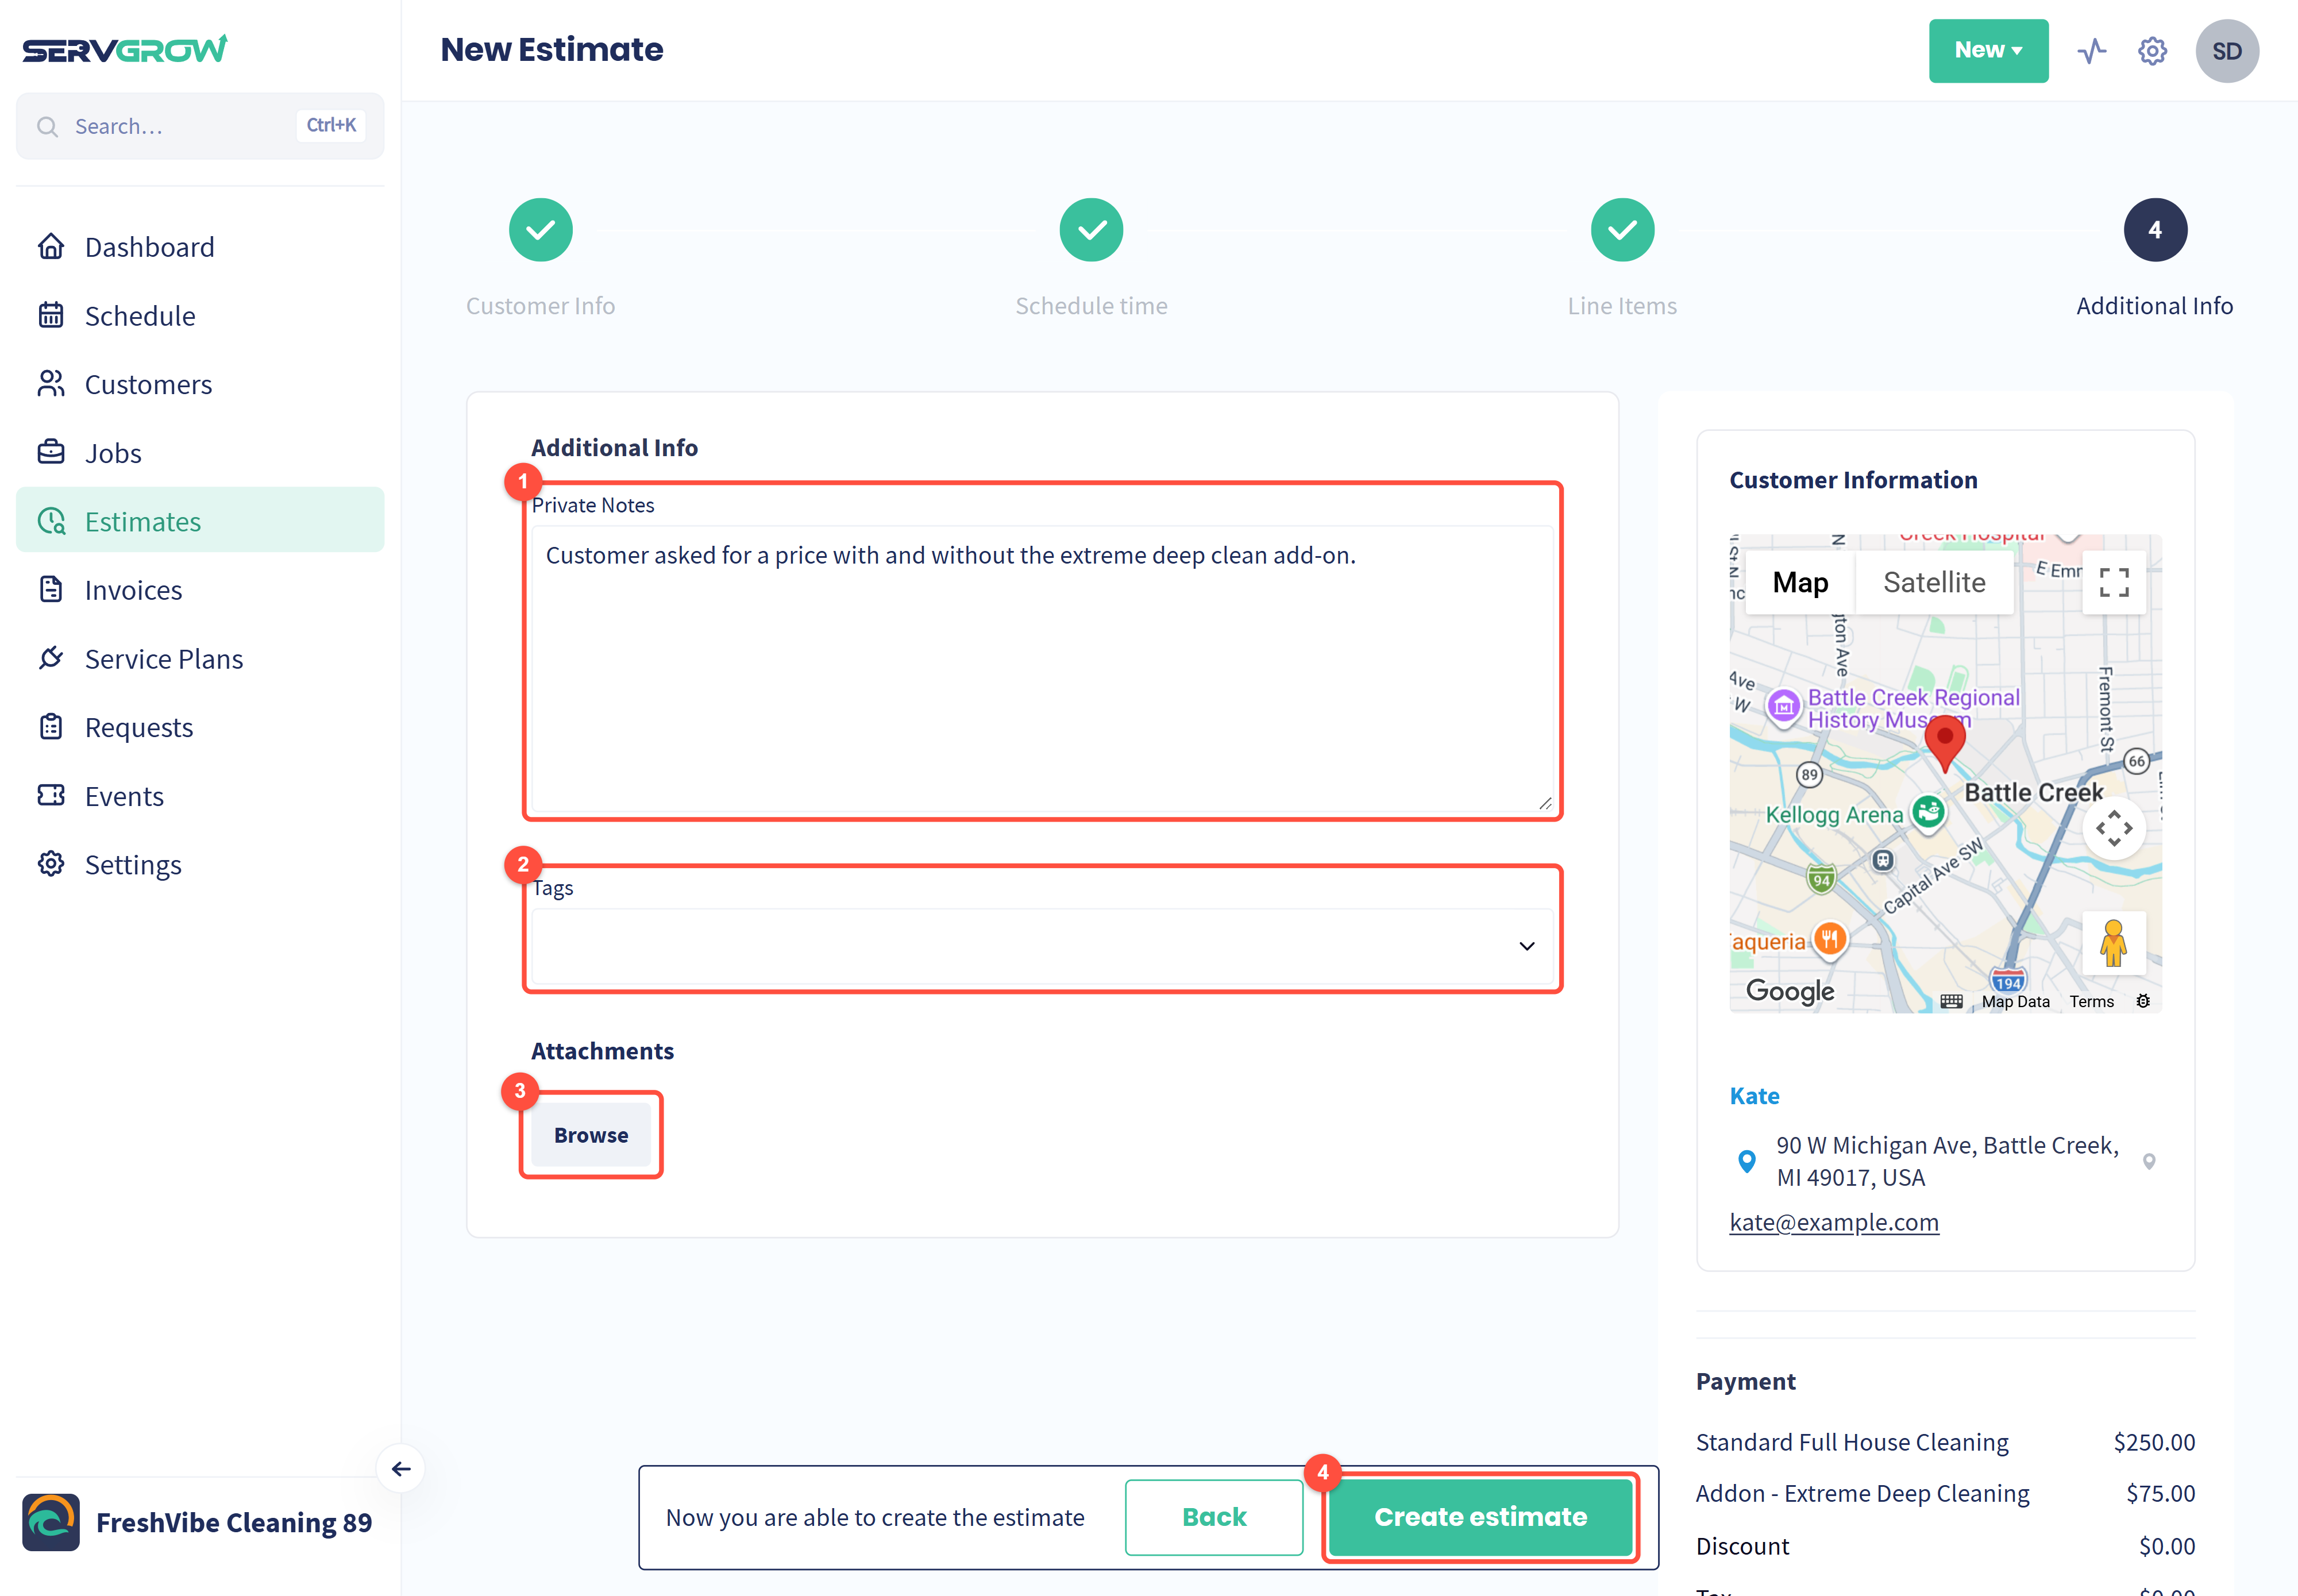
Private Notes: notes for your team, such as what the customer asked for or what to double-check.
Tags: label the estimate so you can find and filter it later.
Attachments: click Browse to add photos or files, such as pictures of the area you are quoting.
Check the customer and payment summary on the right, then click Create estimate.
The estimate is saved to your Estimates list, ready to send to the customer. Need to change something first? Click Back to return to an earlier step.
Tips for estimates that win
Write descriptions for the customer, not your crew. Explain what they get, not just the name of the service.
Offer one or two recommended extras. A pre-ticked upgrade is the easiest upsell there is.
Fill in Cost on every line. The customer never sees it, and it tells you what you actually make on the work.
Ask for a deposit on bigger jobs. It filters out customers who are only shopping around.
Related articles